
User guide

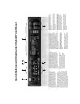


Quick Reference: UltraLite-mk3 Hybrid Front Panel
1. This XLR/TRS combo jack accepts either a mic cable or a
cable with a quarter-inch plug. It is equipped with
approximately +60 dB of boost for the mic (XLR) input
and +32 dB of boost for the instrument (TRS) input.
Separate settings are maintained for the XLR and TRS
inputs for saving with presets. The XLR (mic) input can
also be supplied with 20 dB pad and 48V phantom
power.
2. These two Precision Digital Trim™ rotary encoders
provide +60 dB and +32 dB of boost, respectively, for
the mic (XLR) and instrument (TRS) inputs on the front
and rear panel. Adjustment can be made in approxi-
mately 1 dB increments. Both have preamps, so you can
plug in just about anything: a microphone, a guitar or
even a synth. For +4 dB signals, use the rear panel TRS
inputs. Use the trim knob and input level meter in the
LCD to calibrate the input signal level. For the Mic (XLR)
input, Push the TRIM encoder to toggle a 20 dB pad; push
and hold to toggle 48V phantom power.
3. Turn the VOL knob to control the headphone volume. The
LCD provides visual feedback for the headphone volume
setting as you turn the knob. Push the knob once to view
the current volume setting in the LCD display; push it
again to control the UltraLite-mk3’s MASTER VOLUME
setting. From the factory, MASTER VOLUME controls the
(TRS) MAIN OUTS 1-2 on the rear panel, but MASTER
VOLUME can be programmed to control any combination
of outputs. See “The Monitor Group” on page 84 for
details.
4. When power is off, push the VOL knob to power on the
UltraLite-mk3; press and hold to turn it off. When
connected to the computer via FireWire, the
UltraLite-mk3 is powered by its FireWire connection to
the computer. When connected via USB, it must be
powered with the included DC power adapter.
5. The multi-purpose backlit LCD provides metering for all
of the UltraLite-mk3’s inputs and outputs. It also gives
you access to the UltraLite-mk3’s built-in mixer and
other settings. There are eight independent stereo mix
busses. Each mixes all inputs (or any subset you wish) to
a stereo output of your choice. The four knobs to the right
of the LCD correspond directly to the four labeled
sections of the LCD. Push the PARAMETER knob repeat-
edly to cycle through the three main LCD display modes:
METER, CUEMIX and SETUP.
METER mode provides level meters for each input and
output. The labels above and below the LCD refer to all of
the UltraLite-mk3’s inputs and outputs (both analog and
digital).
CUEMIX mode lets you program the UltraLite-mk3’s on-
board CueMix FX mixer. Use the CHANNEL knob to
choose the input, output or mix you wish to edit. Push it
to switch among inputs, outputs and busses, then turn it
to choose the desired channel or bus. Use the PAGE,
PARAM and VALUE knobs to access the settings for the
chosen channel.
SETUP mode lets you access general settings. Use the
PARAMETER knob to browse settings, and use the VALUE
knob to adjust them.
6. This is a standard quarter-inch stereo headphone jack.
From the factory, its output matches the main outs on
the rear panel. But it can be programmed to mirror any
other output pair (digital or analog). It can even be
programmed to serve as its own independent output.
Use the volume knob above to control its level.
7. Push the TRIM rotary encoder to toggle the 20 dB pad
independently for each mic input. Hold it in momen-
tarily to toggle 48V phantom power independently for
each mic input.
1 2 5
56
3
7
4