
User guide


CUEMIX FX
84
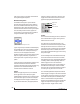
Output
When the Split Point is set to Output, the sends in
Output tab become active and the returns in the
Mix bus tab gray out. This allows you to send from
inputs, mixes and outputs and return to outputs.
Primary controls
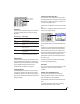
The Primary Controls section (Figure 10-28) in the
Reverb tab provides the following basic parameters
for programming the reverb.
Reverb Time
Reverb time determines the length of decay, or tail,
of the reverb. This is a global setting for the reverb
processor. You can further refine the tails by
independently setting the reverb time of three
separate frequency bands, as discussed below in
the Reverb Design section.
PreDelay
PreDelay is the amount of time before you hear the
very first reflections. If you are in a large room, it
takes a while before the first reflections return.
PreDelay is useful for clarifying the original sound.
For example, with vocals, the reflections won’t start
until after the initial sound of a word has been
sung.
Shelf Filter
The Shelf Filter is a low-pass filter that controls the
high frequency characteristics of the overall effect.
Frequency sets the cutoff frequency for the filter
and Cut sets the amount of signal attenuation
applied by the filter.
Early reflections
Initial reflections give a space its unique sound.
The shape of the room, the angles of the walls, even
furniture in the room will produce a series of Initial
Reflections. Think of the early reflections and
room type as the “flavor” of the reverb. You can
choose between several types of rooms. These are
acoustic models for simulating these different
types of spaces. The Size and Level parameters let
you control the size of the room and the strength of
the initial reflections.
☛ Here’s a tip: try using initial reflections
without any subsequent reverb (turn the reverb
time down as far as it will go). You’ll hear
interesting and unusual effects.
Reverb design
The Reverb Design section allows you to
independently control the reverb time for three
separate frequency bands (Low, Mid and High)
with adjustable cross-over points between them
(Low and High). The reverb time for each band is
specified in percent of the overall reverb time in the
Primary Controls section at the top of the tab.
You can edit these parameters graphically by
dragging the handles in the graphic display
(Figure 10-28).
Width does what its name implies: if you turn this
control all the way up, the result is maximum stereo
imaging. A position of 12 o’clock produces
essentially a mono image. Turning the control all
the way down completely swaps the stereo image.
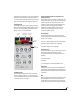
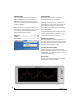
THE MONITOR GROUP
The monitor group is a set of UltraLite-mk3 outputs
that can be controlled with the master Monitor
Level knob in upper right corner of the CueMix FX
mixer window (Figure 10-29), as well as the
MASTER VOL knob on the UltraLite-mk3 front
panel.
Figure 10-29: Monitor group volume control from CueMix FX and the
front panel MASTER VOL knob.
Monitor
group
presets
menu