
User`s guide


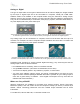

Handheld Microscope Users Guide
6
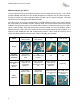
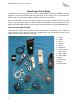
Comparing and Installing Lenses
Both the New and Old Scope-On-A-Rope education kits come with three lenses: 1X, 30X, and
200X. Refer to the table below for general information on these lenses. Detailed instructions for
using each lens are included in the following pages of this section.
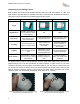
Lens
1X
30X
200X
Image
Magnification
Variable – depending on
how far away the object
is from the lens
30X
200X
How to use
This lens works like a
video camera and/or
document camera.
Touch an object to see
it magnified 30 times.
Touch an object to see it
magnified 200 times.
Focusing
The black ring can be
used to focus the image.
This lens does not
have a focusing
mechanism.
The white, scalloped
(having a pattern of
semicircles) ring is for
fine focusing.
Lighting
Does not have internal
lights
Internal lights can be
polarized by pressing
the LIGHT/ON button
Has internal lights (but
cannot be polarized)
Best used for…
Demonstrations, showing
pictures in books, viewing
whole objects
Examining any of a
multitude of objects up
close
Looking at prepared
slides, cells, small and/or
flat objects
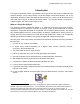
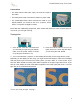
To remove a lens, rotate it counterclockwise until the small index marks on the lens and the
camera body line up. The lens should then be easily removed. To place a lens on, you must
reverse the process. First, line up the small index marks on the lens and the camera body. Do
not force the lens onto the scope! There are several contact points that need to meet up just
right for the lens to function properly. Once the lens is in place, twist it clockwise until it firmly
clicks into place. You should hear a satisfying “snap” when it’s on correctly.
Positions of index marks on lens and camera body
before the lens is twisted into place
Positions of index marks after lens has been twisted
into place and is securely attached