
User`s guide


Handheld Microscope Users Guide
23
ProScope HR
This instrument is a digital scope, meaning that it connects to a computer via a USB cable. It
was designed to work with the same accessories as the L2 Scope (outlined in the previous
section). This section outlines the setup and general use of the ProScope, but for detailed
instruction on using the lenses and accessories, see the section on the L2 Scope.
Parts and Assembly of the ProScope HR
The ProScope comes with a USB cord attached to its bottom, a software installation disc, and
one or more lenses.
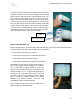
Setting Up and Turning on the ProScope HR
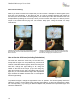
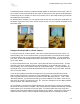
1. Insert the installation disc into your computer. Follow the instructions provided for
downloading the ProScope HR software: (a) Click on “Windows” or “Macintosh.” (b) Click
“install.” (c) A Proscope HR icon will appear on your desktop (along with a Quicktime Player
icon, if not already installed on your computer). Note: If you have the old ProScope HR
software, it only works with Windows XP up to Service Pack 2. If you have Service Pack 3,
then you will need to download and install the free upgraded software version from this
website: http://www.bodelin.com/ prosco pehr/support_proscopehr.
2. Connect the scope’s USB cable to a USB port on your computer.
3. Then, click on the Proscope HR icon on your desktop.
4. Find the light switch on the side of the scope and put it on the “A” setting.
You are now ready to begin “scoping”!
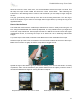
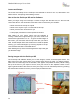
1. ProScope
2. USB cable
3. 50X lens
4. 30X lens
5. 200X lens
6. 100X lens
7. 400X lens
8. 1X lens
9. Stand
10. Lamp
11. Lamp shade
12. XYZ stage
1
2
3
5
4
6
8
7
11
12
10
9