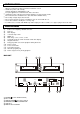
USER'S MANUAL CD CD PLAYER PLAYER 8%,12%,16% 8%,12%,16% CD1 CD2 RELAY RELAY LOOP 0 LOOP 0 digital output PROFESSIONAL DUAL CD PLAYER
IMPORTANT TO SAFETY IMPORTANT TO SAFETY WARNING: TO PREVENT FIRE OR SHOCK HAZARD, DO NOT EXPOSE THIS APPLIANCE TO RAIN OR MOISTURE. CAUTION: 1. Handle the power supply cord carefully Do not damage or deform the power supply cord. If it is damaged or deformed, it may cause electric shock or malfunction when used. When removing from wall outlet, be sure to remove by holding the plug attachment and not by pulling the cord. NOTE: This CD player uses a semiconductor-based laser.
IMPORTANT SAFETY INSTRUCTIONS 1. Read Instructions – All the safety and operating instructions should be read before this product is operated. 2. Retain Instructions - The safety and operating instructions should be retained for future reference. 3. Heed Warnings - All warnings on the appliance and in the operating instructions should be adhered to. 4. Follow Instructions - All operating and use instructions should be followed. 5.
NOTE ON USAGE • • • • • • • • Allow for sufficient heat dispersion when installed on a rack. Handle the power cord carefully. Hold the plug when unplugging the cord. Keep the appliance free from moisture, water, and dust. Unplug the power cord when not using the appliance for long periods of time. Do not obstruct the ventilation holes. (For units with ventilation holes) Do not drop foreign objects into the unit. Do not let insecticides, benzene, and thinner come in contact with the set.
MAIN FEATURES CONTROL UNIT 8%,12%,16% 8%,12%,16% CD1 CD2 RELAY RELAY LOOP CONTROL START UNIT 2 (1) SHUTTLE (Shuttle Dial) (2) OPEN/CLOSE (Open/Close Button) (3) TIME (Time Button) (4) LCD (Liquid Crystal Display) (5) SGL (Single Button) (6) PROGRAM (Program Button) (7) PROGRAM Indicator (8) LOOP Indicator (9) LOOP (Loop Button) (10)PITCH Indicator (11)JOG (Jog Dial) (12)B.
PREPARATIONS 1. Checking the Contents Check that the carton contains the following items: 1) Main unit 2) Control unit 3) Operating instruction (this booklet) 4) Pair of RCA pin cord. 5) Control cords 2. Installing the Unit Mount the unit into your console or rack with 19" EIA rack rails. CAUTION: l The player will work normally when the main unit is mounted with the front panel at within 15 degrees of the vertical plane. If the unit is tilted excessively, discs may not be loaded or unloaded properly.
NAMES AND FUNCTIONS Below is a description of the functions of the controls listed on Pages3 and 4. CONTROL UNIT (1) SHUTTLE (Shuttle Dial) Use the dial to select the scanning direction and speed. The disc is scanned in the forward direction when the shuttle dial is turned clockwise from the neutral position, in the reverse direction when the shuttle dial in turned counterclockwise. The scanning speed increases when the shuttle dial is turned faster.
OPERATIONS 1. Opening and Closing the Disc Holder l Turn the unit power on. Press the OPEN/CLOSE button to open the disc holder. OPEN/CLOSE buttons are provided on both the main unit and control unit. The disc holder cannot be opened during playback to prevent playback from being interrupted if the OPEN/CLOSE button is pressed accidentally. Stop the playback first, then press the OPEN/CLOSE button. l 2.
OPERATIONS 7. Cueing l l l l l "Cueing" is the action of preparing for playback. Press CUE button, the player will enter cue mode, the playback returns to cue point and enter pause condition, the cue indicator light up and play indicator flashes. When PLAY/PAUSE button is pressed, play starts from the cue point. When the track search operation is completed after pressing the SKIP buttons, the player automatically finds the position at which the sound starts and cues there(Auto Cue).
OPERATIONS 11. Matching the Beats Per Minute (BPM) There are three tools available for matching the BPM of the two CDs: • Use the pitch slider to adjust the BPM satirically. ‚ Use the PITCH BEND buttons to change the BPM temporarily. ƒ Turn the JOG dial to change the BPM temporarily. 1) Pitch Slider Œ To adjust the BPM by sliding the pitch slider up or down, press the PITCH button to turn on the PITCH adjustment function before useing. • Slide the pitch slider up to decrease BPM, or down to increase BPM.
BEFORE SWITCHING OFF THE POWER When you have finished using the CD player, before switching off the power, be sure that the disc holder had been closed with the OPEN/CLOSE button. CAUTION: Do not forcibly close the disc holder when the power is off. POWER OFF POWER OFF û Do not switch off the power when the disc holder is open. Switch off the power after the disc holder has been closed with the OPEN/CLOSE button. COMPACT DISCS 1.