
user manual


OPERATIONS
11. Matching the Beats Per Minute (BPM)
There are three tools available for matching the BPM of the two CDs:
• Use the pitch slider to adjust the BPM satirically.
‚ Use the PITCH BEND buttons to change the BPM temporarily.
ƒ Turn the JOG dial to change the BPM temporarily.
1) Pitch Slider
ΠTo adjust the BPM by sliding the pitch slider up or down, press the PITCH button to turn on the PITCH adjustment
function before useing.
• Slide the pitch slider up to decrease BPM, or down to increase BPM. The adjustment range is +/-8,+/-12,+/-16%.
2) Pitch Bending
l The BPM increases or decreases
respectively while the PITCH BEND+ or
PITCH BEND- button is pressed.
l The BPM increase depends on how long
you hold the button. If you hold the button
for about 1/2 second, theBPM will go either
to +16% for PITCH BEND+ or -16% for
PITCH BEND-. If you tap the button, the
BPM will only change a little so you can
change the beat slightly without audible
changes in the music.
l The CD will return to the tempo indicated
by the Pitch slider when you let go to the PITCH BEND+ or -.
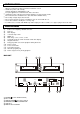
l Figure 11 shows an example of how to use the pitch bend function.
In this example, both players are playing and the BPM has already
been matched with the pitch sliders.
The bass beats also match
CD1 Bass beat
bass beat
PITCH BEND
CD2
bass beat
Bass beat Figure 11-1
3) Turn the JOG dial
Turn the jog dial clockwise during play to increase the BMP in the forward direction, counterclockwise to decrease
the BMP in the reverse direction. The faster you turn the wheel, the more the BMP changes. The BMP changes with
a range of +/-8,+/-12,+/-16%.
When you release jog wheel, the CD will return to the tempo indicated by the pitch slider.
12. Program play
ΠPress the PROGRAM button, the player will enter the program mode and the CD will stop rotating.
• Select the desired track by pressing the SKIP button, then press the PROGRAM button again. The selected
track will be added to the program sequence.
Ž Repeat step 2 operation. A maximum of 20 tracks can be programmed at one time.
• Press the PLAY/PAUSE button to start the program play from the first selection.
• Press the program button again during program play to stop play.
‘ Press and hold the program button more than 2 secords to cancel the program mode and erase all the current
program contents.
13. Loop Play
ΠPress the LOOP button to set the loop start point A, the LOOP indicator will flashes on the LCD.
• Press the LOOP button again to set the loop end point B, after the B point is set, the playback will enter the loop
play from A to B repeatedly.
Ž Press the LOOP button again, the loop play function is canceled, the LOOP indicator goes out.
14.Relay Play
Press PROG and SGL button to switch relay function; the indicator on the LCD track display when flash when relay
is on.
15. Fader start
You have the possibility to start the respective CD-player directly from the mixer. Make sure that the Control socket is
connected with the respective socket on the mixer. Additionally, the Audio out socket have to be connected with the
Line-input sockets of your mixer. Please note that the Fader start function only works with the appropriate mixers.
Insert the CD and select the desired track. Start playback from your mixer.