
manual

Read pages 3-6
for kit assembly.
Read pages 3-6
for kit assembly.
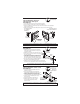
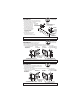
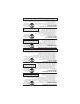
FRONT OF KIT
FRENTE DE
ESTUCHE
"B1" BRACKET
USE HOLE #2
"B1" SOPORTE
USA ABERTURA
NO. 2
"A1" BRACKET USE HOLE #1
"A1" SOPORTE USA
ABERTURA NO. 2
"A2" BRACKET
USE HOLE #1
"A2" SOPORTE USA ABERTURA NO. 1
"B2"
BRACKET
USE HOLE #2
"B2" SOPORTE USA ABERTURA NO. 2
RIGHT SIDE
LADO DERECHO
LEFT SIDE
LADO IZQUIERDA
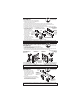
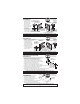
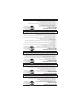
BOTTOM
FONDO
"B2" BRACKET USE HOLE #2
"B2" SOPORTE USA ABERTURA NO. 2
"C2" BRACKET USE HOLE #2
"C2" SOPORTE
USA ABERTURA NO. 2
"D2" BRACKET
USE HOLE #2
"D2" SOPORTE
USA ABERTURA
NO. 2
"A1" BRACKET
USE HOLE #2
"A1" SOPORTE
USA ABERTURA
NO. 2
Read pages 3-6
for kit assembly.
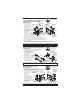
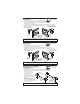
FRONT OF KIT
FRENTE DE
ESTUCHE
"B1" BRACKET
USE HOLE #2
"B1" SOPORTE
USA ABERTURA
NO. 2
"A1" BRACKET USE HOLE #4
"A1" SOPORTE USA
ABERTURA NO. 4
"A2" BRACKET
USE HOLE #2
"A2" SOPORTE USA ABERTURA NO. 2
RIGHT SIDE
LADO DERECHO
LEFT SIDE
LADO IZQUIERDA
24
1982-89 Oldsmobile Toronado
RADIO REMOVAL:
1. Remove the fi ve screws from the top underside of the dash trim.
2. Lower the tilt wheel and gently pull out on the trim piece from the
top side. This allows clearance to disconnect the electrical connections.
Remove the
connections
and the panel.
3. Remove the ten screws
securing the climate controls
and the radio, six screws
from the climate controls
and four screws from
the radio.
4. Disconnect the
antenna, speakers,
and all the electrical
connections and
remove the radio.
USE THE SHADED BRACKETS & THE INDICATED HOLE LOCATIONS. CUT OFF THE REMAINING BRACKETS & DISCARD.
Usa los soportes asombrados y las localizaciónes de aberturas indicadas. Corta los soportes que sobran y desechalas.
USE THE SHADED BRACKETS & THE INDICATED HOLE LOCATIONS. CUT OFF THE REMAINING BRACKETS & DISCARD.
Usa los soportes asombrados y las localizaciónes de aberturas indicadas. Corta los soportes que sobran y desechalas.
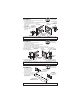
1989-93 Oldsmobile Touring Sedan
RADIO REMOVAL:
1. Open the center console storage compartment, then remove
the two screws securing the storage sleeve/pocket.
Remove the sleeve/pocket insert.
2. Remove the two screws from the front edge of the console pocket
(at the wood trim), then remove the trim section.
3. Pop out and remove the electric seat control panel (located in the center console).
4. Carefully snap off the trim piece from around the gear
selector, then remove the four screws securing the
wood trim to the console substructure.
5. Remove the wood trim piece from the top of the console,
pull the trim piece back and
up to remove. Disconnect
the wire harnesses and
remove the trim piece.
6. Extract the four screws
which secure the radio,
pull the radio out of the
cavity, disconnect the
wire harnesses and the
antenna, then remove the radio.
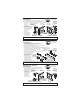
1992-99 Pontiac Bonneville
RADIO REMOVAL:
1. Using a panel removal tool/screwdriver, carefully release
the fastening clips from around the perimeter of the radio
trim bezel and remove the panel.
2. Extract the three
screws securing
the radio to the
dash, pull the radio
from the cavity,
unplug all the
connectors and
remove the radio.
USE THE SHADED BRACKETS & THE INDICATED HOLE LOCATIONS. CUT OFF THE REMAINING BRACKETS & DISCARD.
Usa los soportes asombrados y las localizaciónes de aberturas indicadas. Corta los soportes que sobran y desechalas.