
manual


Read pages 3-6
for kit assembly.
Read pages 3-6
for kit assembly.
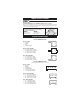
"C1" BRACKET USE HOLE #5
"C1" SOPORTE USA ABERTURA
NO. 5
"B1" BRACKET
USE HOLE #2
"B1" SOPORTE
USA ABERTURA
NO. 5
FLANGE NUT
TUERCO REBORDE
BOTTOM
FONDO
CARRIAGE BOLT
PERNO DE PORTE
"C2" BRACKET
USE HOLE #5
"C2" SOPORTE
USA ABERTURA
NO. 5
TOP
TOPE
BOTTOM
FONDO
Read pages 3-6
for kit assembly.
"B2" BRACKET USE HOLE #5
"B2" SOPORTE USA ABERTURA NO. 5
"C1" BRACKET USE HOLE #5
"C1" SOPORTE USA ABERTURA
NO. 5
"B1" BRACKET
USE HOLE #2
"B1" SOPORTE
USA ABERTURA
NO. 5
"C2" BRACKET
USE HOLE #5
"C2" SOPORTE
USA ABERTURA
NO. 5
TOP
TOPE
BOTTOM
FONDO
"B2" BRACKET USE HOLE #5
"B2" SOPORTE USA ABERTURA NO. 5
9
1982-89 Buick Skyhawk
1982-88 Oldsmobile Firenza
RADIO REMOVAL:
1. Disconnect the support strap from the glove box door.
2. Remove the four screws securing the glove box liner.
3. Pull the glove box liner outward and remove it.
4. Remove the two screws from below
the lighter/heater controls.
5. Remove the three screws
securing the lower dash panel
(each side of the
steering column).
6. Pull the panel down
to expose the screw
under the panel, and
to the left of the heater control.
Unsnap the panel assembly and remove it.
7. Remove the four screws securing the radio
to the dash; pull the radio out of the dash cavity.
8. Disconnect the antenna and all the electrical connections, then remove the radio.
USE THE SHADED BRACKETS & THE INDICATED HOLE LOCATIONS. CUT OFF THE REMAINING BRACKETS & DISCARD.
Usa los soportes asombrados y las localizaciónes de aberturas indicadas. Corta los soportes que sobran y desechalas.
1992-95 Buick Skylark
RADIO REMOVAL:
1. Pull out on the ashtray and extract the two screws
securing the rear of the ashtray assembly.
2. Extract the two screws securing the front of the
ashtray and the lower section of the radio trim
bezel in the ashtray cavity.
3. Carefully pry outward on the radio trim bezel
with a panel removal tool/screwdriver to
release the fastening clips securing it to the
dash and remove.
4. Remove the two nuts from the bottom of the
radio chassis securing the radio to the dash.
Pull the radio from the cavity, unplug all the
connectors, and remove the radio.
USE THE SHADED BRACKETS & THE INDICATED HOLE LOCATIONS. CUT OFF THE REMAINING BRACKETS & DISCARD.
Usa los soportes asombrados y las localizaciónes de aberturas indicadas. Corta los soportes que sobran y desechalas.
1983-85 Buick Skylark
RADIO REMOVAL:
1. Remove the four 9/32 inch hex head screws from the top of the
instrument cluster trim panel. Remove one hex head sheet metal
screw from the bottom left of the instrument cluster trim panel.
2. Remove the two 7mm hex head sheet metal screws from
the trim below the steering column and remove the trim.
3. Place the ignition in the "on" position, apply the
emergency brake and put the transmission in second gear.
Carefully remove the trim panel from the dash and
around the steering column.
4. Remove the four
7mm hex head
sheet metal screws
from the radio
mounting brackets.
Slide the radio out
of the cavity. Disconnect
all the wiring and remove the radio.
USE THE SHADED BRACKETS & THE INDICATED HOLE LOCATIONS. CUT OFF THE REMAINING BRACKETS & DISCARD.
Usa los soportes asombrados y las localizaciónes de aberturas indicadas. Corta los soportes que sobran y desechalas.