
MDT5N25 & MDT5N40 Ice Maker-Dispenser Service Manual
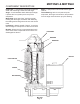
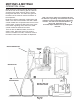
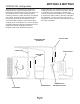
Table Of Contents
- Table of Contents
- FOR THE INSTALLER: Specifications Page 2
- FOR THE INSTALLER: Environmental Limitations Page 3
- FOR THE INSTALLER Page 4
- FOR THE INSTALLER: Wall Mount Kit Page 5
- FOR THE PLUMBER Page 6
- FOR THE ELECTRICIAN Page 7
- FOR THE INSTALLER: Final Check List Page 8
- INITIAL START UP Page 9
- COMPONENT DESCRIPTION Page 10
- COMPONENT DESCRIPTION Page 11
- COMPONENT DESCRIPTION: Control Box Page 12
- ELECTRICAL SEQUENCE Page 13
- OPERATION: Water Page 14
- OPERATION: Refrigeration Page 15
- OPERATION: Ice Vending Page 16
- DISPENSE AREA SANITATION Page 17
- CLEANING and SANITIZING Page 18
- MAINTENANCE AND CLEANING Page 19
- SERVICE DIAGNOSIS Page 21
- SERVICE DIAGNOSIS: Circuit Board Page 23
- REMOVAL AND REPLACEMENT Page 24
- REMOVAL AND REPLACEMENT: Bearing And Breaker Page 25
- REMOVAL AND REPLACEMENT: Water Seal Page 27
- TO REMOVE AND REPAIR THE GEARMOTOR ASSEMBLY Page 29
- REFRIGERATION SERVICE: R-404A (HP62) Page 30
- REFRIGERATION SERVICE Page 31
- CIRCUIT BOARD SERVICE Page 32
- LIQUID CHARGING Page 32
MAINTENANCE AND CLEANING
In some areas, the water supply to the ice maker
will contain a high concentration of minerals, and
that will result in an evaporator and auger
becoming coated with these minerals, requiring a
more frequent removal than twice per year. If in
doubt about the condition of the evaporator and
auger, the auger can be removed so the parts can
be inspected.
Note: Water filters can filter out suspended solids,
but not dissolved solids. “Soft” water may not be
the complete answer. Check with a water treatment
specialist regarding water treatment.
For more information on removal of these
parts, see REMOVAL AND REPLACEMENT.
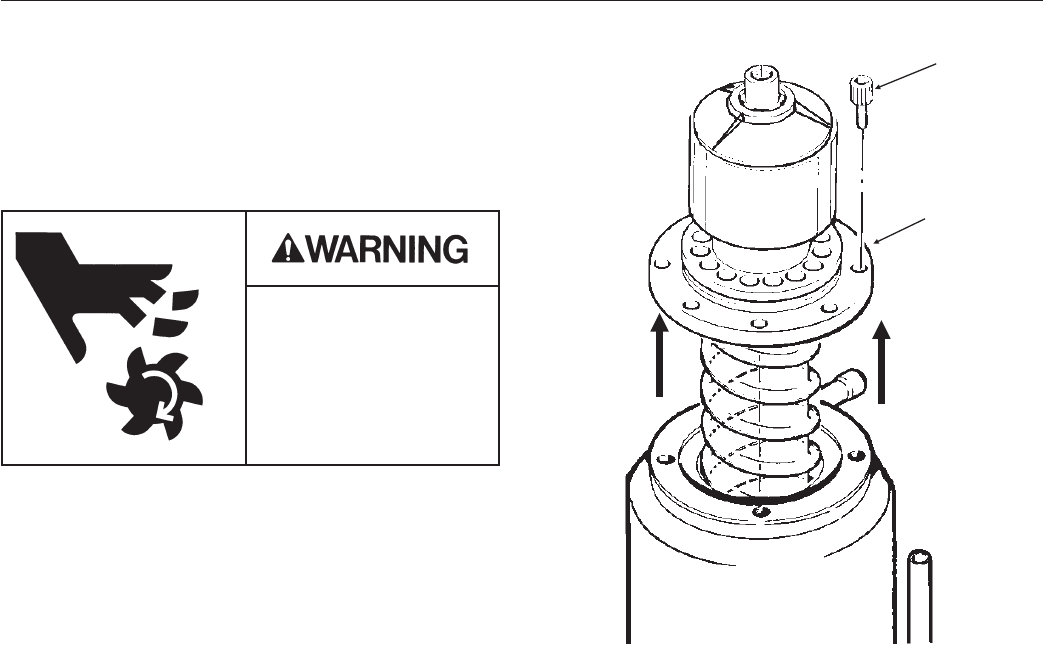
1. To remove the auger, remove the front and top
panels.
2. Push bail clamp off of cover and remove cover.
3. Unscrew and remove ice sweep.
4. Remove ice chute from evaporator.
5. Remove 4 allen screws holding breaker to
evaporator.
6. Pull up to remove auger.
After the auger has been removed, allow the auger
to dry: if the auger is not bright and shiny, it must
be cleaned.
Clean the auger and evaporator as required. DO
NOT HONE THE EVAPORATOR.
7. Replace the water seal.
8. Reverse to reassemble.
MDT5N25 & MDT5N40
May 2001
Page 20
ALLEN
HEAD
SCREWS
BREAKER
AND AUGER
ASSEMBLY
Moving Parts Hazard.
Disconnect electrical
power to the icemaker -
dispenser before
beginning.