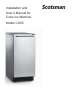
Installation and User’s Manual for Cube Ice Machine Model CU50
Introduction: This ice machine is the result of Scotsman’s decades of experience as an industry leader in the design and manufacture of both commercial and residential ice machines. This manual includes the information needed to install, start up and maintain the ice machine. Note any Caution or Warning indicators, as they provide notice of potential hazards. Keep this manual for future reference. Table of Contents Specifications . . . . . . . . . . . . . . . . . . . . . . . . . .
CU50 Installation and User’s Manual Specifications This ice machine is designed to be used indoors, in a controlled environment, and under limited conditions (see page 1), outdoors. It can be used in a wide variety of environmental conditions, but there are limits. Use outside of the listed limitations is misuse and will void the warranty. Air temperature limits: The ice machine will operate adequately within the limits, but functions best in temperatures between 70 and 80 degrees F.
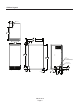
Cabinet Layout FLOOR DRAIN ACCESS HOLE 98.55 3.88 443.23 17.45 606.68 23.89 566.17 22.29 40.51 1.60 377.95 14.88 753.24 29.66 873.25 34.38 DRAIN FLEXIBLE TUBING 3/8 I.D. PUMP MODEL (INCLUDED) 5/8 I.D. GRAVITY MODEL (NOT INCLUDED) POTABLE WATER INLET 1/4" COMPRESSION FITTING 97.79 3.85 AIR OUT AIR IN 82.99 3.27 81.28 3.20 115 V POWER CORD LEG ADJUSTMENT [25.40] 1.00 March 2010 Page 3 62.04 2.44 39.75 1.57 97.16 3.83 188.98 7.
CU50 Installation and User’s Manual Air flow & Control Panel The machine takes in room temperature air at the lower right front and forces warm air out the lower left front. Restricting the airflow will adversely affect the ability of the ice machine to make ice. Scotsman Ice Systems are designed and manufactured with the highest regard for safety and performance. They meet or exceed the standards of agencies like U.L.
CU50 Installation and User’s Manual Water Quality All water, including potable water supplied by municipalities, contains some impurities or minerals. Water absorbs impurities from the air as rain and/ or as it flows through the ground. Some of the impurities are solid particles, these are known as suspended solids, and a fine particle filter will remove them. Other impurities are chemically bonded to the water molecules, and cannot be filtered out, these are called dissolved solids.
CU50 Installation and User’s Manual Door swing change The door can be attached to open with hinges on the left or right. 6. Remove original bottom hinge. To change: 1. Remove top hinge pin from hinge. 7. Remove two plugs or screws from upper cabinet bracket. 8. Attach bottom hinge to upper cabinet bracket using the original screws. 2. Tilt top of door away from cabinet and lift door off bottom hinge. 9. Place the door on bottom hinge, tip up to slide under top hinge. 10.
Notes for the Installer Sealing to floor: In some cases the base of the ice machine must be sealed to the floor to meet local code. Food grade silastic sealant such as Scotsman part number 19-0529-01 is recommended. Place the machine in the intended location. Turn the leg levelers in until the bottom of the unit is as close to the floor as possible. Be sure the unit is level and all four levelers are in contact with the floor.
CU50 Installation and User’s Manual Installation: Water & Drain The recommended water supply tubing is ¼ inch OD copper. Install an easily accessible shut-off valve between the supply and the unit. This shut-off valve should not be installed behind the unit. Drains Note: Do not use self-piercing type valves. Drain Pump Model drain installation 1. Remove the front service panel. 1. Locate the coil of 3/8” ID plastic drain tubing secured to the back of the unit.
Gravity Drain Caution: Restrictions in the drain system to the machine will cause water to back up into the ice storage bin and melt the ice. Gravity drain tubing must be vented, have no kinks and slope to the building drain. Air gaps are typically required by local code. 5. Cut an 8” piece of 5/8” ID X 7/8” OD tygon (clear plastic) tubing. Slide one end of the tube onto the outlet of the barbed connector and secure with a clamp.
CU50 Installation and User’s Manual Electrical The ice machine is supplied with a power cord. Do not remove the grounding pin from the cord’s plug. Do not use extension cords. Follow all codes. Connect the machine to its own 115 volt, 15 amp circuit. 1. If the electrical outlet for the ice maker is behind the unit, plug in the unit. 2. Position the unit in the installation opening. 3. Turn on the water supply. Make sure that the ice maker is plugged in and the power is on. 4.
Start Up Check list: 1. Has the unit been connected to the proper water supply? 2. Has the water supply been checked for leaks? 3. Has the unit been connected to a drain? After about a half hour, ice will fall into the ice storage bin. The machine makes 24 cubes per batch. It is normal for the first batches of ice to melt, that continues until the bin has cooled. It will take 8 to 10 hours of continuous run time to fill the ice bin. When the bin is full of ice, the ice machine will shut off.
CU50 Installation and User’s Manual Use No special instructions are needed for use. Just take as much ice as you need, the machine will replace it. A scoop is provided, and it can be stored in the machine using the loop of tubing on the right side as a holder. That tubing is also the ice level sensor; ice will fill the storage bin until it’s near to or on that tube and then the machine will shut off.
CU50 Installation and User’s Manual Clean and Sanitize Ice Making System bin after the ice making system has been cleaned, and the storage bin is empty. A sanitizing solution can be made of 1 ounce of household bleach and two gallons of hot (95°F. – 115°F.) water. Use a clean cloth and wipe the interior of the ice storage bin with the sanitizing solution, pour some of the solution down the drain. 4. Return the kickplate and front service panel to their original positions.
CU50 Installation and User’s Manual Clean and Sanitize Ice Making System Winterizing Remove Scale 1. Clean the ice making system. 1. Remove and discard all ice. 2. Open the door and push and release the On/Off switch to turn the machine off. 2. Press and HOLD the On/Off button in for 3 seconds until the Green light goes out. 3. Press and HOLD the both the Clean-Reset and On/Off buttons for 5 seconds. The Time to Clean light will blink on and off. 3. Turn off the water supply. 4.
What to do before calling for service Installation and User’s Manual 10. Clean the bin liner of mineral scale by mixing some ice machine scale remover and hot water, and using that solution to scrub the scale off of the liner. Ice cubes are incompletely formed • Clean the ice making system Low capacity • Check for restricted drain or standing water in the bin • Clean the air cooled condenser fins 11. Rinse the liner with hot water. Sanitize the bin interior. 1.
SCOTSMAN ICE SYSTEMS 101 Corporate Woods Parkway Vernon Hills, IL 60061 800-726-8762 www.scotsman-ice.com 17-3314-01 Rev.