Prodigy Eclipseä 1200, 1400, 1800, 2000 Introduction: This manual covers the assembly, installation, start up, operation and maintenance of the 1200, 1400, 1800 and 2000 remote low side cuber systems.
Prodigy Eclipseä 1200, 1400, 1800, 2000 Configuration A remote low side cuber system includes several sub systems: an ice making section, a remote compressor package, and a remote air cooled condenser. Additionally, there are several models of each sub-system and this manual covers all of them. Do Not operate the machine in conditions beyond these limitations. Doing so will void the warranty. The ice making sections are designed for use indoors in a controlled environment.
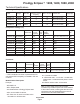
Prodigy Eclipseä 1200, 1400, 1800, 2000 Technical Specifications Ice Making Section (IMS) Model Voltage Cube Size Minimum Circuit Ampacity Max Fuse Size Cabinet Size Weight (lb) EH330SL-1A 115/60/1 Small 3 15 30”w x 24”d x 23”h EH330ML-1A 115/60/1 Medium 3 15 30”w x 24”d x 23”h EH430SL-1A 115/60/1 Small 3 15 30”w x 24”d x 29”h 160 EH430ML-1A 115/60/1 Medium 3 15 30”w x 24”d x 29”h 160 Compressor Package (CP) Model Voltage Contains Headmaster ? Minimum Circuit Ampacity Max
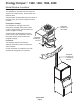
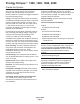
Prodigy Eclipseä 1200, 1400, 1800, 2000 Model Number Locations Ice Making Section The dataplate on the back of the ice machine contains the model number, serial number and electrical data. A second plate, located behind the front panel at the lower front, also lists the model and serial numbers. Compressor Package The dataplate on the right side of the compressor package contains the model number, serial number, electrical data and system refrigerant charge.
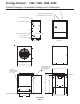
Prodigy Eclipseä 1200, 1400, 1800, 2000 Cabinet Drawings, Ice Making System Note: If dispenser is against the wall, drop zone will be located 1.5" further forward than is shown here. MINIMUM BIN TOP OPENING 15.75" (40.0cm) 2.00" 5.1 cm 9.63" 24.5 cm 9.00" 22.9 cm ICE DROP OPENING 18.30" 46.5 cm 24.00" 61.0 cm 30.00" 76.
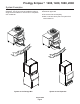
Prodigy Eclipseä 1200, 1400, 1800, 2000 Cabinet Drawings, Compressor Package and Condensers 1/2" CONDENSER DISCHARGE LINE (IN) CONDENSER FAN WIRE ROUTING 3/8" CONDENSER LIQUID LINE (OUT) 1/2" COOL VAPOR LINE 0.88 ELECTRICAL INLET 3/8" LIQUID LINE INTERFACE HARNESS ACCESS HOLE 3/4" SUCTION LINE 1.5” 15” 1.5” BACK VIEW RIGHT SIDE VIEW ER2C6810 - 36.52 27.90 28.
Prodigy Eclipseä 1200, 1400, 1800, 2000 Proper Combinations: · Compressor Package (includes interconnecting The three sub systems are designed to be connected together in certain combinations to meet the user’s needs: control system wire) · Remote condenser or approved rack coil Eclipse 1200 System w/tubing kit · EH330, C1200CP, ERC1086 · 20’, 35’, 50’ or 75’ triple line set (liquid, vapor Eclipse 1400 System: and suction) · EH430, C1410CP, ERC1086 · Bin or dispenser adapter Eclipse 1800 System:
Prodigy Eclipseä 1200, 1400, 1800, 2000 Create the System Plan the installation. The system consists of four parts: the ice making section, the compressor package, the interconnecting tubing and the remote condenser. Of these, the biggest variable is the interconnecting tubing. Interconnecting wires: An interconnecting wire harness is included with the CP unit. One end plugs into the ice making section and the other into the compressor package. The system will NOT operate without this harness.
Prodigy Eclipseä 1200, 1400, 1800, 2000 System Examples The Eclipse system can be installed on a bin or dispenser. The CP unit can be installed on either a single circuit condenser or onto a coil in a separate rack condenser. Separate coils must be: · Scotsman approved · The correct size and capacity · New or not have been part of a system that used mineral oil.
Prodigy Eclipseä 1200, 1400, 1800, 2000 System Examples A variation of the typical system set up is one that uses a non-Scotsman condenser. In that case the CP unit is NOT bolted to the condenser and a RTE10 line set is used to connect the refrigeration system to the condenser’s coil.
Prodigy Eclipseä 1200, 1400, 1800, 2000 Place Remote System Roof preparation Roof Piercing: Most installations of this system will place the compressor package and condenser on the roof of a building. The roof must be physically stout enough to accept the load of the equipment and the roofing material must be prepared to prevent water leaks. The roof (or wall) must have a passage large enough for the three pre-charged, pre-bent tubes and the control wire to pass through.
Prodigy Eclipseä 1200, 1400, 1800, 2000 System Location Limitations: Line Routing: Distance: Limited to the maximum length of a single pre-charged tubing kit, 75 feet. Condensing Unit Elevation over Ice Making Section: 35 feet. · Allowed: One rise after a drop. · Allowed: One drop after a rise. · Not Allowed: More than one rise after a drop · Not Allowed: More than one drop after a rise. Note: Elevations greater than 20 feet require installation of a suction line trap at the 20 foot mark.
Prodigy Eclipseä 1200, 1400, 1800, 2000 Route Tubing Scotsman’s pre-charged tubing kits are pre-bent to fit the connection path at the ice making section. · If the tubing is to be routed out the back, use the straight ends. Suction Select the correct end to send to the roof. The method or technique used to route the tube is left to the installer. However, in many cases it is easier to position the tubing inside the building first, then feed the outside portion through the tubing passage (pitch pot).
Prodigy Eclipseä 1200, 1400, 1800, 2000 Ice Making Section Major Components: TXVs - one feeding each evaporator Vapor Valves - one for each evaporator Water Pump - one for both evaporators Harvest Assist Solenoids - one for each evaporator Water Level Sensor - signals reservoir water level to the controller Controller - operates both the ice machine section and the compressor unit.
Prodigy Eclipseä 1200, 1400, 1800, 2000 Compressor Package Compressor packages are similar in layout, they only differ in compressor and charge. Major Components: CPR Valve - limits refrigeration pressures inside the dome of the compressor. Liquid from Cond. Discharge to Cond. Power Routing Hole Condenser Wire Routing Hole Condenser By Pass Valve - opens during Vapor Line harvest to allow discharge gas to flow to the Connection vapor line.
Prodigy Eclipseä 1200, 1400, 1800, 2000 Condensing Section Assembly (CP to ERC): 1. Remove cartons from compressor package and condenser. 2. Remove top from both units. 3. Remove front panel from CP unit. 4. Locate legs, secured to ERC unit. 5. Locate fasteners, inside junction box of ERC unit. 6. Assemble rear legs to ERC using fasteners from prior step. Connect Power Here Locate Fastener Package Connect Fan Motor Leads 7. Locate wire package in CP unit. Remove short wires and two wire nuts.
Prodigy Eclipseä 1200, 1400, 1800, 2000 Condensing Section Assembly Alternate Assembly: All Assemblies: The CP unit may be connected to an approved condenser coil in a central condenser rack. In those cases, the CP unit must be connected to the condenser coil using special kit RTE10. Route interconnecting control wire through proper hole in side of CP unit and plug into the connection on the bottom of the control box. Position the CP unit in its final spot.
Prodigy Eclipseä 1200, 1400, 1800, 2000 Ice making section: Remove from carton. Attachment: Remove all panels. If the unit is a direct fit, place it on the bin. If the unit is in a position that it need not be moved to complete the installation, secure it to the bin with the hardware provided with the head unit. Utility Connection Route: Electrical: The unit is supplied with a power cord. There is also an interconnecting control wire that must be routed between the ice making head and the CP unit.
Prodigy Eclipseä 1200, 1400, 1800, 2000 Water and Drain The ice making section requires an adequate potable water supply and a gravity drain. In some tight situations it will be necessary to assemble the ice making section to the dispenser or bin and install the water and drain connections before placing the system in its installed position. A loop of water supply tubing will allow movement of the system.
Prodigy Eclipseä 1200, 1400, 1800, 2000 Water and Drain All models require connection to cold, potable water. A hand actuated valve within site of the machine is required. There is a single 3/8” FPT inlet water connection, a 3/8” FPT to 3/8” male flare adapter is supplied with the machine and can be used if desired. Water Filters Install a new cartridge if the filters were used with a prior machine. All models require drain tubing to be attached to them.
Prodigy Eclipseä 1200, 1400, 1800, 2000 Ice Making Section Set Up Rotate the ice making section as needed to access the left side, where the refrigeration connections will be made. Connect the suction line to the top fitting. Connect the vapor line to the middle fitting. Connect the liquid line to the bottom fitting. See Coupling Connections on the next page for detailed instructions. After couplings are connected, add cork-tape type insulation to exposed fittings to reduce condensation potential.
Prodigy Eclipseä 1200, 1400, 1800, 2000 Coupling Connections: The couplings on the ends of the pre-charged line sets are self-sealing when installed properly. Follow these instructions carefully. These steps must be performed by an EPA Certified Type II or higher technician. 4c. Continue tightening the swivel nut until it bottoms out or a very definite increase in resistance is felt (no threads should be showing). Do NOT overtighten. Initial Connections 1. Remove the protector caps and plugs.
Prodigy Eclipseä 1200, 1400, 1800, 2000 Condensing Unit Connections Connect the suction line, the vapor line and the liquid line to the matching fittings on the CP unit. See Coupling Connections on the prior page for detailed instructions.
Prodigy Eclipseä 1200, 1400, 1800, 2000 Final Placement After the utilities and refrigeration connections have been made, secure the unit to the dispenser or bin top. Final Check List Before Initial Start Up Secure ice making section to dispenser or bin adapter. 2. Confirm that all packing materials have been removed from all products. Use strap/clips to secure unit.
Prodigy Eclipseä 1200, 1400, 1800, 2000 Controller Operation The controller has four indicator lights, a code display, four push buttons, and eleven component indicator lights.
Prodigy Eclipseä 1200, 1400, 1800, 2000 Initial Start Up Pre Start A soak-out period of four hours is optional for this system. If desired, powering the compressor unit for four hours prior to start up allows the crankcase heater to warm up the oil in the compressor. Start Up 1. Connect power to the condensing unit and move its toggle switch to Run or On. 2. Open the water supply valve. 3. Remove front panel. Check machine for any packing or wires rubbing moving parts.
Prodigy Eclipseä 1200, 1400, 1800, 2000 Ice Bridge and Water Purge Adjustments Bridge Thickness - For the Service Tech Only 1/8-3/16" bridge 1. Push and hold Off till the machine stops. 2. Remove evaporator cover. 3. Remove curtain. 4. Use a hex wrench and rotate the bridge thickness adjustment screw in 1/16 turn increments CW to increase bridge thickness. Rotate CCW to decrease bridge thickness. Caution: Do not make the bridge too thin or the machine will not harvest properly.
Prodigy Eclipseä 1200, 1400, 1800, 2000 Controller Information Machine Indicator Lights · Power · Status · Water · Clean Code Display Main codes - automatically displayed F Freeze Cycle F flashes Freeze Cycle is Pending Harvest Cycle H H flashes Manual Harvest b Bin is Full C Clean Cycle L Board Locked d Test Mode O Off E Self Test Failed 1 flashes Max Freeze - Retrying Max Freeze Time Shut Down 1 2 flashes Max Harvest - Retrying 2 Max Harvest Time Shut Down 3 Slow Water Fill 4 High
Prodigy Eclipseä 1200, 1400, 1800, 2000 Use and Operation Once started, the ice machine will automatically make ice until the bin or dispenser is full of ice. When ice level drops, the ice machine will resume making ice. Caution: Do not place anything on top of the ice machine, including the ice scoop. Debris and moisture from objects on top of the machine can work their way into the cabinet and cause serious damage. Damage caused by foreign material is not covered by warranty.
Prodigy Eclipseä 1200, 1400, 1800, 2000 Control Switches There is front access to two switches – On and Off. Status Power De-Scale Water Adjustable ice level control, kit # KVS When this option is present there is an adjustment post and an additional indicator light to the right of the four indicator lights mentioned above. The ultrasonic ice level control allows the user to control the point that the ice machine will stop making ice before the bin or dispenser is full.
Prodigy Eclipseä 1200, 1400, 1800, 2000 Options Advanced Feature Board, kit #KSB Ice When this option is present there is an additional display panel in the area below the main control board. It is not visible when the front panel is on. The Smart-Board’s features include: The cuber drops ice in large sections. That ice will break up into random parts as it falls into the bin, but some large sections may remain on top of the ice in the bin.
Prodigy Eclipseä 1200, 1400, 1800, 2000 System Operation: This section is intended for the technician. Understanding it is not necessary for the normal operation and maintenance of this ice making system. Major Components: Freeze: In the air cooled condensing unit sub-system (compressor package and condenser) the compressor is on, the condenser by-pass valve is closed, the fan motor is rotating the fan blade.
Prodigy Eclipseä 1200, 1400, 1800, 2000 Refrigeration Details: combination, when entering the relatively cold evaporators, condenses, transferring latent heat to the evaporators, which warms them. Ice releases and falls into the bin. The low-pressure refrigerant then flows out of the evaporators and into the suction line. The suction line brings the refrigerant, now consisting of a vapor-liquid combination, to the accumulator.
Prodigy Eclipseä 1200, 1400, 1800, 2000 Technicians Only: Freeze Cycle Sequence of Operation This sequence begins with a restart after the unit has shut off with the bin full. Ice has been consumed, causing the ice sensors to become un-blocked. 1. The controller (four minutes has to have passed since the machine shut off on bin full for the machine to restart) 2. The purge valve is opened and the pump started. 3. After the purge valve closes the inlet water valve opens and fills the reservoir.
Prodigy Eclipseä 1200, 1400, 1800, 2000 Technicians Only: Harvest Cycle Sequence of Operation When harvest begins, the controller connects power to the external relay for the CP's solenoids. It also connects power to the vapor inlet solenoid valve in the cabinet of the EH. The vapor inlet solenoid valve and the condenser bypass valve open. The receiver inlet solenoid valve closes. Vapor flows from the condensing unit to the EH evaporator inlets.
Prodigy Eclipseä 1200, 1400, 1800, 2000 Control Safeties Max freeze time – 45 minutes Restarts When exceeded, the controller will attempt another freeze cycle. If the condition is exceeded again the next cycle, the control will again attempt another freeze cycle. If the freeze cycle exceeds the maximum time in 3 consecutive cycles, the controller will shut the machine off and it must be manually reset.
Prodigy Eclipseä 1200, 1400, 1800, 2000 Controller Operation Control Button Use (from standby) Change De-Scale Notification Interval Set purge level, 1-5 (1 is minimum, 5 is maximum) or Automatic: Like the others, this feature is accessible only from standby (Status Light Off). · Press and hold harvest button for 3 seconds. · This will allow control to enter Time to Clean · Hold off button in for 3 seconds. Release. · Press and release the On button to cycle Adjustment State.
Prodigy Eclipseä 1200, 1400, 1800, 2000 Cleaning, Sanitation and Maintenance This ice system requires three types of maintenance: • Remove the build up of mineral scale from the ice machine’s water system and sensors. • Sanitize the ice machine’s water system and the ice storage bin or dispenser. • Clean the air cooled condenser. It is the User’s responsibility to keep the ice machine and ice storage bin in a sanitary condition. Without human intervention, sanitation will not be maintained.
Prodigy Eclipseä 1200, 1400, 1800, 2000 Squeeze Tabs Together, Slide Out Until it Stops, Then Lift to Remove 20. Circulate the sanitizer solution for 10 minutes, then push and release the Clean button. 21. Allow the water system to be flushed of sanitizer for at least 20 minutes, then push and release the Off button. 22. Return the evaporator cover and front panel to their normal position and secure with the original fasteners. 23. Push and release the On button to resume ice making.
Prodigy Eclipseä 1200, 1400, 1800, 2000 Service Diagnosis Problem or Symptom Possible Cause Probable Correction No ice No power to ice making section Restore power No power to condensing unit Restore power Head has power, but power light is off Check transformer Unit manually switched off Push and release the on button, ask user why it was shut off Power to both sections, controller reset, but condensing unit does not operate Interconnecting control wire disconnected, reconnect it Low or high p
Prodigy Eclipseä 1200, 1400, 1800, 2000 Service Diagnosis Problem or Symptom Possible Cause Probable Correction No ice No refrigeration, maximum harvest time code is displayed Check compressor, refrigerant charge, and liquid inlet valve. Note that if liquid inlet valve is not open, compressor will pump down and suction pressure will be very low.
Prodigy Eclipseä 1200, 1400, 1800, 2000 Service Diagnosis Problem or Symptom Possible Cause Probable Correction Low capacity Dirty condenser Clean condenser Air temperature intake to condenser very high Re-orient condenser to avoid hot air intake Water temperature intake to ice making section very high Check for hot water supply to ice machine due to mal-functioning or non-existent hot water check valve at dishwashing sink False bin full - bin full code is ON and the bin is not full Check for ice
Prodigy Eclipseä 1200, 1400, 1800, 2000 Operational Characteristics 1200 lb system Cycle Times @ Condenser Temp/Cabinet Temp/Water Temp in degrees F 70/70/50 90/90/70 120/110/100 Freeze (minutes) 9 to 11 12 to 14 17 to 19 Harvest (minutes) 1 to 1 1/2 1 to 1 1/2 1/2 to 1 System Pressures @ Condenser Temp/Cabinet Temp/Water Temp in degrees F.
Prodigy Eclipseä 1200, 1400, 1800, 2000 Operational Characteristics 1400 lb system Cycle Times @ Condenser Temp/Cabinet Temp/Water Temp in degrees F 70/70/50 90/90/70 120/110/100 Freeze (minutes) 10 to 14 13 to 17 21 to 25 Harvest (minutes) 1 to 1.5 1 to 1.5 1/2 to 1 System Pressures @ Condenser Temp/Cabinet Temp/Water Temp in degrees F.
Prodigy Eclipseä 1200, 1400, 1800, 2000 Operational Characteristics 1800 lb system Cycle Times @ Condenser Temp/Cabinet Temp/Water Temp in degrees F.
Prodigy Eclipseä 1200, 1400, 1800, 2000 Operational Characteristics 2000 lb system Cycle Times @ Condenser Temp/Cabinet Temp/Water Temp in degrees F. 70/70/50 90/90/70 120/110/100 Freeze (minutes) 7 to 11 9 to 13 15 to 19 Harvest (minutes 1 to 2 1 to 1.
Prodigy Eclipseä 1200, 1400, 1800, 2000 Refrigeration System Service Recovery Recovery must be done from the condensing unit, but requires the ice machine to be shut down. 1. At the ice making section, remove the front panel. 2. Push and release the Harvest button. When the machine shuts off, recover the refrigerant. 3. Remove compressor package covers. 4. Attach recovery system to low side (compressor process port valve) 5.