
Service Manual


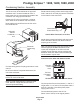

Condensing Section Assembly
(CP to ERC):
1. Remove cartons from compressor package and
condenser.
2. Remove top from both units.
3. Remove front panel from CP unit.
4. Locate legs, secured to ERC unit.
5. Locate fasteners, inside junction box of ERC
unit.
6. Assemble rear legs to ERC using fasteners from
prior step.
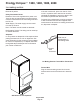
7. Locate wire package in CP unit. Remove short
wires and two wire nuts.
8. Use wire & wire nuts from step 7 to connect to
the wires inside the junction box of the condenser.
Return junction box cover to its original position.
9. Place front of ERC on back flange of CP unit.
10. Secure CP unit to ERC.
11. Attach leg brace between ERC unit and CP
unit.
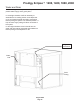
12. Route wires from condenser through hole in
back of CP unit to the CP unit control box.
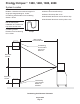
13 Pull ERC female refrigerant connections
forward to engage male connections on CP unit.
14. Rotate swivel nuts to tighten refrigerant
connections. Use a back up wrench to hold female
connection to prevent tearing of the diaphragms.
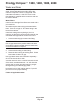
15. Connect wire to T1 and T2 of the contactor.
Use the two wire nuts to connect the other end to
the two black wires in the condenser junction box.
16. Return tops to their original positions.
Prodigy Eclipseä 1200, 1400, 1800, 2000
August 2008
Page 16
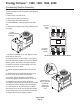
CP Unit Contactor, Three Phase Shown
Connect
Fan Motor
Leads
Connect
Power
Here
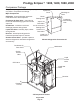
Rotate Swivel
Nuts to Connect
Condenser
System to
Compressor
Unit
Locate
Fastener
Package