
User's Manual


EH330, EH430 D and ECC Condensing Unit
Remote Low Side Cuber User Manual
October 2014
Page 15
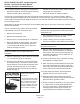
Complete the Installation
After the utilities and refrigeration connections have
been made, secure the unit to the dispenser or bin
top.
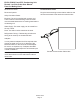
Secure ice making section to dispenser or bin
adapter.
Use strap/clips to secure unit. On some bins or
dispensers it may be necessary to drill small holes
and use eld supplied sheet metal screws to secure
the ice making head to that bin, dispenser or adapter.
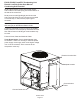
If the ice maker & bin or dispenser is not yet in its nal
position gently move it there.
Note: The refrigerant lines above the machine must
be able to move freely while the machine is being
moved into position.
Final Check List Before Initial Start Up
1. Conrm that the ice making section is installed
indoors in a controlled environment.
2. Conrm that all packing materials have been
removed from all products.
3. Conrm that the ice making section is level.
4. Conrm that all the refrigerant connections have
been made and checked for leaks.
5. Conrm that the proper power supply has been
turned on to the condensing unit.
6. Conrm that cold, potable water has been supplied
to the ice making section and checked for leaks.
7. Conrm that the water supply is adequate.
8. Conrm that there is adequate water pressure and
that any water lters have been checked to conrm
that the cartridges do not need changing.
9. Conrm that the proper size drain tubing has been
installed and properly routed.
10. Conrm that the ice making section has been
connected to the proper power supply.
11. Conrm that the interconnecting wire has been
routed and connected between the ice making section
and the condensing unit.
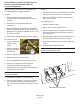
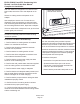
Lower Light and Switch Panel
This user accessible panel provides important
operational information and duplicates the lights and
switches on the controller. It also allows access to
the On and Off buttons that operate the ice machine.
Sometimes access to the switches should be limited
to prevent unauthorized operation. For that purpose
a xed panel is shipped in the hardware package.
The xed panel cannot be opened.
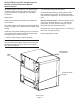
To install the xed panel:
1. Remove the front panel and remove the bezel.
2. Spread the bezel frame open and remove
original door, insert xed panel into bezel. Be
sure it is in the closed position.
3. Return bezel to panel and install panel on unit.
Open door to access On
and Off switch buttons.