SCN60 Installation and Use Introduction This manual includes information for the installation, operation and maintenance of the SCN60 residential ice machine. The SCN60 was developed to offer fans of Scotsman’s Nugget Ice form the ability to have that ice in their homes. Previously Nugget Ice was only available in commercial establishments, where it developed a strong following because of the chewable nature of the ice.
SCN60 Installation and Use Product Description: This ice machine is designed to be used indoors, in Water Quality a controlled environment or outdoors within certain limits. The water to the machine must be potable, or fit for human consumption. Beyond that, water supplies The SCN60 is made up of two major systems: the vary in the degree of mineral content. As this ice ice making system and the ice storage system.
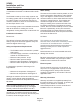
SCN60 Installation and Use Cabinet Dimensions FLOOR DRAIN ACCESS HOLE 3 7/8" 20 3/8" 3/4" 1/4" O.D. COPPER WATER INLET COMPRESSION FITTING PROVIDED 22" 3/4" SHEET METAL DOOR FRONT - IF DOOR KIT INSTALLED .63 MIN. CABINET DOOR 2 3/4" 2 3/8" DOOR KIT AND HANDLE 14 7/8" 5 1/8" 33 3/8" MIN. 34 3/8" MAX. 29 1/4" 4" 3 1/4" 2 1/2" 2 3/4" AIR OUT 115V POWER CORD AIR IN 1" LEG ADJUSTMENT (4) PLACES 7 1/2" 11 5/8" LEFT SIDE SVC. ACCESS PANEL DRAIN ACCESS - FLEXIBLE TUBING 3/8" I.D.
SCN60 Installation and Use Location Recommendations: The machine can be built into a cabinet. It is an air cooled refrigeration system and so air flows in and out of it through the grill at the bottom front. The grill must not be blocked by any covering door or other obstruction. Drain Conversion: A gravity drain model can be converted to a drain pump model by installing a drain pump kit. The drain pump kit consists of a drain pump, wiring harness and associated tubing. The part number is A39462-021.
SCN60 Installation and Use Familiarization The control panel is visible when the door is opened. It has three indicator lights and two switches. Ice Making Check Water Time to Clean Clean Reset Control Panel The model and serial number plate is located on the bottom of the control panel box. The Bin Light and Ice Level Sensor are also visible from that angle, as is the Ice Chute.
SCN60 Installation and Use Decorating Features: The machine ships unfinished, allowing the attachment of a decorator door panel or a metal panel from Scotsman. 5. Place the covers over the hinge areas, and secure each cover to the door using a sheet metal screw. Door Panel 6. Insert hole plug over screw installed in step 5. The ice machine is supplied without a conventional door covering so it can be decorated to the user’s preference.
SCN60 Installation and Use Door Panel Attachment Use Upper Hole at the Top Scotsman Door Panel Gasket Machine Screw Hole Plug Use Lower Hole at the Bottom Cover May 2011 Page 7
SCN60 Installation and Use Door Swing Note: Prior models had separate hinge brackets and different directions to change swing. Moving the hinges allows the door to open from either the left or right side. Change swing before attaching door panel. To change: 1. Remove innermost screw holding each hinge to cabinet, loosen the other.
SCN60 Installation and Use Door Swing 6. Remove kickplate and front service panel. The door swing is reversible. The door can be attached to open with hinges on the left or right using new hinge brackets shipped loose in the ice bin. Retain all screws for re-use. To change: 1. Remove hinge cover and innermost screw holding each hinge to cabinet, loosen the other. 2. Slide hinges to the side and remove door from cabinet. Remove screws loosened in step 1 from both cross braces. Screw Below 7.
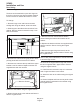
SCN60 Installation and Use Plumbing - Pump Model Drains Water Supply There are two types of ice machine models, one that drains by gravity and one that has an internal drain pump. The recommended water supply tubing is ¼ inch OD copper. Stainless steel flex or reinforced PCV tube may also be used. Install an easily accessible shut-off valve between the supply and the unit. This shut-off valve should not be installed behind the unit. Drain Pump Model drain installation 1.
SCN60 Installation and Use Plumbing: Gravity Drain Model Caution: Restrictions in the drain system to the machine will cause water to back up into the ice storage bin and melt the ice. Gravity drain tubing must be vented, have no kinks and slope to the building drain. Air gaps are typically required by local code. 1. Place the ice machine in front of the installation opening. Adjust leveling legs to the approximate height. clamp.
SCN60 Installation and Use Electrical and Start Up The ice machine is supplied with a power cord. Do not remove the grounding pin from the cord’s plug. Do not use extension cords. Follow all codes. Connect the machine to its own 115 volt, 15 amp circuit. 1. If the electrical outlet for the ice maker is behind the unit, plug in the unit. Installation check list: 1. Has the unit been connected to the proper water supply? 2. Has the water supply been checked for leaks? 3.
SCN60 Installation and Use Use No special instructions are needed for use. Just take as much ice as you need, the machine will replace it. A scoop is provided, and it can be stored in the machine using the loop of tubing on the right side as a holder. Noise: The machine can be shut off anytime by just pushing and releasing the On/Off button. Ice Making What shouldn’t be done? Never keep anything in the ice storage bin that is not ice.
SCN60 Installation and Use Maintenance Scotsman strongly recommends regular maintenance of this ice machine. During normal operation mineral scale that is in the water supply will gradually build up on the ice making surfaces. That build up can cause excessive loading of the ice making system, which can cause premature failure. Regular removal of the mineral scale will lengthen the product’s life. Winterizing 1. Clean the ice making system per the instructions in the Maintenance section. 2.
SCN60 Installation and Use How to remove scale from the ice making system. Cleaning this machine involves adding a solution of scale remover and water to the ice machine and continuing to add it as it makes ice. The scale remover must be diluted to the correct ratio. A squirt bottle will make adding the scale remover much easier when the unit is built in. If not built in, remove the top panel for reservoir access. Float Valve On/Off Lever Recommended tools: Rubber gloves, squirt bottle & scale remover.
SCN60 Installation and Use 6. Locate blue float valve on/off lever. Move lever up about half way to shut water off. Ice Making Check Water Clean Reset Time to Clean 8. Obtain pre-mixed Scotsman Clear 1 Scale remover solution (with squirt bottle) or mix a solution of Clear 1 with water: 2.5 ounces of Clear 1 with 1 quart (32 oz) of warm water. Ice machine scale remover contains acids. Acids can cause burns. If concentrated cleaner comes in contact with skin, flush with water.
SCN60 Installation and Use 11. Press and HOLD both the Clean-Reset and On/Off buttons for 5 seconds. The Time to Clean light will blink on and off. 15. Return the upper back wall of the bin to its original position and secure it with the original screws. Push in at bottom to snap it into place. Press Both Ice Making Check Water 14. Return the reservoir cover to its original position. Time to Clean 16. Pour a gallon of hot (95 oF. – 115oF.
SCN60 Service SCN60 service This section contains information for the service and repair of the SCN60 ice machine. Service Table of Contents SCN60 service . . . . . . . . . . . . . . . . . . . . . . . . . . . . . . . . . . . . . . . . . . . . . . Page 1 Components: . . . . . . . . . . . . . . . . . . . . . . . . . . . . . . . . . . . . . . . . . . . . . . . Page 2 Evaporator and Auger. . . . . . . . . . . . . . . . . . . . . . . . . . . . . . . . . . . . . . . . . . . Page 3 Control System . . . . . . . .
SCN60 Service Components: • Refrigeration system, including air cooled • • • • • condenser, compressor, capillary tube and evaporator. Control system, including ice level sensor, water sensor, auger motor sensor, controller, control pad and transformer. Auger drive system, including auger motor, gear reducer and auger. Auger support system, including top bearing and water seal. Water system, including the float and reservoir. Storage system, including ice storage bin, drain and door.
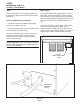
SCN60 Service Evaporator and Auger Bearing Ice Outlet Foam Insulation Auger Heat Exchange Tube Coil Rotating Half of Water Seal Water Inlet Stationary Half of Water Seal Cut Away View May 2011 Page 3
SCN60 Service Control System The control system operates the machine. The controller operates on 12 volts AC, supplied by the transformer. It uses an ultrasonic ice sensor to measure ice level. The ultrasonic system transmits sound waves into the ice storage bin and measures the return time, when the return time is longer than the preset time for bin full, the controller switches the ice machine to an ice making mode. During ice making the compressor, fan motor and auger motor are operating.
SCN60 Service Water System The auger is driven at about 11 RPM by the gear reducer. The gear reducer is a sealed component and does not require lubrication, as it contains a charge of grease. The auger motor drives a set of gears that all together reduce the motor speed to the 11 RPM output speed and correspondingly increasing the torque. The output shaft of the gear reducer is hollow to accept the square end of the auger. The auger is one of the key components in this product.
SCN60 Service Storage The ice storage system is made up of a plastic lined ice storage bin, covered by an insulated top panel and an insulated swing open door with gasket. The ice storage bin is foamed in place, so the side panels are not removable.
SCN60 Service Performance and Technical Specs Overall: • • • • • • • • • • Light Blink Information Refrigerant: 4.
SCN60 Service Electrical Sequence Upon power being supplied, all the lights will blink once and the control system will immediately check for water in the reservoir. If there is water no further action will occur until the On/Off button is pushed. Pushing the On/Off button starts the machine. The Ice Making light will switch on. The auger motor, compressor and fan will begin to operate.
SCN60 Service Service Diagnosis Problem Likely Cause Probable Solution No power Plug unit into power supply Unit switched off Push and release on/off button No water, water diagnostic light is on Restore water supply, check sensor. If RO water is too pure, unit cannot operate. Check float valve for restriction Check float valve shut off lever position No ice Compressor on, fan on, auger motor not operating Check auger motor for voltage, if none, replace controller.
SCN60 Service Service Diagnosis Problem Likely Cause Probable Solution Ice level sensor failure With power on and Ice Making light on, check connector, if secure jump the two middle pins at J2 (bin stat) on the controller together. Unit should start. If it does, replace the sensor, if not, replace the controller. No ice, continued Auger motor on but compressor and fan motor are off.
SCN60 Service Component Diagnostics Membrane Switch Pump Switch - Pump model only Unplug and check connector pins (left side is pin 1), read about 10 ohms when activating the button, and OL when not pressing the button: Pin 2-3 On/Off Switch; 4-3 Clean Reset Switch The pump switch activates the pump based on pressure to it from water inside the drain hose to the pump inlet. It is normally open. When pressure increases the switch closes, turning on the pump motor until the pressure falls.
SCN60 Service Ice Capacity The rate of ice making is relatively fixed, it depends Noise upon the heat load and the ambient temperature the machine is operating in. As either increase the Normal ice making produces very little noise; there amount of ice made will decrease. will be sound from the compressor, fan and auger drive motor. If there is a drain pump it will cycle The machine will work to keep the ice bin full. A full occasionally too.
SCN60 Service Removal and Replacement Component Access Evaporator construction The machine is designed to be cleaned while built in. See the Maintenance section for more information. The evaporator is made up of a stainless steel tube, wrapped with a coil of copper and then heavily insulated. There is no refrigerant path to the water inside of the evaporator. The inside of the tube is polished and rifled with12 vertical grooves that help guide the ice straight up the tube.
SCN60 Service SCN60 Gearbox Access & Removal 1. Shut off water supply 2. Remove drain plug inside bin compartment 3. Disconnect power supply or unplug unit 10. Lift and remove ice chute 11. Remove 4 screws securing float reservoir & set aside 12. Remove gray water tube from evaporator inlet 13. Disconnect power connection to auger motor 14. Remove 4 bolts securing breaker head to freezer by using ¼” allen wrench (socket type - best method) Hazard of Electrical Shock.
SCN60 Service 15. Remove breaker & set aside 16. Pull auger from freezer by lifting straight up (be careful as auger has sharp edges!) 20. Carefully lift and rest gearbox & bracket against back of compartment lip 21. Remove four 5/32” allen head screws holding adapter to evaporator 22. Remove evaporator from gearbox Note: If auger does not lift freely, see Auger Removal Procedure. 17. Inspect auger flights for signs of wear 18. Inspect evaporator barrel for signs of radial scoring 19.
SCN60 Service Water Seal Replacement 1 Go through the prior steps to remove the gear reducer. 2 Remove rotating half of water seal from bottom of auger. 7 Lubricate or moisten the outer edge of the new seal and push it into the bottom of the evaporator tube until flush with the bottom of the tube. Be sure it is in as straight as possible. Note: Do NOT touch the inner ring of the water seal with fingers or sealant. Wipe off with rubbing alcohol if they were touched.
SCN60 Service 13 Slide breaker onto auger shaft. Secure with the original four allen head bolts. 14 Reverse the balance of the steps to complete putting the machine back together. The gear reducer contains no internal serviceable parts. Replace as a unit. Lift breaker off and replace with a new part. Auger Replacement 2 Follow all steps to remove gear reducer from evaporator. 3 Remove bolts holding gear reducer to mounting plate. 4 7 Note: Be sure auger shaft is smooth and un damaged.
SCN60 Service Evaporator Replacement 1 2 3 4 4 Add temporary refrigeration system access valves to the discharge and suction sides of the 5 refrigeration system . 6 Recover the refrigerant. 7 Un-sweat the suction line and cap tube connections from the evaporator. 8 5 Remove original dryer. 6 Attach permanent access valves to system. 7 Attach dry nitrogen to system and purge at about 1 lb pressure while brazing all connections, including access valves, dryer and evaporator.
SCN60 Service Drain Pump (if equipped) 1 Shut off water supply Fan Blade or Motor 2 Remove all ice and/or any standing water. 1 If equipped with drain pump follow all steps to remove pump. 3 Disconnect power or unplug unit 2 Unplug fan motor connection. 4 Uninstall and pull unit out to get access to left side service panel. 3 Remove four screws holding fan motor brackets to shroud. 4 Pull fan blade and motor from unit.
SCN60 Service Compressor replacement. 1 Shut off water supply 14 Remove the compressor from the unit. 2 Disconnect power supply or unplug unit 15 Remove dryer from unit. 3 Uninstall unit and pull out as needed for side and back access. 16 Attach permanent schrader access valves to unit. 4 Remove back panel including drain and power supply panels. 17 Attach dry nitrogen supply to access valves, purge at about 1 lb pressure during brazing. 5 Remove side service panel. 18 Install new dryer.
SCN60 Service Bin and Cabinet The bin and cabinet can be separated from the 17 Lift bin and cabinet off chassis. base. Either the ice making evaporator system must be lifted out and securely suspended or the Auger Motor or Motor Capacitor refrigeration system opened and the connections to the evaporator unbrazed. 1 Remove the unit from its installed position. 1 Remove the unit from its installed position. 2 Disconnect water supply. 2 Disconnect water supply.