
Installation Guide


6
INSTALLATION INSTRUCTIONS
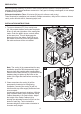
5. To re-install top drawer (E) and bottom drawer
(F). Fully extend lower drawer glide tracks. With
the help of another adult, hold the extended glide
in one hand and the drawer in the other. Gently
place the back of the drawer box into the
metal hook located on the back of the drawer
track. Once the glide hook has been slide into
the hole in the back of the drawer box, gently
lower the drawer box down onto the extended
glide tracks. At the same time depress both of
the glide handles and allow the drawer box to
fully rest on the glide tracks. Test to see if the
drawer box is fully engaged. If the drawer box
can still be lifted off the glide track then start
again from the beginning. Never force
anything or else damage to the drawer or
glide hardware could result. Repeat for
remaining drawers. The drawers location can
be adjusted slightly up or down by twisting the
adjuster knob next to the glide handles.
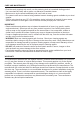
6. Apply silicone caulk (not included) to unpolished
side and bottom of backsplash (C). Position
backsplash (C) on top (B) and against wall.
Clean any excess caulk before allowing
to dry.
Assembly is now complete. Install desired
faucet and drain assemblies (neither included)
per the manufacturers’ instructions to complete
the installation.
5
3
2
1
2
2
6
1
C
B