TM Durham Bathroom Floor Cabinet 24-IN Floor Cabinet ( 24-IN W x 18-IN D x 72-IN H) Date Purchased _______________________ Questions, problems, missing parts? Before returning to your retailer, call our customer service department at 1-855-571-1044 9 a.m. - 5 p.m., EST, Monday-Friday. www.greentouchhome.
TM MODEL NUMBER DESCRIPTION 1328FC-24-220 1328FC-24-236 1328FC-24-241 1328FC-24-242 24" Chocolate Finish Floor Cabinet 24" Espresso Finish Floor Cabinet 24" White Oak Finish Floor Cabinet 24" Light Gray Finish Floor Cabinet 2
PACKAGE CONTENTS PART A B F Wall Mounting Spacer Bar (preassembled to Cabinet (A)) 1 C Left Door (preassembled to Cabinet (A)) 1 D Right Door (preassembled to Cabinet (A)) 1 E Drawer (preassembled to Cabinet (A)) 1 F G Top Shelf Bottom Shelf 2 1 D G C E HARDWARE CONTENTS AA Cabinet QUANTITY 1 B F A DESCRIPTION BB Shelf pin Qty.12 Touch-up pen Qty.
SAFETY INFORMATION Please read and understand this entire manual before attempting to assemble, operate or install this product. WARNING • Some steps are more easily handled with two adults. CAUTION • Before installation, carefully use scissors or utility knife to cut and unwrap all parts. Make sure you DO NOT discard the hardware. • Use care when installing your new floor cabinet; take your time and follow the installation instructions closely. KEEP THESE INSTRUCTIONS FOR FUTURE REFERENCE.
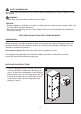
INSTALLATION INSTRUCTIONS 2. Clean area where the cabinet (A) will be permanently located prior to beginning installation, ensuring the cabinet (A) will not interfere with any plumbing or electrical lines once mounted. Locate wall studs and mark locations. With the help of another adult, place completed cabinet assembly to its final location. Adjust the height of the cabinet (A) by twisting the adjustable leveler foot pins on the bottom of each leg.
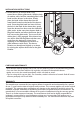
INSTALLATION INSTRUCTIONS 4. If you need to adjust the doors, do so in the following manner. To adjust door up or down, loosen screws (a) on both hinges, adjust door, and retighten screws. To adjust door left or right, turn screws (b) on both hinges, in or out. To adjust door in or out, loosen screws (c) on both hinges, adjust door, and retighten screws. 4 2 2 2 2 2 2 1 3 a 1 a 1 5. To remove drawer (E) preassembled in cabinet (A), fully extend drawer.
INSTALLATION INSTRUCTIONS 6. Locate drawer (E) and set aside. Fully extend lower drawer glide tracks. With the help of another adult, hold the extended glide in one hand and the drawer in the other. Gently place the back of the drawer box into the metal hook located on the back of the drawer track. Once the glide hook has been slid into the hole in the back of the drawer box, gently lower the drawer box down onto the extended glide tracks.
REPLACEMENT PARTS LIST FOR 1328FC-24-220 For replacement parts, call our customer service department at 1-855-571-1044, 9 a.m. 5 p.m., EST, Monday - Friday.
REPLACEMENT PARTS LIST FOR 1328FC-24-236 For replacement parts, call our customer service department at 1-855-571-1044, 9 a.m. 5 p.m., EST, Monday - Friday.
REPLACEMENT PARTS LIST FOR 1328FC-24-241 For replacement parts, call our customer service department at 1-855-571-1044, 9 a.m. 5 p.m., EST, Monday - Friday.
REPLACEMENT PARTS LIST FOR 1328FC-24-242 For replacement parts, call our customer service department at 1-855-571-1044, 9 a.m. 5 p.m., EST, Monday - Friday.