TM Roveland Bathroom Floor Cabinet 24-in Floor Cabinet ( 24-IN W x 16-IN D x 72-IN H) Date Purchased _______________________ Questions, problems, missing parts? Before returning to your retailer, call our customer service department at 1-855-571-1044 9 a.m. - 5 p.m., EST, Monday-Friday. www.greentouchhome.
TM MODEL NUMBER DESCRIPTION 2026FC-24-200 2026FC-24-201 2026FC-24-202 2026FC-24-205 2026FC-24-242 24" Dark Gray Finish Floor Cabinet 24" White Finish Floor Cabinet 24" Mahogany Finish Floor Cabinet 24" Black Oak Finish Floor Cabinet 24" Light Gray Finish Floor Cabinet 2
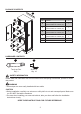
PACKAGE CONTENTS B PART C F G F A D DESCRIPTION QUANTITY A Cabinet 1 B Wall Mounting Spacer Bar (preassembled to Cabinet (A)) 1 C Upper Door (preassembled to Cabinet (A)) 1 D Drawer (preassembled to Cabinet (A)) 1 E Lower Door (preassembled to Cabinet (A)) F G Shelf Wood Door Panel 1 4 1 F E F HARDWARE CONTENTS AA BB Touch-up Pen Qty. 1 Shelf Pin Qty.
PREPARATION Before beginning assembly of product, make sure all parts are present. Compare parts with package contents list and hardware contents list. If any part is missing or damaged, do not attempt to assemble the product. Estimated Assembly Time: 20 minutes (24 hours for adhesive to dry). Tools Required for Assembly (not included): Phillips screwdriver, utility knife or scissors, adhesive, power drill with drill bit and measuring tape. INSTALLATION INSTRUCTIONS 1 2 1.
INSTALLATION INSTRUCTIONS 3. Insert shelf pins (BB) at desired height, ensuring they are level. Place shelves (F) on top of shelf pins (BB). 3 1 BB 2 F Hardware Used BB 2 F Shelf Pin x 16 2 F F 2 4. If you need to adjust the doors, do so in the following manner. To adjust door up or down, loosen screws (a) on both hinges, adjust door, and retighten screws. To adjust door left or right, turn screws (b) on both hinges, in or out.
INSTALLATION INSTRUCTIONS 5 5. To remove drawer (D) preassembled in cabinet (A), fully extend drawer. Locate plastic levers under drawer box on metal glide tracks at left and right sides of drawer box. To disengage drawer box from glides, push on plastic levers. Then, gently lift drawer up to remove it from cabinet (A). A D 6. Locate drawer (D) and set aside. Fully extend lower drawer glide tracks. With the help of another adult, hold the extended glide in one hand and the drawer in the other.
CHANGE DOOR PANELS (OPTIONAL) Note: The pre-installed glass door panels can be switched out with the included wood door panels (G). 1. Remove the silicone trim along the outer edges of the glass panel on the inside of the door. Startat a corner and pull to remove the four pieces. Be careful not to damage the silicone trim as it will be used to secure the new panel. 2. Remove the glass panel from the door frame, then insert the included wood door panel (G). 3.
REPLACEMENT PARTS LIST FOR 2026FC-24-200 For replacement parts, call our customer service department at 1-855-571-1044, 9 a.m. - 5 p.m., EST, Monday - Friday.
REPLACEMENT PARTS LIST FOR 2026FC-24-201 For replacement parts, call our customer service department at 1-855-571-1044, 9 a.m. - 5 p.m., EST, Monday - Friday.
REPLACEMENT PARTS LIST FOR 2026FC-24-202 For replacement parts, call our customer service department at 1-855-571-1044, 9 a.m. - 5 p.m., EST, Monday - Friday.
REPLACEMENT PARTS LIST FOR 2026FC-24-205 For replacement parts, call our customer service department at 1-855-571-1044, 9 a.m. - 5 p.m., EST, Monday - Friday.
REPLACEMENT PARTS LIST FOR 2026FC-24-242 For replacement parts, call our customer service department at 1-855-571-1044, 9 a.m. - 5 p.m., EST, Monday - Friday.