
Instruction manual


GB-2
12
3
4
5
7
6
8
10
9
11
12
13
19
18
17
16
15
14
1213 11
10
9
1234567 8
PACKAGE INCLUDES:
1. Alarm clock radio
2. AC/ DC adapter
3. Instruction manual
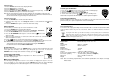
LOCATION OF CONTROLS
1. HOUR/DAY, AL ON/MODE button
2. TIME button
3. TEMP button (temperature)
4. DATE button
5. MIN/MONTH button
6. ALARM button
7. TUNING dial
8. Speaker
9. FM antenna wire
10. DC IN 6V jack
11.
Headphones jack
12. Radio on LED indicator
13.
button
14. VOLUME dial
15. COLOR button
16. Clock back up battery compartment
17. Temperature sensor
18. Multi-color LCD display
19. SNOOZE button
LCD DISPLAY
1. Buzzer alarm indicator
2. SNOOZE indicator
3. MONTH
4. Month /Temperature value
5. DAY
6. Day (01,…,31)
7. Temperature in °C: degrees Celsius
8. Minutes
9. Seconds indicator (flashes once per second)
10. Hours
11. AM / PM indication for 12-hour clock display
12. Back up battery indicator
13. Alarm indicator
GB-3
INSTALLING THE BATTERY
Installing the clock back up battery
Clock back up
The clock and alarm time can be maintained against power failure with a 3V lithium battery (not
supplied). In the event of power failure, the clock time will still run and the clock back-up battery
indicator “ ” is displayed, but without the display backlight. During power interruption, the clock
time may gain or lose a few minutes per hour and may require resetting.
Battery insertion
1. Open the battery compartment on the bottom of the unit by pushing and rotating
anticlockwise.
2. Insert a 3V lithium battery (CR2025 or equivalent) into the battery compartment, following the
correct polarities marked inside the battery compartment.
3. Replace the battery cover by pushing and rotating clockwise.
Note: For optimum performance, the battery should be replaced every 6 months.
Precautions when using batteries
1. CAUTION: Danger of explosion if battery is incorrectly replaced. Replace only with the same
or equivalent type.
2.Ensure that you follow the correct polarities when installing the battery as indicated in the
battery compartment. Reversed batteries may cause damage to the unit.
3. Exhausted batteries must be removed to prevent possible battery leakage.
4. Dispose of batteries properly according to environmental regulations.
Notes on the clock back up battery
Please note that this unit will not operate fully by battery power alone. The batteries provide a
back up system only in the event of an interruption of the AC power supply.
OPERATING INSTRUCTIONS
Connecting the power supply
Insert the AC/DC adapter plug into the AC mains outlet with a 230V AC ~ 50Hz power source
and the other end into the DC IN 6V jack at the back of the unit. The unit goes to standby mode
and the clock starts to run.
Clock and Alarm time setting
Select 24-hour or 12-hour clock display
The 24-hour clock display is the default setting. Press and hold down the TIME button to select
the 12-hour clock display and “AM” or “PM” will be indicated on the display. Press and hold the
TIME button again to select the 24-hour clock display.
Setting the clock
1. Press the TIME button and the clock time display will flash.
2. Press the HOUR button to set the hours.
3. Press the MIN button to set the minutes.
4. Press and hold down the HOUR or MIN button to quickly change the hours or
minutes.
5. Press the TIME button again to confirm the time setting.