
User manual


GB-3
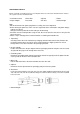
UNPACKING THE BOX
Before you begin assembly, please be sure all parts and accessories have arrived intact. In order to
do so, please use the check list below:
* Instruction manual * RCA cable * Slipmat * Platter
* 45rpm adaptor * Headshell * AC cord * Counterweight
Note:
* Do not connect the AC power plug before assembly has been completed.
* Before turning the power on, make sure once again that all the connections and power voltage
settings are correct.
Always turn off the power when connecting or disconnecting
* Read this manual carefully before using the unit. Be sure to store the manual in a safe place for
future reference.
* Attach a stylus cartridge to the headshell before assembling the turntable unit
.
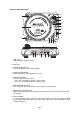
1. Unpacking:
Carefully remove the main unit with the packaging material intact from the box. Remove the
packaging material once the unit has been removed from the shipping carton. Be sure to
identify all the accessories located in the packaging material.
2. 45 rpm adaptor
Locate and remove the 45 rpm adapter from the packaging material and place it in the cut out
designed for this purpose on the top of the main unit.
3. Turntable platter:
Remove the turntable platter from the packaging material and gently insert the platter into the
center spindle on the base of the turntable unit.
4. Drive hub:
Pull the belt to the lower side of the turntable over the drive hub.
5. Slipmat:
Remove the black slipmat from the packaging and place it on the platter.
6. Headshell:
Insert the headshell into the front end of the tone arm. While holding headshell firmly onto the front
end of the tone arm, turn the headshell locking nut counterclockwise to firmly secure the headshell
to the tone arm
.
7. Counterweight: