
Instruction manual
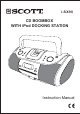


Remote control
1
4
5
6
8
9
2
3
7
10
11
12
14
15
18
17
16
13
19
20
21
1. MUTE
2.
ON/STANDBY
3. MEM/CLK SET / MENU/PROG
4. DISP (Display)
5. SHUFFLE
6. TIMER
7. SLEEP
8. ALBUM /
9. CHAPTER +/-
10. REPEAT/M-DN (Memory Down)
11. STOP/BAND
12. iPod mode
13. EJECT
14. MENU /
15. FUNCTION
16.
/ REW/FWD, TUNE DN/UP
17. SELECT button
18. EQ (Equalizer) 20. VOLUME /
19. PLAYLIST +/– 21. PLAY/PAUSE / MEM-UP+ (Memory +)
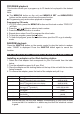
POWER SUPPLY
Using AC power supply
Insert the AC power cord into the AC mains outlet with a 230V AC ~ 50Hz power
source and the other end to the AC IN ~ socket at the back of the unit.
Using batteries
1. Open the battery compartment.
2. Insert 8 x UM2/ “C” size batteries (not supplied) with the polarities (+/-)
matching the engraved markings in the battery compartment. Reversed
batteries may damage the unit.
3. Close the battery compartment.
Using DC IN 12V
Connect the DC IN 12V jack on the unit to the ciger-lighter in your car
using a ciger-lighter adapter (not supplied).
Note:
When AC power is supplied, the battery power is cut off automatically.
When a power failure or interruption occurs and the unit does not have
batteries installed, the time and preset memories will be backed up for
about a minute.
GB-
3