SAFETY LASER: CLASS 1 LASER PRODUCT Type: Wavelength: Output Power: Beam Divergence: Dual semiconductor laser GaAIAs 650nm and 780nm 7mW 60 degrees INVISIBLE LASER RADIATION WHEN OPEN OR INTERLOCK FAILED OR DEFEATED. WARNINGS: DO NOT STARE INTO BEAM. Avoid direct exposure to laser beam. To prevent direct exposure to the laser beam, do not try to open the enclosure.
WICHTIGE SICHERHEITSBESTIMMUNGEN IMPORTANT SAFETY INSTRUCTIONS CAUTION: Read and observe all warnings and instructions in this user guide and those marked on your unit. Retain this guide for future reference. This unit has been designed and manufactured in a way that ensures your personal safety. Improper use can result in electric shock or fire hazard. The safeguards incorporated in this unit will protect you if you observe the following procedures for installation, use, and servicing.
CONTENTS SAFETY--------------------------------------------------------------------------------------------------------------------------------------------------1 IMPORTANT SAFETY INSTRUCTIONS------------------------------------------------------------------------------------------------------2 BOX CONTENTS-------------------------------------------------------------------------------------------------------------------------------------3 FRONT, TOP AND BACK PANEL--------------------------------------------
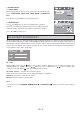
Back panel 10 11 3 7 6 9 52 8 4 1. Power cord (AC~) 2. SCART OUTPUT socket 3. FM antenna output (FM 75 ohm) 4. POWER ON/OFF switch 5. Video output 6. Connector for AM loop antenna 7. AUX IN jack 8. HDMI output 9. Audio input L/R 10. Earphones jack 11. USB port Note: First remove the cover to gain access to the back panel CONNECTIONS Connecting to the TV The way in which the main unit is connected and the kinds of cables used can make a noticeable difference in picture quality.
REMOTE CONTROL 6. 12 13 6 22 21 22 19 18 15 4 16 7 8. 9. 10. 17 20 11. 7. 2 25 24 8 26 9 14 29 5 1. 2. 3. 4. 5. 12. 3 23 10 27 11 28 (standby): Switch the unit on or place it in standby mode. 0 - 9 (number keys): In DVD/VCD/CD mode, use these buttons to enter the title, chapter, track and time search selections. In radio mode, use these buttons to enter a preset station. TITLE: Display the title menu if available on the DVD disc. 3D : Display the 3D sound menu.
GETTING STARTED & BASIC SETUP GETTING STARTED Power supply for the unit 1. Carry out the connections for the unit as shown in “CONNECTIONS”. 2. Insert 2 AAA batteries (supplied) into the battery compartment in the remote control, taking care to follow the correct polarities. 3. Connect the power cord to an AC mains outlet. Set the power ON/OFF switch located at the back of the unit button on the unit or on the remote control to turn on the unit.
2. Press 3. 4. 5. Press or to select a new setting, then press OK to confirm the new setting. Repeat steps 1 to 3 to change any settings. Press the SETUP button to exit setup. For more details, please refer to the next chapters. or to select different settings in a menu. Press or OK to confirm the setting. 1. SYSTEM SETUP 1.1 “SCREEN SAVER” Use this setting to turn the screen saver option on or off.
2. LANGUAGE SETUP You can select different languages for the setup menu. You can also select different languages for the audio, subtitles, and disc menu, according to the languages available on the DVD. 2.1 OSD LANGUAGE Select the on screen display language. 2.2 AUDIO LANG Select the audio language. 2.3 SUBTITLE LANG Select the language for the subtitles displayed on the TV screen. 2.4 MENU LANG Select the disc menu language. 3. VIDEO SETUP 3.
5. SPEAKER SETUP 5.1 VOCAL MODE When playing karaoke discs, you can select one of the following vocal effects: VOCAL NONE, VOCAL LEFT, VOCAL RIGHT and VOCAL ALL. Note: This function is not available for some karaoke discs. 5.2 SPEAKER TEST Press to highlight an icon, the corresponding name (speaker 1, ... speaker 6 or subwoofer) is displayed and a test tone will be produced from that speaker. Repeat the procedure to test the other speakers. Press or OK to exit the test.
PLAYING DVD / CD / VCD DISCS 1. • 2. • 3. • • 4. • • • 5. • • 6. • 7. • 8. • • • 9. • (Open / Close) Note: Load the disc on the disc slot with disc label facing upwards. The unit will start playback automatically. Press the button to eject the disc. (Play/Pause) Press to start or pause playback. (Backward / Forward Search, Slow Motion) Press to search backward or forward. Press to resume normal playback speed.
PBC (VCD/SVCD) When a VCD/SVCD is playing, press ANGLE/PBC repeatedly to switch between PBC ON and OFF. If PBC ON is selected, the disc menu (if available) will appear on the TV. Use the number keys (0-9) to select the options in the menu. • • : [1 2CH ] 10. AUDIO (select the audio languages available on the disc) During playback, different audio languages can be selected. • When a disc is playing, press AUDIO/FM ST to show the current audio language.
3. · · Programming playback Contents of the disc can be played in a selected order. Press the PLAYMODE button. or to select “PROG” mode. When “MODE” is highlighted, use Then press OK to confirm. Note: During VCD/SVCD playback, the function is only available when PBC is OFF. 3.1. DVD Programming · · · · (2 digit format, e.g. 01). Use the Enter the title numbers in buttons to highlight the chapter number and enter the chapter numbers in two digits. / Chapter Title , , or to move to another field.
Note: · The A-B repeat function can only be used within the same title or track. If points A and B are defined · in different titles or tracks, A-B repeat is cancelled. 6. · · VCD/SVCD playback control While a VCD / SVCD is playing, press ANGLE/ PBC repeatedly to switch PBC (Playback Control) on or off. If PBC ON is selected, the disc menu (if available) will appear on the TV. Use / or the number keys (09) to select an option. Press MENU to return to the disc menu when PBC is on. 7.
Selection Menu The selection menu will appear when MP3/ WMA/JPEG/MPEG4 files are read. All the folders will appear on the left hand menu and will be numbered in ascending order. When one of the folders is highlighted, all the contents of the folder will be displayed on the right side of the menu. You can display one type of file (music, pictures or films). Use the navigation keys to highlight the icon corresponding to the type of file that you would like to select (music, image or film).
• • • • • • • • In the START menu, you can check the total tracks, total time and total size that you want to record. Press OK to start playing and encoding the selected tracks. The track progress bar and total progress bar will display on the screen indicating the encoding progress. During encoding, highlight “CHANGE SPEED” and press OK to change the encoding speed. If you select the encoding speed 4X, the sound will be muted. Highlight “CANCEL” and press “O K ” to stop encoding.
TROUBLESHOOTING GUIDE If it appears that the unit is faulty, first consult this checklist. It may be that something simple has been overlooked. Note: Under no circumstances should you try to repair the unit yourself as this will void the warranty. Only qualified service personnel should remove the cover or service this unit. NO POWER · Check that the player is switched on. · Check if the power cord is properly connected. · Check the position of the ON/OFF switch NO PICTURE · Check if the TV is switched on.
TECHNICAL SPECIFICATIONS Power supply Max power Consumption Standby power consumption Speaker output (RMS) / impedance Subwoofer output (RMS) / impedance Discs and files supported AC 230V ~ 50 Hz 120 Watt 0.54 Watt 6x 5 W/8 Ohm 30 W/6 Ohm DVD-Video, DVD+R/RW DVD-R/RW, CD-DA, CD-R/RW, MP3, JPEG, VCD2.0, MPEG 4, Xvid (.avi) The zone this player can play discs from zone “2”. must be marked on the DVD disc This indication label.