Deutsch Français English User Guide SmartTRAK ® SWISS MADE BY UWATEC AG
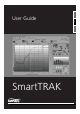
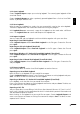
Dive window Dive information panel Dive profile panel Dive computer display Tissue panel Alarm symbols Physiology panel Notes panel Dive table 2 UWATEC® SmartTRAK
List of chapters 4 2. Menu Description . . . . . . . . . . . . . . . . 4 2.1 Logbook . . . . . . . . . . . . . 2.1.1 New Logbook . . . . . . 2.1.2 Open Logbook . . . . . . 2.1.3 Save Logbook . . . . . . 2.1.4 Import Logbook . . . . . 2.1.5 Export Logbook . . . . . 2.1.6 Renumber Logbook . . 2.1.7 Print . . . . . . . . . . . . . . . . . . . . . . . . . . . . . . . . . . . . . . . . . . . . . . . . . . . . . . . . . . . . . . . . . . . . . . . . . . . . . . . . . . . . . 4 4 5 5 5 5 6 6 2.
1. Introduction SmartTRAK is an advanced tool for keeping track of your dives. With SmartTRAK you can: • Keep a dive log at your computer containing information about your dives. • See the depth, temperature and workload variations of your dive. • See how the relative gas saturation varies in different tissues during the dive. • Print your logbook. • Generate statistics about your dive. • Set different criteria for the dives to be displayed with SmartTRAK’s advanced dive select feature.
Choose Logbook/Reopen to select a previously opened logbook from a list that SmartTRAK creates as you open different files. 2.1.3 Save Logbook When changes to a logbook are made, they are automatically saved to the active logbook. Therefore a logbook does not need to be saved when exiting the program. With Logbook/Save as.. command, a copy of the logbook can be saved under a different name. The Logbook/Save as.. command compacts the logbook too. 2.1.
Exporting an Excel file You can export dive profile(s) into a new or existing Excel file. Each dive profile is saved to a separate sheet. The sheet includes the following columns: dive time, depth, temperature, tank pressure (gas integrated computers only) and RBT (gas integrated computers only). Note: if a sheet with the same name exists already in the Excel workbook, it will be replaced with the exported sheet and all the old data on the sheet will be lost.
Printing a logbook Select Logbook. Only the columns which are visible in the Dive table window will be printed. If not all columns fit on the paper, the rightmost ones are left out. The printed column widths can be adjusted by adjusting column widths on the Dive table window. Printing the statistics for dives Select Statistics. Select the kind of statistics you would like to print by checking the appropriate statistics types.
Transferring new dives Press Dives/Transfer to bring up the transfer window. Choose Only new dives to transfer new dives only. Transferring all dives Press Dives/Transfer to bring up the transfer window. Choose All dives to transfer all dives in the dive computer. You can use the dive template (section 2.2.9) to define a default buddy, gear, type, activity and fish when the dive is created. Discard dives shallower than You can select this option and define a minimum depth for transferred dives.
Select the directory and logbook name from which to load the dives, then select the dive number. You can add as many profiles to your graph as you like. If there is an offset in the starting time, you can shift the partner profile with the help of the ‘Shift profile’ panel buttons. Note that your partner’s profile is not saved in the logbook. 2.2.6 Clear Partner Profile Choose this option to remove the last inserted partner profile.
2.2.9 Dive Template The dive template lets you define a dive from which settings are copied whenever you insert a new dive or you transfer dives from the dive computer. Following settings are copied: • Dive site information: location, site, etc. • Conditions / Weather • Conditions / Surface • Conditions / Air Temperature • Conditions / Underwater • Conditions / Visibility • Gear / Weight • Gear / Suit • Tank information: size, type, etc.
You can also configure the dive Profile Cursor (vertical line, cross or diver) and change the background colour of the dive window or the dive profile cursor colour. Changing the cursor colour The leftmost colour button is for changing the Cursor Colour. The cursor colour can be changed only for the vertical line and for the cross cursor, not for the diver cursor. Both cursors will have the new colour.
2.3.3 Show Temperature Profile/Show Workload Profile This option allows you to toggle between the two profiles on the display. 2.3.4 Dive Computer Settings Via the Options/Dive Computer Settings window you can change many of the settings in the dive computer and read the ID and version numbers. You can access this window only if you have established an IrDA connection between your dive computer and PC (section 5.2).
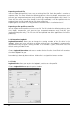
Parameter Meaning Metric or imperial units This changes the dive computer pressure units (bar or psi), depth units (meters or feet) and the temperature (Celsius or Fahrenheit). Attention beeps You can turn all the warning sounds on and off together or set some specific warnings on and off individually. Premix reset after You can set the time after which the dive computer automatically resets the oxygen fraction back to 21%.
Parameter Meaning Safety stop duration Duration of user activated safety stop at depth less than 6.5m/20ft. O2 mixture for tanks 1, 2 and D O2 percentage of gases used. Max. ppO2 for tanks 1, 2 and D The maximum allowed partial pressure of oxygen for each gas. Delete pairing for tanks 1, 2 and D Deletes pairing with the transmitters. Display contrast Allows to change the contrast on the display. Water type Allows to choose between fresh water and salt water calibration.
3. Dive List Window 3.1 Displaying Dives Use one of the following methods to display a dive: Using a wheel mouse You can move from dive to dive by scrolling the mouse wheel. Using the dive logbook You can move from dive to dive with the arrow keys. By holding Control key down and pressing up or down arrow, you can move to first or last dive. You can also use the mouse. To display a particular dive with the mouse, simply click the dive.
Adjusting the width of columns The width of each column can be adjusted by placing the cursor at the right edge of the column header. The standard cursor changes to vertical bar cursor. Click the header with the left mouse button and hold the button down while stretching the right edge of the column to the desired width. Setting which columns to show Right click over the grid to invoke a pop-up menu in which you can activate or deactivate the columns. 3.
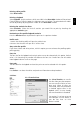
English 4.1 Dive Information Panel The top panel is called the dive information panel. It shows the following information: • number of dive • date of dive • dive site • dive location • MB-level during the dive • altitude class • buddies • weather and conditions • gear • tank data • type of dive • dive computer buzzer To update the information on the information panel, the edit window can be opened by clicking the icons or editable data on the panel.
Delete marker A marker can be deleted by pressing the right mouse button over the text and selecting Marker and then Delete from the pop-up menu. 4.3 Adding Remarks to the Dive You can write and edit remarks for every dive if the remarks panel is active. The remarks panel can be activated from the layout window or from the dive window pop-up menu. The remarks panel font size can be adjusted from the layout window only. Remarks can be edited on the Edit page too. 4.
4.6 Dive Computer Display The dive computer display shows you the face of the dive computer as it appears during the different stages of the dive. For dive logs imported from DataTrak a default screen is shown. Tank information is displayed only for gas integrated computers. For detailed information about the contents of the display(s), please refer to your dive computer operating manual.
4.8 Physiology Panel This graph shows estimated micro bubble formation (left), estimated skin temperature cooling (middle) and estimated workload (right). For gas integrated computers this panel also shows the gas consumption gauge if the tank has been defined and there is a non-zero tank pressure difference between beginning and end of dive. 4.
4.10 Edit Dive English 4.10.
To add a new location, platform, water or bottom, click with the right mouse button over the location, platform, water or bottom list box to activate a pop-up menu and select Insert from the list. With location and water you will enter the location edit when you press the OK button. There you can add additional data for location and water type. Editing a dive site Choose a dive site from the pull down list.
4.10.4 Buddy The Buddy page lets you keep a list of buddies you are frequently diving with. Adding a buddy Write down the nickname of the buddy to the right and press Add New to add it to the list. Editing a buddy Choose a buddy from the list by clicking on the name. The buddy information will appear to the right. You can update the buddy information by just writing new text on the fields. If you change the nickname, press Change to save the new name.
Adding a new tank to the list To add a new tank, click with the right mouse button over the tank list box to activate a popup menu and select Insert from the list. You can now give a name to the tank and when you press the OK button, the tank edit page will appear. There you can set tank size, tank type, nominal pressure, gas type for this tank and some notes. Editing a tank Choose a tank from the pull down list.
Deleting an activity Choose an activity from the list by clicking on the name. The activity name will appear to the right. Press Delete to delete it from the list. Applying an activity to all dives Choose an activity from the list by clicking on the name. The activity name will appear to the right. Press Apply to apply the same setting (on/off) to all dives. Setting an activity as default Select Set as default activity.
Deleting a fish Choose a fish from the list by clicking on the name. The fish name will appear to the right. Press Delete to delete it from the list. Adding a picture Choose a fish from the list by clicking on the name. The fish name will appear to the right. Press the Load Image button or click with the right mouse button over the picture area to open the Open Picture dialog. Adding dive specific information You can add some specific details for each fish related with the active dive.
6. FAQ / Troubleshooting Question 1: What does it mean when the tissues are up to 100 %? I have noticed that the colour is neither red nor green, as usual, but purple. Answer: The purple colour indicates that the tissues are saturated over 100 % and there is an increased risk of decompression sickness. If you have not followed instructed decompression stops, you might see this happen. Question 2: My pictures are not showing up in the dive window or in the edit window.
SCUBAPRO UWATEC Americas (USA/Canada/Latin America) 1166 Fesler Street El Cajon, CA 92020 USA t: +1 619 402 1023 f: +1 619 402 1554 www.scubapro.com SCUBAPRO UWATEC France Les Terriers Nord 175 Allée Belle Vue F-06600 Antibes t: +33 (0) 4 92 91 30 30 f: +33 (0) 4 92 91 30 31 www.scubapro-uwatec.com SCUBAPRO UWATEC Asia Pacific 1208 Block A, MP Industrial Center 18 Ka Yip St. Chai Wan Hong Kong t: +852 2556 7338 f: +852 2898 9872 www.scubaproasiapacific.