Thank you for purchasing our Studio Designs, Inc. Gracias por comprar nuestro mueble Studio Designs, Inc. Merci d’avoir acheté un meuble Studio Designs, Inc.
ASSEMBLY INSTRUCTIONS - IMPORTANT: Carefully unpack and identify each component before attempting to assemble. Refer to parts list. Please take care when assembling the unit and always set the parts on a clean, soft surface. If you require any assistance with assembly, parts, or information on other products, please visit our website: www.studiodesigns.com or call or write us. Check screws, nuts and bolts periodically (or every 6 months). Tighten if necessary. WARNING: Do not use power tools to assemble.
PARTS LIST / LISTA DE PARTES / LISTE DES PIÈCES DÈTACHÉES DESCRIPTION / DESCRIPCIÓN / DESCRIPTION 1. Left Leg QTY / CANT/ QTÉ PICTURE / DIBUJO / IMAGE 1 Pata Izquierda Jambe Gauche 2. Right Leg 1 Para Derecha Jambe Droite 3. Top Frame 1 Marco Superior Cadre Supérieure 4. Center Support Bar 1 Barra de Soporte Central Barre de Soutien Centrale 5. Front Support Bar 1 Barra de Soporte Delantera Barre de Soutien Avant 6.
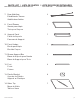
PARTS LIST / LISTA DE PARTES / LISTE DES PIÈCES DÈTACHÉES DESCRIPTION / DESCRIPCIÓN / DESCRIPTION QTY / CANT/ QTÉ 7. Rear Stabilizer Estabilizador Trasero Stabilisateur Arrière 2 8. Pencil Drawer Gaveta para Lápiz Tiroir pour Crayons 1 9. Support Panel Panel de Soporte Panneau de Support 1 10. Pencil Ledge Borde para Lápiz Bord de Crayon 1 11. Drawer Support Bar Barra de Soporte para Gaveta Barre de Support pour Tiroir 2 12. Post Poste Poteau 4 13.
PARTS LIST / LISTA DE PARTES / LISTE DES PIÈCES DÈTACHÉES DESCRIPTION / DESCRIPCIÓN / DESCRIPTION 15. Angle Adjustment Bracket QTY / CANT/ QTÉ PICTURE / DIBUJO / IMAGE 1 Soporte de Ajuste del Ángulo Support d’ajustement d’angle 16. Drawer Top 1 Armazón de Cajón Superior Cadre du Tiroir Supérieure 17. Drawer Middle 1 Armazón de Cajón Central Cadre du Tiroir Centrale 18. Drawer 3 Cajón Tiroir 19. Drawer Bottom 1 Armazón de Cajón Inferior Cadre du Tiroir Inférieure 20.
PARTS LIST / LISTA DE PARTES / LISTE DES PIÈCES DÈTACHÉES DESCRIPTION / DESCRIPCIÓN / DESCRIPTION QTY / CANT/ QTÉ 22. Left Slider Deslizador Izquierdo Coulisse à Bille Gauche 1 23. Right Slider Deslizador Derecho Coulisse à Bille Droite 1 24. Allen Bolt - 1/4" x 1/2" Perno Allen - 6mm x 13mm Boulon Allen - 6mm x 13mm 17 25. Allen Bolt - 1/4” x 5/16" Perno Allen - 6mm x 8mm Boulon Allen - 6mm x 8mm 4 26. Connector Bolt - 1-3/8" Perno de Conexión - 35mm Boulon pour Connexion - 35mm 4 27.
PARTS LIST / LISTA DE PARTES / LISTE DES PIÈCES DÈTACHÉES DESCRIPTION / DESCRIPCIÓN / DESCRIPTION QTY / CANT/ QTÉ 31. Phillips Bolt - 3/16" x 1/4" Perno de Cruz - 5mm x 6mm Boulon Cruciforme - 5mm x 6mm 8 32. Allen Bolt - 1/4" x 5/8" Perno Allen - 6mm x 15mm Boulon Allen - 6mm x 15mm 2 33. Allen Wrench Llave Allen Clé Allen 1 34. Hex Wrench - 1/4" Llave Hexagonal - 6mm Clé Hexagonale - 6mm 1 35. Hex Wrench - 3/16" Llave Hexagonal - 5mm Clé Hexagonale - 5mm 1 36.
1 Follow steps to assemble as shown. For reverse drawers, follow steps 1-4, then 5R-8R. Siga pasos para ensamblar como se muestra. Para ensamblar con gavetas inversas, siga pasos 1-4, luego 5R-8R. Suivez les étapes pour assembler comme indiqué. Pour assembler avec tiroir inverse, suivez les étapes 1-4, puis 5R-8R. 2 24 Arrows show the hole position. Flechas indican posición de agujeros. Flèches indiquent la position des trous.
2 Connect both Stabilizers (7) at center, then attach to legs. Conecte ambos Estabilizadores (7) en el centro, y luego fije a las patas. Connecter les deux Stabilisateurs (7) au centre, puis attacher aux jambes. 24 24 24 24 24 30 7 34 37 37 37 37 Futura Craft Station p.
3 Leave Bolts (27) slightly loose. Deje Pernos (27) ligeramente sueltos. Laissez Boulons (27) un peu lâche. 27 15 27 27 27 13 27 27 36 27 13 27 27 27 Futura Craft Station 3 p.
4 32 32 Futura Craft Station p.
5 For reverse drawer assembly, skip steps 5-8, and continue with step 5R. Para ensamblaje con gavetas inversas, omita el paso 5-8, y continúe con paso 5R. Pour l’assemblage avec tiroir inverse, sautez l’étape 5-8, et continuer à l’étape 5R. Install (26) short side up and make sure it’s tight, then install (12), then install (11). Instale (26) lado corto hacia arriba y asegure que quede apretado, luego instale (12), luego instale (11).
6 Attach Left Slider (22) to Support Panel (9), then attach Support Panel (9) to bars. Fije Deslizador Izquierdo (22) al Panel de Soporte (9), luego fije el Panel de Soporte (9) a las barras. Fixer Coulisse Gauche (22) au Panneau de Support (9), puis fixer Panneau de Support (9) aux barres. 9 27 27 31 31 22 39 9 39 38 38 35 Attach rear Bolt (31) using hole indicated, then close Slider and install second Bolt through tab opening.
7 Install Glass Top (14) first. Instale la Mesa de Vidrio (14) primero. Installer la Table de Verre (14) en premier. 14 31 31 29 25 25 29 25 25 Futura Craft Station 31 35 Ridge on the Nut (29) faces down. Cresta en la Tuerca (29) da hacia abajo. Arête sur l’Écrou (29) vers le bas. 31 8 Holes in Drawer (8) are closer to the front - see arrows. Agujeros en Gaveta (8) están cercas al frente - vea flechas. Trous dans Tiroir (8) sont plus proches de l’avant - voir flèches. p.
8 LAST STEP / ÚLTIMO PASO / DERNIÈRE ÉTAPE Install Trays, then tighten Bolts from step 3. Instale Bandejas, luego apriete Pernos de paso 3. Installer Plateaux, puis serrer Boulons de l’étape 3. 21 20 21 20 10 27 Leave Bolts (27) slightly loose. 27 Deje Pernos (27) ligeramente sueltos. Laissez Boulons (27) un peu lâche. 28 18 16 Assemble frame (16, 17, 19), secure with Screws (28), then install 3 Drawers (18).
5R REVERSE DRAWER / GAVETA INVERSA / TIROIR INVERSE Install (26) short side up and make sure it’s tight, then install (12), then install (11). Instale (26) lado corto hacia arriba y asegure que quede apretado, luego instale (12), luego instale (11). Installer (26) côté court vers le haut et assurez-vous qu’il est très serré, puis installer (12), puis installer (11). Two people are recommended. Se recomiendan dos personas. Deux personnes sont recommandées.
6R REVERSE DRAWER / GAVETA INVERSA / TIROIR INVERSE Attach Right Slider (23) to Support Panel (9), then attach Support Panel (9) to bars. Fije Deslizador Derecho (23) al Panel de Soporte (9), luego fije el Panel de Soporte (9) a las barras. Fixer Coulisse Droite (23) au Panneau de Support (9), puis fixer Panneau de Support (9) aux barres. 9 27 27 31 31 23 39 9 39 38 38 34 Attach rear Bolt (31) using hole indicated, then close Slider and install second Bolt through tab opening.
7R REVERSE DRAWER / GAVETA INVERSA / TIROIR INVERSE Install Glass Top (14), then Drawer (8). Instale la Mesa de Vidrio (14), luego Gaveta (8). Installer la Table en Verre (14), puis Tiroir (8). 14 25 25 31 31 29 31 31 25 8 29 25 35 Ridge on the Nut (29) faces down. Cresta en la Tuerca (29) da hacia abajo. Arête sur l’Écrou (29) vers le bas. Holes in Drawer (8) are closer to the front - see arrows. Agujeros en Gaveta (8) están cercas al frente - vea flechas.
8R REVERSE DRAWER / GAVETA INVERSA / TIROIR INVERSE 21 Install Trays, then tighten Bolts from step 3. Instale Bandejas, luego apriete Pernos de paso 3. Installer Plateaux, puis serrer Boulons de l’étape 3. 16 24 20 21 17 19 20 28 18 10 27 Leave Bolts (27) slightly loose. Deje Pernos (27) ligeramente sueltos. 27 Assemble frame (16, 17, 19), secure with Screws (28), then install 3 Drawers (18). Ensamble el marco (16, 17, 19), asegure con Tornillos (28), luego instale 3 Cajones (18).
LIMITED WARRANTY Studio Designs (the “Company”) warrants to the original purchaser that this product will be free from defects in its workmanship and materials, under normal residential use and service conditions, as described herein.