801 Avenida Acaso, Camarillo, Ca. 90312 • (805) 494-0622 • Fax: (805) 494-8861 www.sdcsecurity.com • E-mail: service@sdcsecurity.com E5 Series Installation and Setup Guide P:\Installation Instructions\Access Controls\Inst-E5\INST-E5.
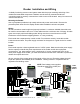
Reader Installation and Wiring A reliably functioning access control system starts with the proper mounting and wiring of the readers and associated components. Readers must be securely mounted and all wire connections must be securely connected and cable runs must be located away from sources of electrical interference. Mounting the Reader: Use any templates provided to help neatly and securely mount each reader.
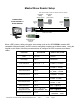
Reader Setup Each reader must have a separate Terminal Address CONNECTING E5P READERS TO CREATE A NETWORKED SYSTEM Front Door Terminal Address 01 Side Door Terminal Address 02 Rear Door Terminal Address 03 TR+ TRGND (-) RS485 from readers D+ D- PC SG RS485/RS232 OR RS485/USB Converter In a networked system, each reader must be assigned a unique Terminal Address Number . The factory default terminal address number of “01”.
Master/Slave Reader Setup Each master reader must have a separate Terminal Address Front Door (Entry) (Master Reader) CONNECTING A SLAVE READER TO AN E5P READER Front Door (Exit) Rear Door (Slave Reader) Terminal Address 01 Terminal Address 02 TR+ TRGND (-) RS485 from readers D+ D- PC SG RS485/RS232 OR RS485/USB Converter When a E5P reader is being used with slave reader (such as the SDC E5PW or another HID compatible Wiegand reader), the E5P must be configured to operate as a Master reader.
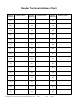
Reader Terminal Address Chart Reader Address Reader Name Reader Address Reader Name Reader Address 01 17 33 02 18 34 03 19 35 04 20 36 05 21 37 06 22 38 07 23 39 08 24 40 09 25 41 10 26 42 11 27 43 12 28 44 13 29 45 14 30 46 15 31 47 16 32 48 P:\Installation Instructions\Access Controls\Inst-E5\INST-E5.
Software Setup Installing the Software: Insert the installation cd provided with the E5P reader. If setup does not begin automatically, Go to My Computer, double-click on the EntryCheck_E5, and double-click on Setup.exe Log In / Logout : To Log in Double-click on the E5 desktop icon shortcut, or Go to Start>All Programs>SDC>E5>Launch E5 Type in the Account & Password, and click “Login” Default Login Credentials: Account: a Password: a To Logout: Press the Exit Button.
Enter Time Zone and Holiday Schedules : Note: If the reader will be active at all times, and all the users will have 24/7 access, you may skip this section. Follow the procedure documented in the SET TIME ZONE PARAMETERS section (Page 3) of the Software Reference Guide to define access schedules for each reader. Follow the steps documented in the HOLIDAY SCHEDULE TABLE section (Page 4) of the Software Reference Guide to define holiday schedules for each reader.
801 Avenida Acaso, Camarillo, Ca. 90312 • (805) 494-0622 • Fax: (805) 494-8861 www.sdcsecurity.com • E-mail: service@sdcsecurity.com E5 Series Software Reference Guide P:\Installation Instructions\Access Controls\Inst-E5\INST-E5.
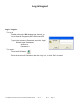
Log in/Logout Log In / Logout : To Log in Double-click on the E5 desktop icon shortcut, or Go to Start>All Programs>SDC>E5>Launch E5 Type in the Account & Password, and click “Login” Default Login Credentials: Account: a Password: a To Logout: Press the Exit Button. Enter the Account & Password, and click “Log out”, or click “Exit” to cancel. P:\Installation Instructions\Access Controls\Inst-E5\INST-E5.
SET SYSTEM PARAMETERS Select System Select Set System Parameters (1-1) Use this menu to set the way that the software communicates to the readers. By selecting Edit you can change the following parameters: Communication Rate : 9600 baud (default) or 19200 baud. Data Format : 7 bits 1 stop bit odd parity (default) or 8 bits 1 stop bit no parity. Language : English (default) Way to Export : No Export (default), To a fixed file, Daily Export, Monthly Export Automatic Execution : Disable (default) or Enable.
SET READER PARAMETERS Select System Select Set Reader Parameters (1-2) The Reader Parameters tab (1-2-1) will be displayed by default. Use this menu to add and delete readers as well as setting their basic operation parameters. Select Add to display the above screen. Enter the following information : Name : Enter a name that describes where the reader is in the building. Location : Where is the system located. Use this field to mark remote locations. Module : Type of reader (Leave as E5).
SET TIME ZONE PARAMETERS Select System Select Set Reader Parameters (1-2) Select a reader from the window on the left, and press Edit Select the Time Zone Table tab (1-2-2) Use this tab to edit general access and special time zone schedules: Zone 1-6 : General time zones that set when access is allowed. Zone 1 is usually used as a 24 hour access time zone. Zone 7-8 : Special zones that are used to automatically unlock the door for extended periods of time.
HOLIDAY SCHEDULE TABLE Select System Select Set Reader Parameters (1-2) Select a reader from the window on the left, and press Edit Select the Holiday Table tab (1-2-3) Double-click on the day that you wish to mark as a holiday. Once selected, the date will turn RED. When you are done, select Save to exit, or Cancel . Note: If you are using the automatic door unlock feature (Zone 7) and do not want the door to unlock on Saturday, you must mark Saturday as a holiday.
UPDATE READER TIME To synchronize all readers to the same time and date : Select System Select Time Correction for Reader (1-3) 1. Set the Region (Time Zone), Date and Time for each Com Port shown. 2. Press Start to begin updating to the readers. All readers that are connected to the chosen com port will be simultaneously updated with the same time and date.
COMPANY PROFILE Select Users Select Company Profile (2-1) Select Edit to enter company profile information. Press Save mode, or Cancel . P:\Installation Instructions\Access Controls\Inst-E5\INST-E5.
DEPARTMENT CODE MAINTENANCE Select Users Select Department Setting (2-2) Add, edit, or delete department codes using this screen. Users may be assigned to a department through the Cardholder Profile screen. Select Edit to add or change a department code. Be sure to press Enter on your keyboard after each new or edited department code entry. Select a department name and press Delete to delete a department Use Save to exit, or Cancel .
CARDHOLDER PROFILES Select Users Select Cardholders Profile (2-4)Select Add to create a new cardholder. Enter the Cardholders are added from Setting this screen. information into the required Employee ID and Card Number fields along with any of the optional Use menu to addand andDepartment delete cardholders as button settingtotheir access parameters. fieldsthis such as Name . Select as thewell Save save your entry and exit.
CARDHOLDER PROFILES (Continued) To ADD a Cardholder using METHOD 1: Select Add . Enter the following information : Employee ID : Enter an employee number. Each number must be unique. Name : Name of Employee. Card Number : Enter the access card or key fob number. Access TZ : Select the time zone that this user will be active. Password : If PIN codes are used with each card, enter that PIN here Select the card reader(s) assigned to the user by checking the box next to the reader.
CARDHOLDER PROFILES (Continued) To add a Cardholder using METHOD 2: Step 1 – Enroll the cards into the card reader. If you have multiple readers, you may choose any reader whose communications link has been verified: FUNCTION PROCEDURE Enter Programming Mode Press and Hold the ‘#” for 3 seconds 0. CHECK VERSION 1. SETUP Enter “1” PASSWORD: Enter “1111” + “#” 1. ENROL 2. PASSWD 3. TIMER 4. SYSTEM Enter “1” 1. ACCESS CARD 2.
CARDHOLDER PROFILES (Continued) Reference the file spreadsheet notes for a brief description of each column. Red column headers indicate required fields. (f) (a) (c) (d) (a) Click on the Red “Events” in cell A1. (b) Press Ctrl+A to highlight the sample data. (c) Go to Edit > Delete. Press OK to confirm. (d) Go to Data > Import External Data > Import Data (e) Select the data source. This will be the *.xls file created in Step 2. Once the file has been selected, Press Open, then OK, and OK to confirm.
PROGRAM ACCESS – ACCOUNT AND PIN SETTINGS Select Users Select Account & Pin Settings (2-5) Access to the program and its settings are set from this screen. The default administrator user account name is “a” with a password of “a”. This account is configured to have complete access to all areas of the program. Select Add or Edit to add or edit authorized users, change program access passwords or limit areas of program access. Select Save or Cancel when you are done.
SYSTEM MONITORING (AUDIT TRAIL) Each reader stores every transaction for future uploading to the PC. This data may be retrieved in a batch or in a real-time manner. Real-time transaction monitoring requires that this program run at all times. Batch Collection Select Monitor Select Collect Transactions in Batch (3-1) Select the reader(s) from the window on the left, then select Start . The number of transactions collected will appear in the window to the right.
REMOTELY LOCKING / UNLOCKING THE DOOR Select Monitor Select Remotely Open Door (3-3) You may remotely lock or unlock each door by using this screen. Check the box next to the reader you wish to control and select: Unlock , Emergency Unlock Emergency Lock . (reader will beep), or RESTORE TRANSACTION DATA Select Monitor Select Restore Transactions (3-4) When you retrieve a transaction, the record of that transaction is uploaded to the PC and deleted from the reader.
TRANSACTION REPORTS Select Reports Select Transaction Reports (4-1) The Find window will appear. To create a report of all transactions, select the dates you would like to search, leave all other fields blank, then select Search , or Cancel . If you cancel, select Find to access the Find window. To create a filtered report, enter the data you wish to search for, then select Search . Once the report is displayed on the screen, it may be reviewed on screen or printed by selecting Print .
SOFTWARE ACCESS RECORD Select Reports Select Software Access Record (4-3) Every action that is made while in this program is recorded in an internal audit trail log. Use this screen to access this log. P:\Installation Instructions\Access Controls\Inst-E5\INST-E5.
COPYING READER DATA Select Database Select Copy Reader Data (5-1) Use this screen to copy system configuration and scheduling data from one reader to another. Note: A minimum of two readers must be configured in the Reader Parameters (1-1-2). To Copy: 1. Select a source reader in the Copying From box and then check the appropriate boxes below to select the type of data to copy. 2. Select the reader in the window to the right that you wish to copy the configuration data to. 3. Press Save No to cancel.
BACKUP DATABASE It is important that you backup your database every time that you make a configuration change or add/delete a user. Select Database Select Backup Database (5-3) To Backup: 1. Enter a file name and location to create a backup database file (the default file name is the date). 2. Press Save , or Cancel . A message will appear confirming that the backup file has been created. RESTORE DATABASE Select Database Select Restore Database (5-4) To Restore: 1.
DATABASE REPAIR Select Database Select Zip Database (Repair) (5-5) If your database becomes corrupt and you do not have a current backup file, you may be able to save you data by running this utility. When select the option button, the utility will automatically run. Since this is not a guarantee of data recovery, you will need to check your data for accuracy. SCHEDULED JOBS Select Database Select Scheduled Jobs (5-6) This screen configures the tasks that the Schedule Module (Menu 6.) will perform.
AUTOMATIC MONITORING (SCHEDULING) Select Schedule Use your account and password to exit the main program and enter the scheduling module. Select the Start button to enable the scheduling and monitoring module. The module will run in the background on your PC and perform the polling and updating functions for the readers that are checked in the left window. The tasks will be performed per the schedules that were enabled in the task list (Database – Scheduled Jobs (5-6)).