Model: iP10 Instruction manual - US English Size: 102 x 150 mm Date: May 21, 2012 Mat’l: 128gsm matte finish paper Color: Black text on white background Warranty Cover W E L C O M E Thank you for choosing the iP10 from iHome. This user guide will get Model iP10 stereo alarm clock to charge your iPod or iPhone you up and running quickly and provide helpful hints to maximize enjoyment. For more information about this and other iHome products, please visit www.ihomeaudio.
Model: iP10 Instruction manual - US English Size: 102 x 150 mm Date: May 21, 2012 Mat’l: 128gsm matte finish paper Color: Black text on white background Warranty Cover W E L C O M E Thank you for choosing the iP10 from iHome. This user guide will get Model iP10 stereo alarm clock to charge your iPod or iPhone you up and running quickly and provide helpful hints to maximize enjoyment. For more information about this and other iHome products, please visit www.ihomeaudio.
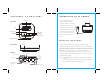
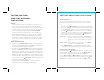
F E A T U R E S Top panel & CONNECTING TO AC POWER F U N C T I O N S This unit operates on AC power Back rest using the included 100V-240V universal AC adaptor for charging and playing your iPhone or iPod . RESET R ESET Place unit on a stable surface. Plug Dock TEST T EST the power adaptor into the DC jack 7.5V 2.5A on back of the unit and the other Time Sync button Sleep button Alarm button Settings/ Volume Control buttons Power On/Off button end into a working wall socket.
F E A T U R E S Top panel & CONNECTING TO AC POWER F U N C T I O N S This unit operates on AC power Back rest using the included 100V-240V universal AC adaptor for charging and playing your iPhone or iPod . RESET R ESET Place unit on a stable surface. Plug Dock TEST T EST the power adaptor into the DC jack 7.5V 2.5A on back of the unit and the other Time Sync button Sleep button Alarm button Settings/ Volume Control buttons Power On/Off button end into a working wall socket.
CHA R GIN G YO UR iPHO N E O R iPO D B AC K U P B AT T E R Y ( C O N T I N U E D ) 1. 1. Please make sure the AC adaptor is connected. Otherwise all settings Gently dock your iPhone or iPod into the flexible dock located on the top of the unit. may be lost during battery replacement. While your iPhone/iPod is docked in the unit and the unit is connected to AC power, it recharges (until fully charged). The unit 2.
CHA R GIN G YO UR iPHO N E O R iPO D B AC K U P B AT T E R Y ( C O N T I N U E D ) 1. 1. Please make sure the AC adaptor is connected. Otherwise all settings Gently dock your iPhone or iPod into the flexible dock located on the top of the unit. may be lost during battery replacement. While your iPhone/iPod is docked in the unit and the unit is connected to AC power, it recharges (until fully charged). The unit 2.
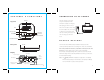
SETTING THE TIME: TIME SYNC & MANUAL TIME SETTING SETTING AND USING THE ALARM TIME SYNC buzzer alarm. The alarm will sound for 60 minutes or until reset/turned SETTING THE ALARM This unit lets you wake to your docked iPhone, iPod or to the built-in This unit is equipped with auto sync. By default, the unit will sync to the off. time on your iPhone or newer iPod (iPod touch, iPod nano and iPod 1. Classic; older iPod models such as iPod mini do not support this feature) 2.
SETTING THE TIME: TIME SYNC & MANUAL TIME SETTING SETTING AND USING THE ALARM TIME SYNC buzzer alarm. The alarm will sound for 60 minutes or until reset/turned SETTING THE ALARM This unit lets you wake to your docked iPhone, iPod or to the built-in This unit is equipped with auto sync. By default, the unit will sync to the off. time on your iPhone or newer iPod (iPod touch, iPod nano and iPod 1. Classic; older iPod models such as iPod mini do not support this feature) 2.
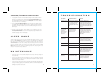
S N O O Z E / D I M M E R O P E R AT I O N 1. T R O U B L E S H O O T I N G To program a custom snooze duration, during normal operation (when alarm is not sounding) press and hold the Snooze/Dimmer Button until the display flashes, then press the + and – Buttons on the unit to adjust the snooze time to 1 - 29 minutes.
S N O O Z E / D I M M E R O P E R AT I O N 1. T R O U B L E S H O O T I N G To program a custom snooze duration, during normal operation (when alarm is not sounding) press and hold the Snooze/Dimmer Button until the display flashes, then press the + and – Buttons on the unit to adjust the snooze time to 1 - 29 minutes.
I M P O R TA N T S A F E T Y T I P S IM P O R TA N T SA FE T Y T IPS(CO N T IN UE ) When used in the directed manner, this unit has been designed and manufactured to ensure your personal safety. However, improper use can result in potential electrical shock or fire hazards. Please read all safety and operating instructions carefully before installation and use, and keep these instructions handy for future reference. Take special note of all warnings listed in these instructions and on the unit. 12.
I M P O R TA N T S A F E T Y T I P S IM P O R TA N T SA FE T Y T IPS(CO N T IN UE ) When used in the directed manner, this unit has been designed and manufactured to ensure your personal safety. However, improper use can result in potential electrical shock or fire hazards. Please read all safety and operating instructions carefully before installation and use, and keep these instructions handy for future reference. Take special note of all warnings listed in these instructions and on the unit. 12.
L I M I T E D 1 Y E A R WA R R A N T Y iHome Products, a division of SDI Technologies Inc. (hereafter referred to as SDI Technologies), warrants this product to be free from defects in workmanship and materials, under normal use and conditions, for a period of 1 Year from the date of original purchase. Should this product fail to function in a satisfactory manner, it is best to first return it to the store where it was originally purchased.