iKN150 IB (English) Size: 130 x 102 mm Color: 1C + 1C (Black text on white paper) 20 pages Date: Jan. 7, 15.
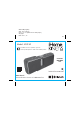
P2 Introduction K1 Thank you for purchasing the iHome Kineta K1. This product is designed to provide high quality wireless sound for your iPad, iPhone, iPod, computer, tablet or other Bluetooth audio device and mobile charging on the go with the included removable K-Cell rechargeable battery. This unit features NFC (Near Field Communication) technology which allows you to wirelessly connect your NFC–enabled device to instantly ‘pair and play’.
P3 Maintenance K1 • Place the unit on a level surface away from sources of direct sunlight or excessive heat. • Protect your furniture when placing your unit on a natural wood and lacquered finish. A cloth or other protective material should be placed between it and the furniture. • Clean your unit with a soft cloth moistened only with mild soap and water. Stronger cleaning agents, such as thinner or similar materials can damage the surface of the unit.
P4 Table of Contents K1 Included / Meet Your K1 ................................................................................................. 1-2 Getting Started: Charging the Unit and K-Cell via AC Adaptor .................................................3 Battery Level Meters ..........................................................................................................4 Charging the K-Cell via USB...........................................................................................
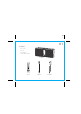
P5 K1 Included • K1 system • K-Cell • AC adaptor • USB charging cable K1 system K-Cell USB cable 1 AC adaptor
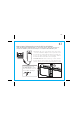
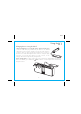
P6 K1 Meet Your K1 Top Power/End Call Button NFC Antenna Area Bluetooth Pairing K-Cell Eject Button Internal Battery level meter K-Cell External Battery level meter Talk/Play/Pause Button Volume Down Volume Up Button Button Left Side Splash-resistant Jack Cover (attached) Aux-in Jack Reset Button DC Jack DC 9V 2.
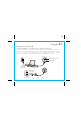
P7 Getting Started: Charging the Unit and K-Cell via AC Adaptor K1 Charge unit fully with K-Cell inserted before use. For first time charge, charge for at least 8 hours. Use iHome K-Cell battery ONLY. Do NOT attempt to use with/insert other USB battery cells. DC 9V 2.5A T ESER RESET T SET TEST Pull back the jack cover on the left of the unit to access jacks. Connect the included AC adaptor to the DC jack and connect the other end to a working wall outlet.
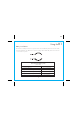
P8 Using the K1 Battery Level Meters The unit has one battery level meter on top of the unit for the internal battery and one for the removable K-Cell external battery. The table below shows the charge status indicated by each meter when unit is connected to AC power.
P9 Using the K1 Charging the K-Cell via USB Charge K-Cell fully before use. For first time charge, charge for at least 3 hours. Connect the included micro USB cable to the micro USB Charging Port on the top of the K-Cell and connect the other standard USB plug to a computer, USB AC adaptor (not included) or other USB power source. The LED on the K-Cell flashes while it is charging and becomes solid once fully charged. A charged K-Cell can operate the unit when the internal battery is depleted.
P10 Using the K1 Charging Devices Using the K-Cell Charge K-Cell fully before use. For first time charge, charge for at least 3 hours. Connect the USB cable plug included with your device to the standard Charging Port on the top of the K-Cell and connect the other end to the device you wish to charge. To charge an Android or Windows phone you may use the USB to micro USB cable supplied with this model.
P11 Using the K1 Using Bluetooth: Pairing Your Device Using NFC This unit features wireless NFC pairing, which allows NFC-enabled devices to pair and play instantly. (For pairing non-NFC devices, please see the following section “Pairing Your Device Manually”.) The first time the unit is powered on, it will enter auto-pairing mode. Follow steps below to pair. 1. Turn on your Bluetooth–enabled/NFC–enabled device and turn on NFC capability as described in the device’s user manual. 2.
P12 Using the K1 Pairing Your Device Manually Pairing is the set-up process to introduce your Bluetooth-capable device to the K1. Once your device is paired, the K1 can recognize it and you can play your audio through it. 1. Make sure your Bluetooth device is fully charged. Turn on your Bluetooth device and make it “discoverable” by turning on Bluetooth mode (check in Options or Settings). 2. Press the Power/End Button to turn on the K1.
P13 Using the K1 Pairing with a Different Device When you power ON the speaker, it will automatically link with the most recently connected Bluetooth device as long as that device is still within range (approx. 30 feet). To pair with a different device follow steps 1 - 4 under ”Pairing Your Device” on previous page. Playing Audio Via Bluetooth 1. Press the Power/End Button to turn on the unit. The Bluetooth Button will glow solid when a linked device is in range and detected.
P14 Using the K1 Speakerphone Operation NOTE: The unit must be powered on and linked to a Bluetooth phone to receive a call. When a call is received, playing music is muted to hear the ring tone. The will flash green, and the Power/End Button will flash red. Talk/Play/Pause Button 1. Press the Talk/Play/Pause Button to answer a call or press the Power/End Button to ignore the call.
P15 Using the K1 Playing Audio via Aux In 1. Connect one end of a 3.5mm stereo audio cable (not included) to the Aux-in jack on the left side of the unit and connect the other end to the headphone or line-out jack on your audio device. 2. Press the DC 9V 2.5A Button on the unit to turn it on. 3. Power on the audio device and use the controls on the device to play or pause audio, and navigate tracks. 4. Press the or Button to adjust the system volume. You can also adjust volume on your device. 5.
P16 Consumer Product Safety Guide IMPORTANT SAFETY INSTRUCTIONS When used in the directed manner, this unit has been designed and manufactured to ensure your personal safety. However, improper use can result in potential electrical shock or fire hazards. Please read all safety and operating instructions carefully before installation and use, and keep these instructions handy for future reference. Take special note of all warnings listed in these instructions and on the unit. 1.
P17 8. Attachments – Do not use attachments not recommended by the product manufacturer. 9. Lightning and Power Surge Protection – Unplug the unit from the wall socket and disconnect the antenna or cable system during a lightning storm or when it is left unattended and unused for long periods of time. This will prevent damage to the product due to lightning and power-line surges. 10.
P18 K1 FCC/IC Information FCC ID: EMOIKN150 IC : 986B-IKN150 FCC Radiation Exposure Statement This equipment complies with FCC RF radiation exposure limits set forth for an uncontrolled environment. This transmitter must not be co-located or operating in conjunction with any other antenna or transmitter. This device complies with Industry Canada licence-exempt RSS standard(s).
P19 Troubleshooting Unit doesn’t respond (no power) • • • • Check that unit is fully charged OR connected to AC power. Make sure your device is properly paired with the K1. Make sure the Power is ON. If the unit seems “frozen” or locked up, insert the end of a paperclip or similar into the Reset button under the jack cover on the left of the unit to reset unit. Resetting Bluetooth If Bluetooth function is not operating properly, you may wish to reset Bluetooth.
P20 Limited 1 Year Warranty iHome Products, a division of SDI Technologies Inc. (hereafter referred to as SDI), warrants this product to be free from defects in workmanship and materials, under normal use and conditions, for a period of one (1) year from the date of original purchase. Should this product fail to function in a satisfactory manner, it is best to first return it to the store where it was originally purchased.