Page 1 of 31 TMP-3T PLAYER User’s Manual
Page 2 of 31 Table of Contents 1.Introduction ................................................................................................................... 3 1.1Preface................................................................................................................. 3 1.2 Packing List ....................................................................................................... 4 1.3 Caution ......................................................................................
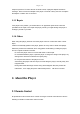
Page 3 of 31 8.3 Copyrights and Trademarks............................................................................ 30 8.4 Warranty ........................................................................................................... 31 1.Introduction 1.1Preface Dear Customer, Thank you very much for purchasing our product. In the digital era, this product is a great home entertainment partner.
Page 4 of 31 DVB-T TV - supports Digital Video Broadcasting Terrestrial (DVB-T) TV reception; - supports Electronic Program Guide (EPG) and Teletext. We hope that this product will bring you a lot of enjoyment. We are committed to apply multimedia technology in your work, entertainment, family, daily life, car and everywhere! Welcome to be with us. Thank you again for choosing our product. 1.
Page 5 of 31 subject to pressure. To reduce the risk of electric shock, unplug the adapter first before cleaning it. Never connect the adapter to the player in a humid or dusty area. Do not replace the adapter or cable’s wire or connector 1.3.3 Repair If the player has a problem, you should take it to an appointed repair center and let the specialists do the repair, never repair the player yourself, you might damage the player or endanger yourself or your data. 1.3.
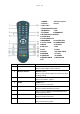
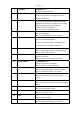
Page 6 of 31 1.POWER 2.Numeric buttons 3.Subtitle/-4.Audio 5.VOL+/VOL-6.UP/DOWN/RIGHT/LEFT 7.DVB MENU 8.FAV 9.TV/RADIO 10.ZOOM/EDIT 11.EPG/REVEAL/F.SCREEN 12.STOP/LOCK 13.PLAY/PAUSE/TTX 14.BGM/INDEX 15.ROTATE/SIZE 16.16:9/4:3/NEXT 17.PMODE/PREV 18.MUTE 19.RETURN 20.CH+/CH-21.OK 22.LIST 23.INFO 24.SLEEP 25.CLOCK/GOTO 26.RECORD 27.PG.UP 28.PG.DOWN 29.A-B/MIX 30.REPEAT/HOLD 31.DELETE/FR 32.FF NO. 1 Name POWER Function POWER button: Press to enter standby mode or wake up.
Page 7 of 31 9 TV/RADIO TV/RADIO button: Press to select DTV or radio. 10 ZOOM/EDIT ZOOM/EDIT button: Press to zoom in/out the image (photo or video). Press to edit schedule. 11 EPG/REVEAL/F.SCREEN EPG/REVEAL/F.SCREEN Press to enter the Electronic Program Guide which displays an on-screen list of programs for the coming week when watching Digital Terrestrial TV. Press to reveal in the TELETEXT. Press to full screen when playing video. 12 STOP/LOCK STOP/LOCK Press to stop playback.
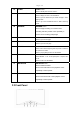
Page 8 of 31 24 SLEEP SLEEP button: Press to standby after 30 60 90 120min。 25 CLOCK/GOTO CLOCK/GOTO button: Press to display the clock in the TELETEXT. Press to go to the select time you choose and play in video playing mode. Press to go to the recorded files menu in DVB-T receiving mode. 26 RECORD RECORD button: Press to begin recording or to resume when recording has been paused. Press repeatedly to set one touch recording (OTR) length. 27 PG.UP PG.UP button: Press to go to the last page.
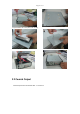
Page 9 of 31 A POWER B RETURN/CHANNEL_RETURN LEFT RIGHT C SELECT/DVB_MENU UP/CHANNEL_PLUS DOWN/CHANNEL_MINUS D PLAY/PAUSE E STOP 2.3 Rear Panel A TV/RF IN socket B USB DEVICE port C A/V OUT jack D Y/Pb/Pr OUT jack E S/PDIF COAXIAL jack F HDMI jack G USB HOST port H DC IN jack 3. Assembling and Connection 3.1 Assembling steps 1.
Page 10 of 31 3.Lay the HDD to the correct place (hole to hole) 4. Whorl back the side cover 3.
Page 11 of 31 3.
Page 12 of 31 3.4 AV Output Follow the picture and Use AV cable to connect TV 3.
Page 13 of 31 3.6 Connect to Computer Connect the unit to PC by USB cable when it power on, you can copy, stick, and delete files. Please refer to the picture. 3.7 USB device (like USB disk 、 USB HDD etc.) Connection Connect the unit to USB device; you can play the files in it. Please refer to the picture.
Page 14 of 31 3.
Page 15 of 31 4. Watching DVB-T programs 4.1 How to search TV channel Press the Menu button on the remote control. Press the LEFT / RIGHT button on the remote control to select the DTV tab from the menu bar. Channel Search Select to set the region for Channel Search。 In Channel Search mode, you can select Auto Search,Manual Search, Country,Antenna Power。 Press the UP / DOWN button to select, and the LEFT / RIGHT button to confirm.
Page 16 of 31 Auto Search In Auto Search mode, the system will automatically scan for available DVB-T TV channels. Manual Search In Manual Search mode, you can select the CH name, Bandwidth, Input Frequency and Quality. Use the Right and Left buttons on the remote control to select or input. Press the ENTER button to confirm. Program Select to set the region for Program. Press the UP / DOWN button to select, and the LEFT / RIGHT button to confirm.
Page 17 of 31 Select to set the region for Time Time In this menu, Press the UP / DOWN button to select, and the LEFT / RIGHT button to confirm. PVR Configure Select to set the region for PVR Configure. In this menu, Press the UP / DOWN button to select, and the LEFT / RIGHT button to confirm. 4.2 Program List Menu Press the List button when watching DVB-T TV programs, and the program list menu where you can see the program number and name will be displayed.
Page 18 of 31 Press the ENTER button to confirm. Press the PG.UP / PG.DOWN button to page up /down. Press the UP / DOWN button to select channels. 4.3 Info Bar While switching channels by the Info button, an info bar will be displayed to show the channel information. There’re 4 strings displayed on the bar. Taking the info bar in the above photo for example C800 YLE TV1 ----- Stands for TV channels.
Page 19 of 31 Press the Right / Left button to change channels. 4.5 Teletext Menu If the broadcasted stream supports Teletext, press the TTX button to enter the Teletext menu. Press the INDEX and MIX buttons to view the content in the Teletext menu 4.6 Subtitle List Menu Press the SUBTITLE button when watching DVB-T TV programs, the Subtitle List menu will be displayed.
Page 20 of 31 Press the UP / DOWN button to select the subtitle, press the ENTER button to confirm. 5. Timer Record Menu The Timer Record menu allows you to create, edit and delete recording schedules and view all schedule status and history. Press the OK button on the remote control to enter the menu when you playing EPG function。 5.1 Create a New Schedule Press the RED button on the remote control to select the Add tab from the menu bar.
Page 21 of 31 RIGHT button to adjust each setting. Channel Type Channel No. Channel Name Start Date Start Time End Time Repeat Select the video source Display the channel number Display the channel name Enter the date of the recording. Enter the time of the begin recording. Enter the time of the end recording. Select how often you want the schedule to record. Choose fromOnce, Everyday, Mon-Fri, Mon-Sat or for an individual day of the week. Mode Select the recording mode. 5.
Page 22 of 31 Enter the folder press UPand DOWN ,to select the file you want to view and press OK to play. 1. Introduce Video Music Movies ►|| ■ 16:9/4:3 Info A-B Subtitle Repeat ◄◄ ►► VOL+ VOLGoto Playback Stop 16:9/4:3 To show some information on the video Press to set the beginning and end points of a section to repeat. Switch between different captions Press to set repeat option. FAST REWIND FAST ORWARD VOL+1 VOL-1 Go to the time you choose and play 2.
Page 23 of 31 MPEG2 MPEG4 H264 .MPG\.VOB .AVI .MKV\.MOV \ DIVX,XVID H.264 Up to 9.8Mbps Up to 9Mbps Up to 9Mbps 6.2 Music Menu Enter the folder press UPand DOWN ,to select the file you want to view and press OK to play. 1. Introduce Photo Music ►|| ■ PG. up Playback Stop Page up Movies PG. down Page down ►► ◄◄ VOL+ VOL GOTO Repeat B.G.M Fast Forward Fast Rewind VOl +1 VOL -1 Go to the time you choose and play Press to set repeat option. To select files and go to BM Menu T T T T 2.
Page 24 of 31 Enter the folder press UPand DOWN ,to select the file you want to view and press OK to play. 1. Introduce ►|| ■ 16:9/4:3 Information Rotation ◄◄ ►► PG. up PG. down Repeat B.G.M Photo Music Movies Playback Stop 16:9/4:3 To show some information on the photo Rotation photo FAST REWIND FAST FORWARD Page up Page down Press to set repeat option. To select files and go to BM Menu 2. Information Display photo name, type,resolution,size information. 3.
Page 25 of 31 7.Setup Menu 7.1 Changing DVB-T TV settings Please refer to watching DVB-T programs on page 17. 7.2 Changing Movies settings Press the LEFT / RIGHT button on the remote control to select the Movies tab from the menu bar,Press the UP/DOWN button to select the Movie Configure tab,Press the OK button to confirm Select to set the region for Movie Configure. Movie Configure In this menu, Press the UP / DOWN button to select, and the LEFT / RIGHT button to confirm. 7.
Page 26 of 31 Select to set the region for Photo Configure Photo Configure In this menu,you can select Slide Time,Slide Mode,Aspect Ratio。 Press the UP / DOWN button to select, and the LEFT / RIGHT button to confirm. 7.4 Changing Setup settings Select to scan for Picture。 Picture In this menu,you can select Aspect Ratio,Resolution ,TV Format,Video Output。 Press the UP / DOWN button to select, and the LEFT / RIGHT button to confirm.
Page 27 of 31 In this menu,you can select OSD Language,Subtitle Language,Audio Language Digital Audio。 Press the UP / DOWN button to select, and the LEFT / RIGHT button to confirm. Select to set the region for System。 System In this menu,you can select Parental Guidance,Set Password,Restore Factory Default,Information。 Press the UP / DOWN button to select, and the LEFT / RIGHT button to confirm. 8. Appendixes 8.
Page 28 of 31 DAT/VOB/MPG/AVI/TS/MP4/MKV MP3/OGG/WMA Compression rate: between 32 kbps and 320 kbps JPEG/BMP ———————————————————————— VIDEO CODECS SURPORTED: MPEG-1/MPEG-2 MPEG-4 ASP: XviD H.
Page 29 of 31 DIGITAL TERRESTRIAL TV SYSTEM Frequency Range 44.25MHz~863.25MHz (VHF I/III / UHF) COFDM 2K FFT or 8K FFT COFDM demodulator (Fully DVB-T compliant : ETS 300-744) Code Rate 1/2, 2/3,3/4, 5/6, and 7/8 Guard Interval 1/4, 1/8, 1/16, 1/32 Constellation QPSK 16QAM, 64 QAM Bandwidth 6, 7 or 8MHz Digital TV Tuner 75 Ohm (VHF / UHF) TV Digital Antenna ———————————————————————————— GENERAL Power Supply AC 100~240V 50~60Hz Power Consumption Approx.
Page 30 of 31 hubs. Question 2. I used my player to transfer files back and forth between different computers. Will defragmenting the player hard disk do any harm to it? Answer: Defragmenting the player hard disk may be useful after having transferred many files to and from the player. It is never harmful to use the defragment on the player. Make sure no other programs are running while using the Windows® defragment utility.
Page 31 of 31 Microsoft and Windows are registered trademarks of Microsoft Corporation. All other trademarks are property of their respective holder 8.4 Warranty What your warranty does not cover: -Acts of nature, such as fire, static discharge. -Damage from unauthorized repair, alteration or accident. -Damage from misuse or neglect. -A unit that has been modified or incorporated into other products or is used for institutional or other commercial purposes.