guitaRF™ A S S E M B LY + U S E
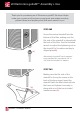
sE Electronics guitaRF™ Assembly + Use Thank you for purchasing an sE Electronics guitaRF! We hope it helps make your records and live shows sound great, and makes recording guitars & bass (and anything else!) that much easier for you. STEP ONE (a) Screw the vertical standoff into the bottom of the filter, making sure the flat side of the standoff is aligned with the back of the filter. Use the included wrench to adjust the tightening nut on the standoff (a) to make sure they’re aligned properly.
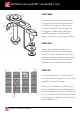
sE Electronics guitaRF™ Assembly + Use STEP THREE (e) (c) (f) (d) Use the second of the smaller screws (c) to tighten the vertical adjustment rod (d) to the hardware. This screw/ rod can be used to raise or lower the condenser or ribbon hung from the guitaRF hardware, with (e) used to move it towards or away from the filter. STEP FOUR Attach the hardware to the top of the guitaRF with the included larger screw (f), rubber washer on top of the bracket, and paper washer underneath.
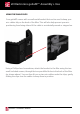
sE Electronics guitaRF™ Assembly + Use USING THE CABLE CLIPS Your guitaRF comes with a small metal bracket that can be used to keep your mic cables tidy on the back of the filter. This will also help prevent your mic positioning from being altered if the cable is accidentally moved or stepped on. Using a Phillips-head screwdriver, attach the bracket to the filter using the two small included screws, through the two pre-drilled holes in the back of the filter (as shown above).
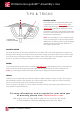
sE Electronics guitaRF™ Assembly + Use TIPS & TRICKS ELECTRIC GUITAR As an alternative to side-by-side miking, aim a dynamic mic or SDC (like the sE5) at the center of the dustcap, and angle a ribbon mic (like the VR1) towards the edge of the cone.