
User Manual

guitaRF™ aSSEMBLY MaNuaL
sE Electronics guitaRF™ Assembly + Use
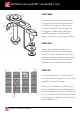
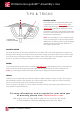
STEP THREE
Use the second of the smaller screws
(c) to tighten the vertical adjustment
rod (d) to the hardware. This screw/
rod can be used to raise or lower the
condenser or ribbon hung from the
guitaRF hardware, with (e) used to
move it towards or away from the lter.
(c)
(d)
(e)
(f)
(g)
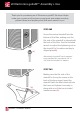
STEP FOUR
Attach the hardware to the top of
the guitaRF with the included larger
screw (f), rubber washer on top of the
bracket, and paper washer underneath.
This screw can be used to rotate the
hardware mount relative to the lter.
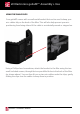
STEP FIVE
Insert your dynamic or small-capsule
mic into the pass-through hole (g) of the
guitaRF. It should t snugly.
Screw your condenser or ribbon’s mic
clip (or shockmount) onto the hanging
vertical adjustment rod (d), and then use
(c), (e) and (f) to ne-tune the position of
the hanging mic relative to the dynamic/
small-capsule mic.