REFLEXION FILTER® PRO A S S E M B LY + U S E Late 2016 & onwards
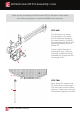
sE Electronics RF Pro Assembly + Use Thank you for purchasing an sE Electronics RF Pro! We hope it helps make your tracks sound great - no matter WHERE you’re recording. STEP ONE The first step is to attach the hardware to the stand, which is done by loosening the metal clamps (a), fitting the stand between them, and tightening the key (b) for a secure fit. a c If your stand’s diameter is very large or very small, you may have to adjust the large threaded nut (c) opposite the turning key to fit.
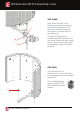
sE Electronics RF Pro Assembly + Use STEP THREE f g h Now, attach the filter to the mounting hardware by pushing the support rod down into its socket on the stand clamp (f), and tighten it in place with the turning key (g). To adjust the angle of the hardware and filter relative to the mic stand, loosen the main clamp key (h), rotate the hardware/filter to the desired angle, and tighten (h) again.
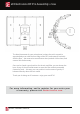
sE Electronics RF Pro Assembly + Use The ideal placement for your microphone is where the mic’s capsule is approximately even with the front edge of the RFX, and centered vertically with the filter – but some mics sound better when pushed a little closer, and some a little further away.