
Installation Guide


Install the Fixture
2
1
2
3
4
5
6
1A
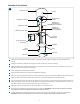
MOUNTING
PLATE
MOUNTING
PLATE SCREW
DIFFUSER
FIXTURE
TAB
SLOT
SOCKET
RECESSED CAN
SOCKET ADAPTOR
GROUND TERMINAL
TOP SOCKET
ADAPTOR TERMINAL
SPRING CONNECTOR
SPRING
CONNECTOR SCREW
7
8
9
RING TERMINAL
2
3
9
2
4
8
10
11
B
BOTTOM SOCKET
ADAPTOR TERMINAL
Install the spring connectors to the mounting plate as shown using the spring connector screws.
Install the fixture to the mounting plate and secure it in place using mounting plate screws.
Install the diffuser by aligning the tabs on the diffuser with the square slots on the fixture, then push the diffuser into
the slots to secure it in place.
Screw the socket adaptor into the socket.
Remove the bottom half of the socket adaptor terminal.
Insert the black fixture wire in the hot port (marked in black) on the bottom socket adaptor terminal.
Insert the white fixture wire in the remaining port on the bottom socket adaptor terminal.
The following are the options for attaching the ground wire; A) Use an existing screw or stud and nut inside the
housing to secure the ring terminal. B) If none of the previous options are available, use a #8 drill bit to drill a hole
in the housing and secure the ring terminal with the provided #8 screw.
Insert the fixture ground wire to an available port on the ground terminal.
Reconnect the top and bottom socket adaptor terminals. NOTE: To ensure proper connection, the connectors have
been marked with the letter B and a black line.
Gently push the fixture into the recessed can so that the three spring connectors snap into place. NOTE: Make sure
no wires are being pinched between the mounting plate and recessed can.
1