
Installation Guide


INSTALLATION AND SAFETY INSTRUCTIONS
FOR YOUR SAFETY
GENERAL
ASSEMBLY
WARNING: BE SURE THE ELECTRICITY TO THE WIRES YOU
ARE WORKING ON IS SHUT OFF; EITHER THE FUSE REMOVED
OR THE CIRCUIT BREAKER SET AT OFF.
You don't need special tools to install this fixture. Be sure to follow
the steps in the order given. Under no circumstances should a
fixture be hung on house electrical wires, nor should a swag type
fixture be installed on a ceiling which contains a radiant type heating
system. Read instructions carefully. If you are unclear as to how
to proceed, consult a qualified electrician.
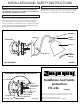
Carefully remove the fixture from the carton and check that all parts
are included, as shown in figure 1 and 2. Be careful not to misplace
any of the screws or parts which are needed to install this fixture.
Installation And Safety
Instruction
HC-226
100101
Fill In Item Number On Carton And
File This Sheet For Fixture Reference. ITEM#_______________
®
Line art shown may not exactly match the fixture enclosed.
However, the installation instructions do apply to this fixture.
GREEN
GROUNDING
SCREW (G)
NIPPLE (F)
*OUTLET BOX
SCREWS
MOUNTING BAR (D)
*WIRE CONNECTORS
*GROUND WIRE
*OUTLET BOX
GROUNDING AND MOUNTING BAR LOCK UP
FIGURE 2
*NOT INCLUDED
NUT (E)
*OUTLET BOX
CANOPY (I)
HOLDER (K)
THUMB
SCREWS (L)
CAP NUT (H)
GLASS (J)
GLASS
RETAINING
RING (M)
FIGURE 1
*NOT INCLUDED