
Installation Guide
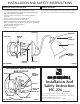
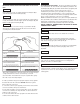

FIGURE 1*NOT INCLUDED
HOLDER (K)
THUMB
SCREWS (L)
GLASS (J)
GLASS
RETAINING
RING (M)
GREEN
GROUNDING
SCREW (G)
NIPPLE (F)
*OUTLET BOX
SCREWS
MOUNTING BAR (D)
*WIRE CONNECTORS
*GROUND WIRE
*OUTLET BOX
GROUNDING AND MOUNTING
BAR LOCK UP
FIGURE 2
*NOT INCLUDED
NUT (E)
Installation And
Safety Instruction
HC-226
100101
Line art sho
wn ma
y not exactly matc
h the fixture enclosed.
Ho
wev
er
, the installation instructions do apply to this fixture.
Fill In Item Number On Carton And
File This Sheet For Fixture Reference. ITEM#_______________
INSTALLATION AND SAFETY INSTRUCTIONS
Carefully remove the fixture from the carton and check that all parts
are included, as shown in figure 1 and 2. Be careful not to misplace
any of the screws or parts which are needed to install this fixture.
• Be sure the electricity to the system you are working on is turned
off; either the fuse removed or the circuit breaker set at off.
• Use of other manufacturers components will void warranty, listing
and create a potential safety hazard.
• If you are unclear as to how to proceed, contact a qualified
e
lectrician.
• You don’t need special tools to install this fixture.
• Be sure to follow the steps in the order given.
• Under no circumstances should a fixture be hung on house electrical
wires, nor should a swag type fixture be installed on a ceiling which
contains a radiant type heating system.
• Read instructions carefully.
• Save these instructions.
IMPORTANT SAFETY INSTRUCTIONS BEFORE YOU BEGIN
*OUTLET BOX
CANOPY (I)
CAP NUT (H)
MOUNTING
BAR (D)
MOUNTING
NIPPLE (F)