
Installation Guide

2
1A
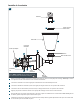
Level then secure the mounting plate to the electrical box with two mounting plate screws. Ensure that the fixtureNote:
screw holes are oriented vertically.
Connect the fixture to a suitable ground in accordance to local electrical codes.
Connect the white fixture wire to the neutral power line wire with a wire nut.
Connect the black fixture wire to the hot power line wire with a wire nut.
Align then place the fixture base onto the mounting plate and secure it with the fixture screws.
Place the shade onto the shade base and secure it in place by installing and tightly screwing the shade collar nut onto the
socket; repeat for all shades
Install the lamps by pushing the lamp pins into the large portion of the socket slots and rotate it clockwise to lock it
in place.
1
2
3
4
5
6
7
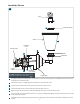
1
ELECTRICAL BOX
MOUNTING
PLATE SCREW
FIXTURE BASE
LAMP
SHADE
SOCKET
Install the Fixture
MOUNTING
PLATE
SHADE BASE
7
SHADE COLLAR NUT
6
FIXTURE
SCREW
1
1
1
5
5
5
5
6
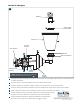
Use type spiral self-ballasted,MAX 13 Watt
GU24 base compact fluorescent lamp.