
Instructions / Assembly


1A
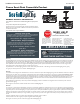
CHAIN
FIXTURE LOOP
FIXTURE
JUNCTION BOX
MOUNTING PLATE
CANOPY
SCREW COLLAR
THREADED NIPPLE
1
2
3
4
5
6
7
8
9
10
11
12
13
14
2
FOR SEMI FLUSH MOUNT ONLY-:Unscrew and remove the fixture loop from the fixture, then remove the cap nut screws and
washers by unscrewing the cap nuts.
FOR SEMI FLUSH MOUNT ONLY SKIP TO STEP-: 9Install the mounting plate with the two mounting studs to the junction box.
If necessary, screw the shorter end of the threaded nipple tightly onto the mounting plate.
Temporarily unscrew and remove the collar nut from the screw collar, then screw the screw collar tightly onto the threaded
nipple.
Secure the mounting plate to the junction box.
Screw the fixture loop onto the fixture. Determine the wanted height of the fixture and remove a portion of the chain by
opening a link and removing it from the bottom.
Install the canopy and collar nut onto the chain (in that order), then install the open link onto the fixture loop and secure it in
place by closing the link.
Weave the cord through the chain and canopy, then trim the cord leaving enough to make electrical connections.
Connect the fixture to a suitable ground in accordance to local electrical codes.
Connect the white fixture wire (square and/or rigid) to the neutral power line wire with a wire nut.
Connect the black fixture wire (round and/or smooth) to the hot power line wire with a wire nut.
FOR SEMI FLUSH MOUNT ONLY-:Align, then place the fixture onto the mounting plate studs and secure it with the two cap nuts.
SKIP TO STEP 14
Neatly place all the wires into the junction box, place the canopy onto the ceiling, and secure it in place by screwing the collar
nut tightly onto the screw collar.
Screw the lamps into the sockets. Refer to the label on the socket for Max Wattage information.
COLLAR NUT
Install the Fixture
LAMP
Semi-Flush Mounting
FIXTURE
CAP NUT
FIXTURE
LOOP
MOUNTING
PLATE
MOUNTING PLATE STUD
CAP NUT
SCREW
1
WASHER
2
12
14
6