
Installation Guide


3A
2
Prepare for Installation
Note: Multiple fixtures may be interconnected at any
distance apart in accordance with specifications.NEC
Using the necessary 1/2” NPT conduit connection
locations, bring power to fixture housing in accordance
with local electrical code.
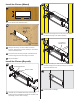
Place the housing in the desired location in the brick run
and adjust the brackets as needed.
Ensure that the housing is flush with the face of the
surrounding brick. The brackets may be used toNote:
secure the housing in place during installation.
Set the fixture base in place with mortar.
Skip to SECTION 6.
For installation, Go to .BRICK SECTION 2
For installation, Skip to .CONCRETE SECTION 3
For installation, Skip to .WOOD SECTION 4
For installation, Skip to .DRY WALL SECTION 5
Install the Fixture (Concrete)
Ensure all four brackets are extended as much as
allowable.
Using the necessary 1/2” NPT conduit connection
locations, bring power to fixture housing in accordance
with local electrical code.
Secure the fixture housing in the desired location using
No. 6 flathead wood screws through the front
mounting screw holes to the wood support frame.
Pour the concrete.
Skip to SECTION 6.
NO. 5 FLATHEAD
SCREWS
MOUNTING
SCREW
HOLE
1/2” CONDUIT
CONNECTION
1/2” CONDUIT
CONNECTION
2A
3
1
2
3
4
5
6
7
2
3
3
3
3
4
5
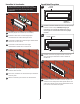
Separate the fixture from the fixture housing by
removing the four screws.
For Brick and Concrete installs only, install the cover
plate in place of the fixture housing.
1
2
3
1A
FIXTURE HOUSING
FIXTURE
FIXTURE
SCREW
COVER PLATE
1
2
BRACKET
Install the Fixture (Brick)
BRACKET
1
1