
Instructions / Assembly


2
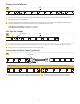
Cut Tape to Length
Determine the length of tape required ensuring that space is left for the power cord to attach to the end of the tape.
Make a clean cut at the designated cut points to shorten the tape.
TAPE
CUT POINT
2A
1
1
Connecting to Other Tapes (optional)
Remove the first inch of paper backing, then open the tabs on the connector and push the tape into the connector,
ensuring that the pins on the connector are touching the contacts on the tape, then close the tab to secure in place.
1
CONNECTOR
1
TAB
3A
CAUTION: Make sure to orient the connecting tape to the same polarity by matching the symbols on the end of the tape.
2
Prepare for Installation
It is important to determine the proper wattage needed, location of the transformer, and fixture layout before beginning the
following installation and modifications.
Do not exceed 40 feet on any continuous run of tape light. For large projects use a larger power supply or multiple power
supplies separately. Do not exceed the wattage of any components or power supply.
Jane 100 Power Consumption: 4.9 W/Meter or 1.5 W/Foot
Jane 200 Power Consumption: 7.2 W/Meter or 2.2W/Foot
TAPE
1A
1
2