UNDERWATER HOUSING for Canon EOS 40D 日本語 MDX-40D English 取扱説明書 Instruction Manual
Introduction Thank you for purchasing SEA&SEA products. Please read this instruction manual carefully prior to using your underwater housing. Only with a thorough understanding of this manual’s content will you be able to use the housing correctly. After reading the manual, please be sure to keep it in a place where you can easily come back to it at any time.
Safety Precautions For safe handling of the product, please read the following precautions carefully before use. Failure to heed the precautions listed below could result in serious consequences. To prevent injury or damage to yourself and/or others, please observe the precautions as they contain highly important information related to personal and product safety. WARNING Situations that could result in severe injury or death. CAUTION Situations that could result in property damage or personal injury.
Safety Precautions z Always dry the front port, the lens, the flash window or the finder using a soft cloth to prevent stain or salt residue from marring the glass surface. z Rinse the product with fresh water, after underwater use. Ensure that the product is waterproofed before rinsing. Refer to [Maintenance and Storage] (P.E-17) for details. z Make sure that the connectors have been secured with the connector caps before rinsing the product with fresh water, after removal from other products.
Precautions on Handling the O-ring This model is kept watertight by the O-ring. To keep the O-ring functioning properly, please observe the following. Improper handling of the O-ring could cause flooding. CAUTION z SEA&SEA products use blue O-rings. These O-rings are impregnated with silicone oil through a special process. The lubricating effect of the O-ring lasts as long as the silicone oil is gradually seeping out from within.
Precautions on Handling the O-ring Coat with silicone grease Silicone grease protects the O-ring from chafing. After checking the O-ring to make sure that there are no scratches, dust, or debris, apply a light coating of silicone grease to the entire O-ring with your finger. Applying too much grease will make it easier for dust and debris to adhere to the Oring, and could cause flooding.
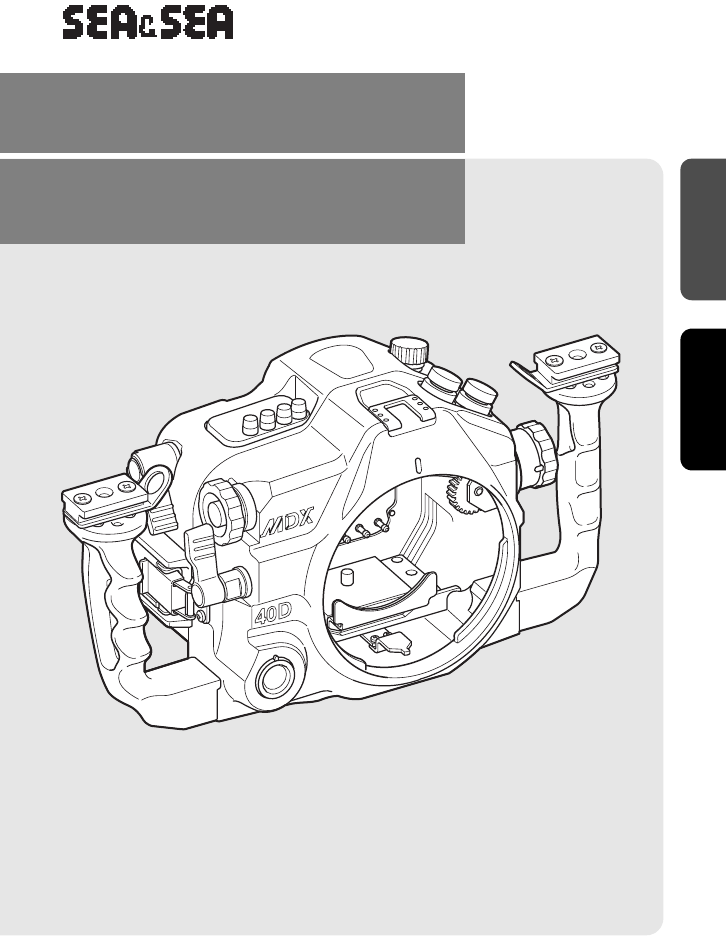
Identification of Parts TTL converter bulkhead (Red) Strobe bulkhead (Black) Lanyard hook Accessory shoe Main dial Shutter lever Bracket shoe Focus / Zoom dial Grip Port lock Locking latch Front case LCD panel illumination button Finder Menu button Leak sensor Metering mode selection / White balance selection button AF mode selection / Drive mode selection button ISO speed set / Flash exposure compensation button Mode dial AF start / AE lock / FE lock lever AF point selection / Enlarge button Mult
Identification of Parts Front case Sync connector Quick shoe Quick lock Leak Sensor The leak sensor lights up in red if water leakage is detected while underwater. If the leak sensor lights up, surface as soon as you safely can and remove the camera from the housing. CAUTION If a lot of water leaks in, the atmospheric pressure inside the housing will increase, which is very dangerous. When releasing the locking latches, the rear case could come flying off, so be very careful.
Identification of Parts Finder This model comes equipped with a standard finder (0.66x). The finder is replaceable; if you replace it with an optional finder unit, you can change the finder magnification to match your shooting conditions. Replacing the finder 1 Rotate the finder unit mounted on the rear case in a counterclockwise direction to remove it z The screw areas are coated in grease, so be careful not to touch them.
Opening and Closing the Housing Opening and closing the housing is done with the locking latches. Here we will explain how to open and close the locking latches. Opening the locking latches 1 With the surface of the rear case facing up, press and hold the right and left locks (1) and remove the locking latches from the hooks (2) CAUTION z When removing the locking latches, be sure to use the tips of your fingers, not your fingernails.
Attaching and Detaching the Port 1 Set the port lock on the bottom of the front case to the OPEN position OPEN LOCK 2 Align the positioning mark on the front case with the OPEN mark on the port, insert the port into the front case, and then rotate the port in a clockwise direction until it stops CAUTION Before attaching the port, make sure there are no specks of dust, scratches, or deformities on the O-ring and the Oring contact surfaces.
Mounting the Camera in the Housing CAUTION z Before mounting the camera in the housing, make sure the O-ring is not sticking out of its groove. z Make sure to remove the eyecup from the camera. If used with the eyecup in place, it could cause flooding.
Mounting the Camera in the Housing 6 7 Align the quick lock with the LOCK position to fix the camera in place Insert the sync connector into the camera’s accessory shoe CAUTION When inserting or removing the sync connector, be sure to hold the connector part. If you push or pull on the cord part, it could damage the sync connector or cause contact failures.
Attaching the TTL Converter You can attach the optional TTL converter to this model. If you attach the TTL converter, you can use TTL flash compensation with YS series strobes.
Connecting the Strobe This model comes equipped with a strobe bulkhead (black: 1) and a TTL converter bulkhead (red: 2). 2 1 CAUTION If you connect the YS series strobe sync cord to the bulkhead for TTL converter (red: 2), it could damage the pins on the bulkhead connector; so make sure never to do that. Likewise, if you connect the TTL converter’s camera connection cable to the strobe bulkhead (black: 1), it could damage the pins on the bulkhead connector; so make sure never to do that.
External Controls Power switch When turning the power ON/OFF, rotate the dial in the direction of the arrows. Power switch Focus / Zoom dial When shooting with a focus / zoom gear: Pull the focus / zoom dial out and rotate it so that the convex part of the dial is set in the deep groove on the spacer. Spacer z The focus / zoom dial cannot be used if there is no gear mounted on the lens. z When using a zoom gear, you cannot shoot with manual focus.
External Controls AF start / AE lock / FE lock lever When shipped from the factory, the lever is set to the position for operating the AF start button. To operate the AE lock button or the FE lock button, follow the procedures below to change the position of the lever. 1 Pull the lever in the direction of the arrow and keep it there. 2 Rotate the collar in the direction of the arrow. Lever Collar 3 Notch Set the lever in the notch in the collar.
Maintenance and Storage CAUTION z Never use chemicals, cosmetics, any petroleum solvents such as paint thinner, or neutral detergent on the product. They may deform and damage the product. z After each use in salt water, make sure it's watertight, then soak it sufficiently in fresh water. z Insufficient soaking causes damage by salt to the product. Salty residue may be left on the product where it will crystallize as it evaporates.
Specifications Compatible camera Canon EOS 40D Controls Power switch, Shutter lever, Metering mode selection / White balance selection button, ISO speed set / Flash exposure compensation button, Main dial, Quick control dial, Focus / Zoom dial, AF mode selection / Drive mode selection button, LCD panel illumination button, AF point selection / Enlarge button, Setting button, AF start / AE lock / FE lock lever, Multi-controller, Mode dial, Menu button, Erase button, Playback button, Info / Trimming orient
シーアンドシー・サンパック株式会社 SEA&SEA SUNPAK Co., Ltd. 〒332-0016 埼玉県川口市幸町3-2-20 TEL.048-256-2251 3-2-20, Saiwai-cho, Kawaguchi-shi, Saitama, Japan 332-0016 TEL. +81-48-256-2251 World Customer Service Center TEL. +81-48-255-8512 http://www.seaandsea.jp カスタマーサービスセンター TEL.048-255-8512 http://www.seaandsea.co.