Setup, Use and Care Guide HVX200 Housing Gates Underwater Products 5111 Santa Fe Street, Suite H San Diego, CA 92109 858-272-2501 800-875-1052 Fax 858-272-1208 Customersrvc@GatesHousings.com www.GatesHousings.
Dear Gates Customer, Welcome to the Gates family! You now own one of the finest underwater housings available, and we thank you for choosing Gates. For over 36 years Gates has crafted the most reliable, durable and dependable housings to suit many needs, from recreational diving to treasure hunting, marine research and Hollywood productions to U.S. Navy programs. You see, at Gates, your selection of our product is only the beginning.
Congratulations on owning a new Gates housing! You’ve selected a product that will provide years of value and reliable service. This housing was custom designed for the Panasonic HVX200 video camera for the underwater imaging professional. Please read through this entire guide to become familiar with the Gates HVX200 housing. The following setup guidelines will explain how to prepare and use your camera and housing so you’ll get the best results from your video endeavors.
5. If you intend to use the manual functions of the camera, be sure the Auto/ Manual button on the lower left side of the camera is in the mid position, not in the Auto Lock or Hold positions. 6. Install a tape, P2 cards, memory card and charged battery. Preparing the Housing 1. Release the latches. Three stainless steel safety latches secure the housing halves. They have a positive locking feature, so to open them you must first depress the center bar release while lifting the rear lever.
external monitor, etc. the buoyancy and balance will naturally change, and most likely to the negative. In this case the weights can be repositioned to other areas inside (and outside) the housing to reestablish trim. Extra mounting strips are provided with your housing for this purpose. However, it is important when installing the weights in the housing that you make sure the weights do not interfere with the controls or camera placement.
Pull out controls and gently insert the camera into the housing. 4. Secure the camera. Underneath the mount plate, use the two gold thumbscrews to secure the camera mount plate to the housing. Tighten until snug. Camera mount plate thumbscrews. 5. Check controls. With the camera turned on and installed into the housing front, press in each control and confirm proper operation (refer to the next section for more detail on controls).
Closing the housing 1. Carefully inspect the orange o-ring on the back and the sealing surface on the front. Make sure they are clean and free of debris or marks that could compromise the seal. 2. Mate the two halves of the housing. Place the housing back onto housing front leading with the right side first to align the Camera/Off and Rec/Stby controls with the camera. Use the ‘drip lip’ to guide the alignment. The housing halves should mate easily with no obstructions.
5. Position controls for mating by pushing them inward and aligning the control heads with the camera. a Caution: The safety latches must be closed and locked prior to use to avoid opening underwater. It is your responsibility to make sure the latches are secure and locked, and in good condition. DO NOT enter the water with a faulty latch. Gates will replace a damaged or faulty latch free of charge. 6. Carefully inspect parting line between front and rear.
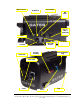
Manual Focus Focus Assist A/M Focus ND Filter User 1 / User 2 (Optional) AWB Gain/WB Preset Iris Dial Scene File Iris Button External Monitor Plug Record/ Standby Card/Tape Power Zoom Filter Gates Underwater Products 5111 Santa Fe Street, Suite H San Diego, CA 92109 858-272-2501 800-875-1052 Fax 858-272-1208 Customersrvc@GatesHousings.com www.GatesHousings.
Control Operation • Power (Camera On/Off) This control is located on the back window. The positions for this control are exactly like that found on the camera switch. Rotate clockwise to turn on, and opposite to turn off. • Record/Standby The Record Standby control is red and operates by a short motion counter-clockwise on the lever trigger. Press once to Record; press again for Standby. You will “feel” the record/standby button on the camera actuate through the control as it is depressed.
• Gain/White Balance Preset Switch This control performs two functions. Rotation of the knob will adjust gain or white balance presets. With the knob pulled out, position the dot facing the rear of the housing, then push the knob in to mate the control head with the Gain switch With the knob pulled out, position the dot towards the front of the housing then push the control in to mate the control head with the White Balance Preset switch.
Attaching the Handles 1. Loosen the thumbscrews from the handles, then slide the handle onto the accessory rails on top of the housing (see photo). Position them to suit your own preferences. 2. Tighten the thumbscrews to secure the handles onto the housing. Slide each handle onto the accessory rails on the top. Position and secure with the thumbscrew. Attaching the Foot Plate Loosen the knurled brass retainer from the screw on the dovetail, slide the dovetail onto the housing until fully seated.
Ports Change The ports for the HVX200 housing are attached with a bayonet-style mount. Port changes are easy and straightforward: 1. To remove a port: • Rotate the port 90 degrees counter-clockwise until it stops. The alignment dots will be 90 degrees apart from each other. • Pull the port away from the housing. • If you have trouble, look inside the front half of the housing and ensure the bayonet tabs of the port are lined up with the cut-outs of the port opening.
a Caution: Perform a final check after installing a port to ensure it’s flush with the front bulkhead of the housing. If not, remove the port and reinstall. Failure to do so may result in flooding. Insert the port with the alignment dots at sides, then turn clockwise until dots align. Use of Diopters • The FP44 Flat Port is designed specifically for macro video using multiple diopters mounted to the camera lens.
To change the color filter, remove the screw and push element forward. To remove the filter holder, remove the screw and filter holder only. Filter Mount Block Cleaning Ports Gates ports can be cleaned readily by following these simple guidelines. • Dust or Lint can be blown with compressed air, preferably air from a can. Do not clean the surfaces if it is unnecessary. • Salt deposits or sand may also be removed with compressed air.
Optional External Monitor This section covers mounting of the optional monitor to the HVX200 housing and connection to the Panasonic camera. Note that the monitor has no controls; it will power up automatically when a video signal is present, it senses a PAL or NTSC signal automatically and displays a proper image regardless of video format. The EM253 offers a 2.5”/64.26mm color active LCD and the EM419 offers a 4.1”/104mm color active LCD. EM419 EM253 Camera Connection and Setup 1.
2. Verify Operation. You can check operation at this time by plugging in the monitor (see below) and turning on the camera. Note – your Panasonic camera must be set to display external video, as well as camera information. If you have not already set the external video mode, please refer to the “Preparing the Camera” section for directions. 3. Attach the monitor bracket to the swivel base on the small metal dovetail. (see photo).
5. Plug in the monitor cable to the HVX200 housing bulkhead connector, which is found on the right side of the housing. Mate the cable until fully seated into the bulkhead connector. Plug in the monitor cable to the bulkhead connector. If necessary, use water or silicone lubricant for easier mating of the connectors. a Caution: If you are not using the monitor for any reason, do not plug the RCA connector into the camera. 6. Verify operation by turning on the camera.
Optional Submersible Microphone If you have the submersible microphone installed on your Gates housing, there are special considerations for setting up your camera and connections to capture external audio. First, setup the camera to allow use of the submersible microphone. Behind the LCD screen are several switches that must be set as follows: * CH2 SELECT SWITCH > INPUT 2 * PHANTOM POWER +48v CH2 SWITCH > ON Next to the XLR inputs on the camera is a switch labeled ‘MIC/LINE’.
The submersible microphone will plug directly into the external microphone jack on the camera Plug this into the Input 2 connector on the camera, and be sure to fully engage the connectors. Plug in the XLR audio adapter into Input 2. Gates Underwater Products 5111 Santa Fe Street, Suite H San Diego, CA 92109 858-272-2501 800-875-1052 Fax 858-272-1208 Customersrvc@GatesHousings.com www.GatesHousings.
Optional Water Alarm If your Gates housing includes the optional water alarm, there are three alarm conditions to watch for: Condition LED (if installed) Siren (always installed) New Battery (when inserted) Flood Bright intense blink for 6 seconds Bright intense blink Low Battery Low intensity fast blink Screaming sound for 6 seconds Screaming sound. Alarm will sound for duration of flood + 6 seconds. Intermittent chirp for 40 seconds after flood condition.
Setup, Use and Care Guide EM419 Color External Monitor Gates Underwater Products • 5111 Santa Fe Street, Suite H • San Diego, CA • 92109 858.272.2501 • 800.875.1052 • Fax 858.272.1208 • Reliable@GatesHousings.com • www.GatesHousings.
Dear Gates Customer, Welcome to the Gates family! You now own one of the finest underwater housings available, and we thank you for choosing Gates. For over 33 years Gates has crafted the most reliable, durable and dependable housings to suit many needs, from recreational diving to treasure hunting, marine research and Hollywood productions to U.S. Navy programs. You see, at Gates, your selection of our product is only the beginning.
Gates EM419 External Color Monitor Setup and Use Congratulations! You’ve selected a Gates product that will provide years of value and reliable service. This monitor was designed for operation with a variety of cameras and housings. Please read through this entire guide to become familiar with the Gates External Color Monitor. The following setup guidelines will explain how to prepare and use the EM419 and housing so you’ll get the best results from your video endeavors.
Mounting to a Housing Attachment of the EM419 to any housing is straightforward and generally the same (with exception of the Gates XL1/XL1s housing). See photos below for typical installations. ? TRV / VX / PD / HD /GL housings utilize a bracket that secures to the handles and spans the top of housing. In the center of the bracket the EM419 swivel base will attach.
? Sea & Sea VX2000 Housing. The EM419 will mount to the Sea & Sea VX2000 housing on a dovetail bracket (see photo). This bracket will slide into the same slot as the carrying handle (which cannot be used at the same time as the monitor) and secured by use of a thumb screw. (EM 253 shown) Dovetail mount bracket EM419 Connection to Housing The EM419 will connect to the housing via the 2-pin EO-type connector.
Batteries The EM419 uses 8 AA cells for power. They can be Alkaline or NiMH/NiCad rechargeable. The monitor will operate for ~14 hours on a fresh set of Alkaline cells, and ~10 hours on fully charged NiMH/NiCad cells depending on the capacity. To change the cells, release the latches on the either side of the monitor and separate the two halves where you’ll find the batteries readily accessible. When closing the EM419 housing, perform a routine inspection of the o-ring for any foreign material or damage.
Monitor Adjustment The EM419 has three adjustments for brightness, color and contrast. These adjustments can be found on the inside rear half of the housing (see photo). While the monitor is pre-adjusted at the factory, Gates recommends the monitor be further adjusted to match the camera being used. This will ensure a consistent match between the monitor and the image actually being recorded.
Gates Underwater Housing Care & Maintenance Guide Housing Care and Maintenance O-Ring Care and Maintenance Gates Underwater Products, Inc 5111 Santa Fe Street, Suite H • San Diego, CA • 92109 • 858.272.2501 • 800.875.1052 • 858.272-1208 Reliable@GatesHousings.com • www.GatesHousings.
Housing Care and Maintenance Congratulations on your new ownership of a Gates housing, the worlds most reliable underwater housing! It is manufactured from “bulletproof” machined aluminum, given a type III “hard” anodized coating for durability, and then finished with a dichromate or clear sealing process to lock out corrosion. Reliable mechanical controls, preferred by the pros, are standard.
• • • Close the housing. See that the halves are mated and aligned properly. Close the safety latches into their locked position. Check the port for proper installation (if it has been removed). The port should be flush to the housing and secured with the bayonet tabs on the inside (it should not pull off when secured properly). One final check should be made to look for anything unusual. This could be a pinched o-ring, damage from impact or drop, cracked window, etc.
• inside when the housing is opened. Do the same around the port if you intend to remove or change it. When you are ready to close the housing again for another dive, start with “Before you Dive” guidelines above. ‘Wet’ Connectors Your housing may come equipped with one or more ‘wet’ style connectors for video out, strobe, or other electrical signals. While Gates selects only the most robust connectors designed to provide years of service, the contacts may degrade from salt water corrosion over time.
Storing a Gates Housing When the dives are over and it’s time to store your Gates housing, there are several significant actions to take. • • • • • Dry the housing completely with a towel. Remove ports, handles, and accessible o-rings. Then use compressed air to blow out water around seals, mating parts, ports, etc. Remove every visible trace of water. Do the same with the accessories and other parts you used underwater or were exposed to salt water, or even salt air during your diving adventures.
Cleaning Ports Gates ports can be cleaned readily by following these simple guidelines. ü Do not clean port lens surfaces if it is unnecessary. Water spots, for example, will disappear when you return to the water. ü Dust or Lint can be blown with compressed air, preferably from a can. ü Salt deposits or sand may also be removed with compressed air. Use a soft lens brush if necessary to brush away foreign material that remains.
O-Ring Care and Maintenance If you’re like many owners of underwater video or camera equipment, you may wonder: just how does one provide proper care to the o-ring seals that keep water safely away from my expensive electronics? This is an excellent question. The answer seems to pervade the world of SCUBA, passing from mouth to mouth, but there seems lacking a consolidation that brings all that useful advice together.
Inspection Begin by carefully inspecting the o-rings. As a matter of habit your should inspect your equipment o-rings before every use. Once you gain experience, this step will be quick and easy. ~ Caution: Never use metal tools or objects for removing o-rings! These devices can easily damage the surface of the o-ring, the groove, or both. ü Only If necessary, remove the o-rings from the recessed groove where they may be stretched or secured.
Lubrication Now you’re ready to lubricate the black o-rings. For this you’ll need pure silicone lubricant or silicone grease (available at dive shops). ü Put a generous amount of silicone between your thumb and forefinger, then run the entire loop of the black o-ring between your fingers several times. You need to coat the entire surface of the o-ring with a film of lubricant. The lubricant film should be thin, uniform and completely cover the o-ring, and have a ‘wet’ feel.