
Specifications


Maintenance and Troubleshooting 6009-33 Broadband At Sea
7-9
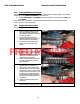
5. Loosen, remove and discard the bottom
bolt of the pneumatic dampener
assembly.
6. Discard the pneumatic dampener
assembly.
7. Apply Loctite to the M12x40 and
M12x55 bolts provided in the kit. Place
a lock washer on each bolt.
8. Install the M12x55 bolt through the
bottom of the replacement pneumatic
dampener and into the threaded
mounting..
9. Install the M12x40 bolt through the
hole in the top of the replacement
pneumatic dampener assembly and into
the threaded mounting. hole. NOTE:
You may need to lift, or pull down on,
the upper pedestal to align the hole for
the upper bolt to thread into the bracket
on the upper pedestal.
10. Tighten the upper and lower bolts to
torque spec.
11. Install the flow control valves using the
procedure above.
7.2.9. Replacing the Chain Tensioner Spring
Use Sea Tel PN: 116175-3
1. Using a screw driver, or hook, release the
spring from the tensioner arm.
2. Un-hook the spring from the bracket
that is attached to the bottom of the
Azimuth Motor mounting bracket.
3. Hook the replacement spring onto the
bracket on the bottom the Azimuth
Motor mounting bracket.
4. Using a screw driver, or hook, attach the
other end of the replacement spring to
the tensioner arm.
PRELIMINARY