
Installation Guide

INSTALLATION INSTRUCTIONS
GSS-Series
Straight Grab Bar
Page 2
of 2
Proceed cautiously through the following steps in this installation process to avoid drilling into in-wall water supply lines.
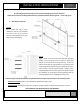
2. Mounting the Grab Bar.
Step #1
Use a power drill with a 3/32”
carbide tip drill bit (not provided)
and drill at the six (6) locations
marked on the wall into the 2” thick
solid wood in-wall backing.
Step #2
Apply a bead of silicone around the Grab Bar Mounting
Flanges on the mounting surface to ensure a water-tight
seal will be created at all mounting locations. Secure the
grab bar to the wall using six (6) #10 x 2-1/2” stainless steel
screws (supplied by manufacturer) and screw into the 3/32”
holes created in the solid wood backing. Tighten screws
completely after ALL screws are in place. Complete the grab
bar installation by covering the mounting flanges with the
Concealed Flange Covers, snapping them into place.
To ensure proper and safe installation, the grab bar should not shift in any direction on the mounting surface.
Hardware Provided: (6) #10 x 2-1/2” Phillips Pan Head sheet metal screws.
Tools required: Marking pencil/pen, level, power drill, 3/32” carbide tip drill bit, #2 phillips driver, silicone.
THIS COMPLETES THE INSTALLATION OF THIS GRAB BAR.
All mounting points must fasten into structural wood backing, minimum 2” thickness.
Avoid electrical and/or plumbing behind the wall, and where possible drill through tile – not through grout.