........................................ Barracuda ATA Family ........................................ ST328040A, ST320430A ........................................ ST313620A, ST310220A ........................................ ST36810A ........................................ Installation Guide ........................................
© 1999 Seagate Technology, Inc. All rights reserved. Publication Number: 21200135-001, Rev. A, July 1999 Seagate, Seagate Technology, the Seagate logo and Barracuda are registered trademarks of Seagate Technology, Inc. DiscWizard, SeaFAX, SeaFONE, SeaTDD and SeaBOARD are either trademarks or registered trademarks of Seagate Technology, Inc. or one of its subsidiaries. All other trademarks or registered trademarks are the property of their respective owners.
Barracuda ATA Family Installation Guide, Rev. A -1 iii Contents The easiest way to install your drive .................................... 1 What you need ........................................................................ 2 Ultra ATA/66 requirements..................................................... 2 Before you begin .................................................................... 2 Handling precautions............................................................. 3 Master/slave jumpers ......
0iv Barracuda ATA Family Installation Guide, Rev.
Barracuda ATA Family Installation Guide, Rev. A 1 The easiest way to install your drive DiscWizard is Seagate’s exclusive Windows program that is included with your drive for easy drive installation. DiscWizard helps you configure your new drive and your computer. It analyzes your system, lets you select various installation options and creates customized step-by-step instructions. It also allows older computers to access the full capacity of large hard drives.
2 Barracuda ATA Family Installation Guide, Rev. A What you need • Straight-edge and Phillips screwdrivers • Four 6-32 UNC drive mounting screws • A standard 40-pin ATA interface cable, or an 80-conductor cable to run Ultra ATA 66 (max length: 18 inches) • An unused drive power cable for your new drive Ultra ATA/66 Requirements The drive can support transfer rates up to 66 Mbytes per second in Ultra ATA/66 mode.
Barracuda ATA Family Installation Guide, Rev. A 3 Handling precautions Disc drives are extremely fragile. Do not drop or jar your drive. Keep the drive in its antistatic bag until you are ready to install it. Protect your drive from static discharge by making sure you are well grounded before touching the drive. We recommend wearing a grounded wrist strap throughout the installation process. Do not touch the connectors or any part of the printed circuit board.
4 Barracuda ATA Family Installation Guide, Rev. A Master/slave jumpers If you already have one hard drive in your computer and you are installing a second drive, you must configure one drive as a master and the other as a slave. Note. If you need to change the jumpers on your existing hard drive, see the Disk Manager online manual, look on the drive label, or contact the drive manufacturer.
Barracuda ATA Family Installation Guide, Rev. A ATA interface pin 1 connector 4-pin power connector 2 46 8 1357 Slave Master or single drive Figure 1.
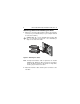
6 Barracuda ATA Family Installation Guide, Rev. A Attaching cables and mounting the drive 1. Attach one end of the drive interface cable to the interface connector on your motherboard (See your computer manual for connector locations). Caution. Align pin 1 on the motherboard connector with pin 1 on your drive connector. Pin 1 on is marked by a stripe on one side of the cable. ! Pin 1 Co Mo mpu the ter rbo ard Figure 2. Attaching the cables Note.
Barracuda ATA Family Installation Guide, Rev. A 7 Note. You can mount the drive in any orientation. Usually it is mounted with the circuit board down. ! Caution. Do not overtighten the screws or use metric screws. This may damage the drive. Figure 3. Mounting the drive 3. Secure the drive in the computer using four 6-32 UNC mounting screws in either the side-mounting or bottommounting holes. Insert the screws no more than 0.22 inch (5.58 mm) into the bottom-mounting holes and no more than 0.20 inch (5.
8 Barracuda ATA Family Installation Guide, Rev. A Configuring your computer Before you format or partition your new drive, you must configure your computer’s BIOS. To configure your computer’s BIOS: 1. Turn your computer on. As your computer starts up, watch for a message that describes how to run the system setup program (also called BIOS or CMOS setup). This is usually done by pressing a special key, such as DELETE, ESC OR F1, during startup. See your computer manual for details.
Barracuda ATA Family Installation Guide, Rev. A 9 BIOS Settings Drive Model Cylinders Heads Sectors ST328040A CHS addressing Addressable sectors 16,383 53,385,552 16 63 ST320430A CHS addressing Addressable sectors 16,383 40,079,088 16 63 ST313620A CHS addressing Addressable sectors 16,383 26,692,776 16 63 ST310220A CHS addressing Addressable sectors 16,383 20,005,650 16 63 ST36810A CHS addressing Addressable sectors 14,123 13,346,235 15 63 Note.
10 Barracuda ATA Family Installation Guide, Rev. A Addressing drive-capacity limitations Some DOS-based computers and operating systems are not designed to accommodate large-capacity hard disc drives. The most common system limitations are listed below. 528-Mbyte limit The BIOS in some older computers cannot support drives with capacities greater than 528 Mbytes. Seagate provides free Disk Manager software with your drive to overcome this limitation.
Barracuda ATA Family Installation Guide, Rev. A 11 BIOS upgrades If you need to upgrade your BIOS, contact the appropriate BIOS manufacturer listed below: American Megatrends (AMI): www.megatrends.com 1-800-828-9264 Award Software International, Inc.: www.award.com 1-800-800-2467 Phoenix Technologies Ltd.: (Upgrades from Microfirmware) www.ptltd.
12 Barracuda ATA Family Installation Guide, Rev. A Preparing your drive for use Installing a single drive For a quick installation, we recommend you use Disk Manager to automatically partition and format your drive. Disk Manager also ensures that your computer can access the full capacity of your hard drive. See “Installation using Disk Manager” below. If you do not want to use Disk Manager, you can use the standard DOS commands to partition and format your drive.
Barracuda ATA Family Installation Guide, Rev. A 13 4. Select either (E)asy Disk Installation or (A)dvanced Disk Installation. Disk Manager lists all the hard drives that it detects. You should see your new Seagate drive and your existing hard drive, if any. If any hard drive is not recognized, exit Disk Manager and turn off your computer. Check all cables, jumpers and BIOS settings. Then start at step 1 to run Disk Manager again. 5.
14 Barracuda ATA Family Installation Guide, Rev. A Standard DOS installation ! Caution. Partitioning or formatting a drive erases all data on it. Seagate assumes no liability if you erase your data. Drive partitioning Partitioning a hard drive divides it into sections (partitions) that function as separate logical drives (labeled C,D,E, etc.). To partition your new drive using DOS: 1. Insert a bootable DOS diskette into your diskette drive and restart your computer.
Barracuda ATA Family Installation Guide, Rev. A 15 7. When partitioning is complete, FDISK reboots your computer. Proceed to “Drive Formatting.” á Note. If you are adding a second drive to your system, you can run FDISK from Windows. Click the Start button. Select Run... Then type fdisk and click OK. Drive formatting ! Caution. Use the correct drive letters so that you do not format a drive that already contains data.
16 Barracuda ATA Family Installation Guide, Rev. A Additional installation options 2 46 8 13 5 7 Master with non-ATA compatible slave Enable cable select Figure 4. Non-ATA compatible and cable select jumpers Non-ATA compatible slave jumper If your computer does not recognize your new drive as a master in a two-drive system, the slave drive may not be ATA-compatible. You may be able to solve this problem by setting a jumper on pins 5 and 6 and a jumper on pins 7 and 8 as shown in Figure 4.
Barracuda ATA Family Installation Guide, Rev. A 17 Advanced Disk Manager options The Disk Manger online manual Disk Manager contains an extensive online manual. This manual includes detailed installation instructions, troubleshooting and a list of master/slave jumper settings for many different hard drives. To view the Disk Manager online manual, type dm. Then press ENTER. You can also view the online manual from within Disk Manager by selecting (V)iew/Print Online Manual in the main menu.
18 Barracuda ATA Family Installation Guide, Rev. A Supported operating systems The Disk Manager dynamic drive overlay provides support for drives with capacities greater than 528 Mbytes under MS-DOS, Windows 3.x, Windows 95, Windows NT 3.51, Windows NT 3.50 (requires DM upgrade drivers), OS/2 V3.0 (Warp full pack), and OS/2 V2.0–3.0 (requires DM upgrade drivers). Before you install a non-DOS operating system on the drive, install DOS and Disk Manager and make sure that the drive is bootable.
Barracuda ATA Family Installation Guide, Rev. A 19 To remove a DDO from a drive: 1. Boot the computer to drive C. 2. Insert your DiscWizard diskette or CD. 3. Type dm to start Disk Manager. 4. Select the Select Installation Options Menu. 5. Select (M)aintenance Menu. 6. Select (M)igrate Dynamic Drive. This program moves the data on your drive so that it can be accessed without the DDO. The migration may take up to an hour to complete, depending on the size of your drive. 7.
20 Barracuda ATA Family Installation Guide, Rev. A Troubleshooting If you have installed your drive and it does not function properly, perform the following basic checks: Warning. Always turn off the computer before changing jumpers or unplugging cables and cards. Wear a ground strap or use other antistatic precautions while working on your computer or handling your drive. • Verify compatibility.
Barracuda ATA Family Installation Guide, Rev. A 21 • Verify the drive-type settings in the system setup pro- • gram. The drive-type settings in the system BIOS must not exceed the physical specifications of your drive. Also, the settings must not exceed the limitations set by the operating system and BIOS. Check for viruses. Before you use someone else’s diskette in your system for the first time, scan the diskette for viruses.
22 Barracuda ATA Family Installation Guide, Rev. A 2 46 8 1357 Full capacity Limit capacity to 2.1 Gbytes (4,092 cylinders) Figure 5. Alternate Capacity Jumper 2. Move the jumper on the alternate-capacity jumper, as shown in Figure 5. This causes the drive to appear to your BIOS as having a 2.1-Gbyte capacity (4,092 cylinders, 16 heads, 63 sectors per track). You may need third-party partitioning software, such as Disk Manager, to achieve full capacity of the drive.
Barracuda ATA Family Installation Guide, Rev. A 23 3. Remount your drive in the computer and replace the computer cover. 4. Insert a bootable system diskette into drive A and turn on the computer. It should boot from drive A and automatically detect the new drive as a 2.1-Gbyte drive. 5. Insert your DiscWizard diskette or CD (If you are using the CD, change to the drive letter of your CD-ROM). Type dm. Then press ENTER. This runs the Disk Manager program. 6.
24 Barracuda ATA Family Installation Guide, Rev. A • Reboot the computer and listen to make sure the drive motor • • • starts up. If the drive is very quiet, it may be difficult to hear its discs reach operating speed. If the drive motor does not start up, recheck all drive cables. Verify that for each drive, a drive-type value is listed in the system setup program. Try rebooting your computer by pressing the CTRL, ALT and DELETE keys simultaneously.
Barracuda ATA Family Installation Guide, Rev. A 25 • If Disk Manager has installed the DDO on your hard drive and you have booted directly from a diskette, the information in the boot record for the drive may not have been loaded. Make sure there is no diskette in drive A and reboot. If you want to boot from the diskette, follow the “Booting with a Diskette” instructions under “Advanced Disk Manager options” on page 17.
26 Barracuda ATA Family Installation Guide, Rev. A tem. You must disable this feature in the system setup program before you can use FDISK. See your computer reference guide for assistance. Be sure to re-enable this important feature when FDISK is done. The system error message, “Drive not Ready,” appears. • Check all cable connections. Verify that pin 1 on the drive is connected to pin 1 on the motherboard. • Make sure the power supply is adequate for system needs.
Barracuda ATA Family Installation Guide, Rev. A ! 27 Caution. If you change the drive-type values in the system setup program, you must partition and format the drive again. This erases data on the drive. • If you have partitioned the drive into individual logical drives, • you may need to make the partitions smaller to access the full drive capacity. If your computer supports LBA mode, you may need to enable LBA mode in the system setup program to access the full capacity of the drive.
28 Barracuda ATA Family Installation Guide, Rev. A Seagate Technology support services Online services Internet For online information about Seagate products, www.seagate.com or e-mail your disc questions to: Presales support: DiscPreSales@Seagate.com Web site: http://www.seagate.com/feedback.shmtl Technical support: DiscSupport@Seagate.com Web site: http://www.seagate.com/feedback.
Barracuda ATA Family Installation Guide, Rev. A 29 Presales Support Presales Support Our Presales support staff can help you determine which Seagate products are best suited for your specific application or computer system. Technical support Technical support If you need help installing your drive, consult your dealer. Dealers are familiar with their unique system configurations and can help you with system conflicts and other technical issues.
30 Barracuda ATA Family Installation Guide, Rev. A Authorized service centers If you live outside the US, you can contact an Authorized service center for service or repair.
Barracuda ATA Family Installation Guide, Rev. A 31 European support services For European customer support, dial the toll-free number for presales support, technical support, SeaFAX and warranty repair. If your country is not listed here, dial our European call center at +31-20-316-7222 from 8:30 A.M. to 5:00 P.M. (European central time) Monday through Friday. The European call center is located in Amsterdam, The Netherlands.
32 Barracuda ATA Family Installation Guide, Rev. A Africa/Middle East support services For presales, technical support, warranty repair and FAX services in Africa and the Middle East, dial our European call center at +31-20-316-7222 from 8:30 A.M. to 5:00 P.M. (European central time) Monday through Friday, or send a FAX to +31-20-6533513. The European call center is located in Amsterdam, The Netherlands.
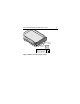
Barracuda ATA Family Installation Guide, Rev. A 33 Storing and shipping your drive Keep your original box and packing materials for storing or shipping your drive. The box has a Seagate Approved Package label. Shipping a drive in an unapproved container voids the warranty. Call your authorized Seagate distributor for information on packing materials. Figure 6 shows how a drive fits in an approved single-pack box, including the packing materials. Note.
34 Barracuda ATA Family Installation Guide, Rev. A Warranty See your authorized Seagate distributor or dealer. Preinstalled or bundled software is provided “as is.” There are no warranties of merchantability or fitness for a particular purpose. All such warranties are expressly and specifically disclaimed. Maintenance and repair Seagate drives do not require maintenance. The head/disc assembly is sealed; a broken seal voids the warranty.
Barracuda ATA Family Installation Guide, Rev. A 35 3. Als Versorgungsspannugen werden benötigt: +5V ± 5% 0,6A; +12V ±% 0,8A (1,9A fur ca. 30 Sek. fur ± 10%) 4. Die Versorgungsspannung muss SELV entsprechen. 5. Alle Arbeiten auf dem Festplatte dürfen nur von Ausgebildetem Servicepersonal durchgeführt werden. Bitte entfernen Sie nicht die Aufschriftenschilder des Laufwerkes. 6. Der Einbau des Laufwerkes muss den Anforderungen gemäss DIN IEC 950 VDE 0805/05.90 entsprechen.
36 Barracuda ATA Family Installation Guide, Rev.
Barracuda ATA Family Installation Guide, Rev.
38 Barracuda ATA Family Installation Guide, Rev. A Seagate Technology, Inc. 920 Disc Drive, Scotts Valley, CA 95066-4544, USA Publication Number: 21200135-001, Rev.