
User guide


2. Setting up the GoFlex Satellite™ Device Step 1: Connecting Your GoFlex Satellite™ Device to Your Computer
GoFlex Satellite™ User Guide 6
Step 1: Connecting Your GoFlex Satellite™ Device to
Your Computer
The GoFlex Satellite device comes with a USB 3.0 adapter and cable. This USB 3.0 system
provides faster transfer speeds when connected to a USB 3.0 port on your computer.
Note: If your computer does not have a USB 3.0 port, you can connect the cable to a USB
2.0 port.
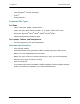
1. Remove the plastic cover from the end of the GoFlex Satellite device to expose the
connector.
2. Connect the USB 3.0 adapter and USB 3.0 cable to the GoFlex Satellite device, then connect
to a USB port (2.0 or 3.0) on your computer.
Step 2: Setting up Your Device and Loading Content
Set up Your Device
Before you begin to fill up your GoFlex Satellite device with your media, please go to
seagate.com/support/goflexsatellite and verify that you have the latest firmware.
Review the following table to ensure that no further setup is needed before you start copying
files to your GoFlex Satellite device.
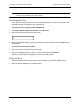
Loading Content
Once you’re physically connected to your GoFlex Satellite device, the easiest way to fill up
your device is to drag and drop files from your computer to your device.
Note: It is the user's responsibility to comply with applicable copyright laws and to respect owner's
rights in content usage.
Table 1: Set up Requirements
Computer Type Set up requirements
PC No set up required.
Mac
a
a. Do not allow Time Machine
®
to use your GoFlex Satellite device for backup. Time
Machine will attempt to reformat the drive inside your GoFlex Satellite device. See
“Troubleshooting” on page 33 if you reformat the drive by mistake.
Install MacInstaller.dmg (located on your
GoFlex Satellite device) to allow file copying.
PC and Mac Install MacInstaller.dmg to format your
GoFlex Satellite device to use with both PCs
and Macs.