
Installation guide


2
3
Installing the MaxAttach NAS 4000 Unit
3.1 Connect MaxAttach to Your Network
1. To connect the MaxAttach unit to the network, insert the cable that came with
the unit into the network connection on the back of MaxAttach. Insert the other
end into a 10/100 BASE-T Ethernet connection on your network hub or switch.
Use the power cord to connect the MaxAttach to a power source.
2.
Power on MaxAttach by pressing the On/Off rocker switch next to the power cord in
the back of the unit. Then press the power standby button on the other side of the
back panel.
On the front panel of the box, the power light will flash for several
minutes during the power-up cycle. When the power light stops flashing and
the network light is on, your MaxAttach is ready to configure.
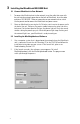
3.2 Installing the MaxNeighborhood Software
1. Use a computer system that is logged onto the network where the MaxAttach
unit is connected. Insert the self-launching CD in the CD-ROM and follow the
installation instructions on your screen. If the launch fails, please see
Troubleshooting Section 10.2.
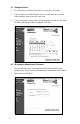
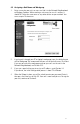
2. If the launch succeeds, the welcome screen appears. To install
MaxNeighborhood, click the MaxNeighborhood button. The program now
walks you through the process.