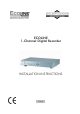
ECOLINE 1-Channel Digital Recorder INSTALLATION INSTRUCTIONS TV8433 1
Preface Dear Customer, Thank you for purchasing this ECOLINE 1-channel digital recorder. You made the right decision in choosing this state-of-the-art technology, which complies with the current standards of domestic and European regulations. The CE has been proven and all related certifications are available from the manufacturer upon request.
Contents SCOPE OF DELIVERY......................................................................................................................... 5 OVERVIEW......................................................................................................................................... 6 DESCRIPTION.................................................................................................................................... 6 SYSTEM DESIGN ......................................................
Installing the software for single-frame display .................................................................. 23 Operating the PC program ................................................................................................ 23 TRANSFERRING PICTURE SEQUENCES TO THE PC......................................................................... 24 ADDITIONAL FEATURES OF THE 1-CHANNEL DIGITAL RECORDER ............................................... 24 Display of remaining recording capacity ......
Scope of delivery Packaging 1-Channel Digital Recorder Connection cables Installation Guide Data cable 5
Overview • Modern Wavelet reference picture technique • Multiplexer compatibility permits recording of up to 16 camera signals (B/W and colour) • High resolution of 720 x 576 pixels (PAL) • Adjustable recording quality level • Adjustable recording speed (50, 25, 12, 6, 3, 2, 1, 0.5 frames/second) • Portable 3.
System design Single video source (camera) Combination with multiplexer 2nd monitor Main monitor 7
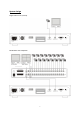
Rear connections (1) (1) (2) (3) (4) (5) (6) (7) (2) (3) Voltage supply Ventilator Alarm Video IN Video OUT RS232-C (serial connection) NTSC/PAL video norm toggle switch (4) (5) (6) (7) 100–240 V AC Never touch this! Connections for alarm input and output BNC video connection (composite video signal) BNC video output (composite video signal) For connecting a PC In Europe, select PAL. Important: Make sure you use the correct power cable for your country.
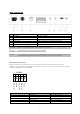
Description of operating controls (11) (10) (1) (1) (2) (3) (4) (5) (6) (7) (8) (9) (a) (b) (c) (d) (e) (10) (11) (2) (3) (4) (5) (6) (7) (8) (9) Power[On/Off] Record Playback Transfer Menu Search Event Rewind Enter REW Down Pause/Stop FWD Up Hard disk LEDs (a) (b) (c)(d) (e) Press to switch the digital recorder on or off. Press to start recording. Press to switch to playback mode. Press to start transferring a picture via the RS-232 interface. Press to switch to the OSD of the digital recorder.
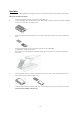
Hard disk Use only the hard disk supplied for the digital recorder or hard-disk models recommended for this purpose. Fitting the hard disk supplied 1. Switch off the digital recorder and open the hard disk slot. 2. Turn the handle to face upwards and pull the HDD frame carefully out of the slot. (Keys and fitting screws are contained in the HDD frame.) 3. Push the plastic lock of the HDD frame cover down and push the upper cover of the HDD frame back. 4.
First steps with the 1-channel digital recorder To start the 1-channel digital recorder: 1. 2. 3. 4. 5. 6. 7. Insert the hard disk as described and lock the HDD frame. Connect the video signal sources (camera or multiplexer) with the video input on the rear of the digital recorder. Connect the video output of the digital recorder with the monitor input of your monitor (digital recorder with camera or Quad) or with the recorder input of your multiplexer.
Alarm menu The alarm menu gives you the following options: 2004-01-01 12:00:00 MAIN MENU ALARM FPS ALARM REC ALARM SIGNAL EXIT : : 60 P : CONTINUOUS : CONTINUOUS : MAIN MENU ALARM FPS ALARM REC ALARM SIGNAL EXIT Use the direction keys (a,b,d,e) to select a menu option. To confirm your selection, press Enter (9). Change the value using the down (b) and up (e) keys. MAIN MENU: If you confirm this menu option with Enter (9), you go to the main menu of the programming menu of the digital recorder.
Main menu The main menu gives you the following options: 2004-01-01 12:00:00 SET MENU DATE: 2004-01-01 12:00:00 REC MODE: FIELD REC FPS: 60P REC QUALITY : HIGH SCHEDULE: NONE AUTO REVERSE: ON (ON.OFF) MULTIPLEXER: 1 (CH) 1P CLEAR HD: OFF (ON.OFF) EXIT DATE, REC MODE REC FPS, REC QUALITY SCHEDULE, MULTIPLEXER AUTO REVERSE, CLEAR HDD EXIT Use the direction keys (a,b,d,e) to select a menu option. To confirm your selection, press Enter (9). Change the value using the down (b) and up (e) keys.
AUTO REVERSE As opposed to an analogue tape recorder, the digital recorder has no tape to rewind when it is full. The digital recorder has a so-called FIFO (first in first out) memory. The oldest data is overwritten by new data, so that the latest events (depending on the memory capacity) are always present on the hard disk. Confirm the menu option with Enter (9) and select one of the two options: ON: Old data is automatically overwritten by new data when the hard disk is full.
Notes on using the 1-channel digital recorder with a multiplexer 1. Before connecting the digital recorder with the multiplexer, connect the digital recorder direct to a monitor. 2. Open the main menu of the digital recorder. 3. In the main menu, under REC MODE, set the value to: FRAME: 4. In the main menu, under REC FPS, set the value to: 50. This input is very important for correct synchronisation between recorder and multiplexer. If you want to extend the recording duration, do this under MULTIPLEXER. 5.
Operating the 1-channel digital recorder Operating the digital recorder is user-friendly and almost intuitive. Manual data recording To start manual recording of video data, briefly press Record (2). The red recording LED lights up. The monitor displays the following: 00% REC A 2004-01-01 12:00:00 60P The percentage refers to how much of the hard disk has already been used. REC A under the percentage shows that this is a manual recording.
Locking the operating controls To prevent unintentional or unauthorised operation of the digital recorder during recording, you can lock the operating controls. To do this, press the direction keys b and e simultaneously. The monitor displays LOCK: To unlock the operating controls: 1. Press the direction keys b and e simultaneously again. 2. When prompted, enter the password using the direction keys. 3. Confirm your input with Enter (9). The word LOCK is no longer displayed.
Scheduled recording At the time you programmed, the digital recorder automatically starts recording. The red recording LED lights up. The monitor displays the following: 100% REC A DAYLY 2004-01-01 12:00:00 LOCK 60P The word DAILY under the percentage shows that this is a scheduled recording. The word LOCK means that the operating controls are locked. The scheduled recording ends at the programmed time. The operating controls are then unlocked. To stop recording manually: 1.
Playback To start playback on the digital recorder, make sure that it is in standby mode. First stop recording if active (only the green ON/OFF LED should be on). Proceed as follows: 1. Briefly press Playback (3). The red menu LED lights up. 2. Briefly press Enter (9). Playback ends after a few seconds. 3. Press Enter (9) again. Playback starts with the oldest recorded data.
Fast forward and rewind To rewind or wind forward, press REW or FWD (a) or (d). Keep the respective key pressed. The longer the key is pressed, the faster the rewind/fast forward. To stop, release the direction key. Single-frame playback Single-frame playback simplifies the search for a specific event. To activate single-frame playback, check that playback is paused. To do this, press the Pause key (c).
Playback – event search Event search simplifies the search for a specific alarm event. To activate this function, make sure that the digital recorder is in standby mode. First stop recording if active (only the green ON/OFF LED should be on). Proceed as follows: 1. Briefly press Playback (3). The red menu LED lights up. 2. Press Event (7).
To search the hard disk hour by hour: 1. In search mode, press the date/time Search button (6) again. The monitor displays the following: HOUR 2004-01-01 12:00:00 PLAY -> STOP 60P HOUR means that the digital recorder is searching the hard disk hour by hour. To jump to the next hour, press FWD (e); to jump to the previous hour, press REW (a). To start playback: 1. Press Stop (c). 2. Press FWD (d). Playback starts.
Transferring image data to the PC The 1-channel digital recorder can transfer image data fast to a connected PC via the RS-232 interface. First install the software supplied on your computer. The following system requirements must be met: CPU: RAM: Hard disk: Monitor: Operating system: CD-ROM: Pentium 166MHz or higher minimum 64 MB 20 MB free memory min. 640 x 480, 24-bit colour Microsoft Windows 95, 98, 2000, XP 4 x CD-ROM or higher Installing the software for single-frame display 1.
Transferring picture sequences to the PC For details on using the 1-Channel Clipper software, see the user guide in pdf format on the CD-ROM. Additional features of the 1-channel digital recorder Display of remaining recording capacity The 1-channel digital recorder can calculate the recording capacity on the basis of values set in the main menu. To display the recording capacity: 1. Start manual recording. 2. Press Record (2) again.
Technical data Operating voltage: 100–240V AC / 50Hz Power consumption: 60 watt Hard disk: IDE 120GB (Western Digital) HDD frame: 5,25“ Video IN: Composite BNC 1Vp-p Video OUT: Composite BNC 1Vp-p Alarm input: NO Alarm output: NO / NC relay (100mA / 5V DC) Video norm: B/W-CCIR, colour PAL Compression method: Wavelet Compression stages: 3 (high, medium, low) Resolution: 720 x 576 pixels Recording duration. up to 164 hrs. (realtime/120GB) / 5000 hrs.
Troubleshooting Despite the most meticulous quality controls in our company, it may happen that a device does not perform all functions as required. However, a user error is usually the cause of the apparent malfunctioning of the equipment. Our technical support team is happy to help you in removing misunderstandings by answering your questions. Please read these tips before contacting us: Apparent error No picture on monitor HDD FAILURE appears on the monitor. The digital recorder cannot be switched on.
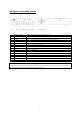
List of compatible multiplexers The ECOLINE II digital recorder can be used with most multiplexers. The advantage is that signals from 4, 9, or 16 cameras can be recorded simultaneously. Explanation: Compatible = function works, Not compatible = function does not work, – = function must be tested.