PVR-8000 COVER 1/18/03 3:10 PM Page 3
PVR-8000 ENG 1/21/03 11:10 PM Page 5 Contents Safety ------------------------------------------------- GB1 ~ GB2 Warning & Glossary -------------------------------- GB3 Reference -------------------------------------------- GB4 STB Connections ---------------------------------- GB5 ~ GB10 Remote Control Unit ------------------------------- GB11 ~ GB12 Function Guide -------------------------------------- GB13 ~ GB16 Main Menu Guide ----------------------------------- GB17 ~ GB43 Hard Disk Recorder ----
PVR-8000 ENG 1/21/03 11:10 PM Page 6 Safety This STB has been manufactured to satisfy the international safety standards. Please read the following safety precautions carefully. MAINS SUPPLY : 90-250V AC 50/60Hz OVERLOADING : Do not overload a wall outlet, extension cord or adapter as this may result in electric fire or shock. LIQUIDS : The STB should not be exposed to any liquids (incl. drips/splashes). No objects filled with liquids, such as vases, should be placed on the apparatus.
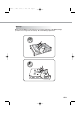
PVR-8000 ENG 1/21/03 11:10 PM Page 7 Warning! When replacing HDD, you may burn if you touch any metal area of the HDD cartridge (a metal cover on top, a bolt on bottom). Be careful during replacement.
PVR-8000 ENG 1/21/03 11:10 PM Page 8 Warning & Glossary Copyright • VIACCESSTM is a trademark of France Telecom. • CryptoWorks(TM) is a trademark of Philips Electronics N.V. • Irdeto is a trademark of Mindport BV. • Nagravision is a registered trademark of Kudelski S.A. • Conax is a trademark of Telenor Conax AS. • ‘Dolby’ and the double-D symbol are trademarks of Dolby Laboratories. Warning HUMAX cannot be held responsible for any kind of problems caused by the use of non-proprietary software.
PVR-8000 ENG 1/21/03 11:10 PM Page 9 Reference Software Upgrade HUMAX digital set-top box is a highly sophisticated product - incorporating one of the best software applications. Whenever a problem is found with this software or, in fact, extra functions or enhanced applications are added, the software in the equipment has to be upgraded. In order to maintain proper performance of the product, it is essential to have the most up to date software.
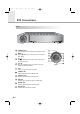
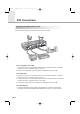
PVR-8000 ENG 1/21/03 11:10 PM Page 10 STB Connections Front 1 STANDBY Button Press to switch between Operation and Standby modes. 2 MENU/ Display the Main menu or move the cursor to the down menu option. 3 CH / Move the TV/Radio service down or move the cursor to the right menu option. 4 CH+/ OK Move the TV/Radio service up or select a menu and confirm the selected operation. 5 EXIT Return to the previous menu or screen. 6 STANDBY LED Indicates that the STB is in standby mode.
PVR-8000 ENG 1/21/03 11:10 PM Page 11 Rear Panel 1 2 3 4 5 6 7 8 9 1 LNB OUT Connect other digital/analog satellite receiver. 2 LNB IN 1, 2 (Two) Connect a satellite antenna cable. Up to 2 cables can be connected. 3 RS-232C Connect to your PC to upgrade product’s software programme. 4 TV SCART Connect a TV SCART cable. 5 VCR SCART Connect a VCR SCART cable. 6 VIDEO/AUDIO OUTPUT Connect to your TV or VCR and output video/audio signals.
PVR-8000 ENG 1/21/03 11:10 PM Page 12 STB Connections Connecting TV, VCR and Hi-Fi System There are several ways of connecting the STB to your existing Audio/TV system. We recommend using one of the following set-up for best results: • To TV only(with scart cable) 1. Connect one end of a 21-pin SCART cable to the TV SCART connector on the STB and the other end to a SCART socket on your TV. 2. Connect the coaxial cable from the LNB to the LNB IN socket on the STB. • To TV with VCR 1.
PVR-8000 ENG 1/21/03 11:10 PM Page 13 • To TV only(with RCA/Cinch cable) 1. Connect one end of an RCA/Cinch cable to the RCA/Cinch socket on the STB and the other end to an RCA/Cinch socket on your TV. RCA/Cinch : Audio-left (white), Audio-right (red), Video (yellow) 2. Connect the coaxial cable from the LNB to the LNB IN socket on the STB. • To TV using the RF cable 1. Connect a terrestrial antenna to RF IN socket on the STB. 2. Connect one end of the RF cable to the RF OUT socket on the STB. 3.
PVR-8000 ENG 1/21/03 11:10 PM Page 14 STB Connections PVR-8000 has the following antenna settings in order to make the most use of performances of PVR STB and provide its simplicity during installation and use. • Tuner A features Live and Timeshift, and Tuner B features recording. • To make the most use of PVR in the current system, input all signals of your antenna (whether you have a single antenna or two antennas) to Tuner A, and then input the same signals to Tuner B.
PVR-8000 ENG 1/21/03 11:10 PM Page 15 • When a user has two antennas (Hotbird and Astra): Connect two antennas to DiSeqC and input outputs to Tuner A. Then input the signal input to Tuner A to Tuner B using a splitter or loop through. • Note : A splitter is recommended in the Single mode. (For Tuner A, use a splitter with the function of DC bypass, and for Tuner B use a splitter regardless of the function of DC bypass.) When using a loop through in the Single mode, use when the single level is over 25%.
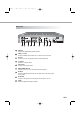
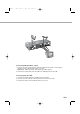
PVR-8000 ENG 1/21/03 11:10 PM Page 16 Remote Control Unit / PAGE / PAGE GB11 GB
PVR-8000 ENG 1/21/03 11:10 PM Page 17 1 MUTE 13 EXIT Press to return to the screen or return to the screen from a sub-menu screen. Press to temporarily cut off the sound. 2 MENU Press to display the Main Menu on the screen, or return to the screen from a menu screen. 3 OK/CH LIST 14 RSV LIST Press to display a list of reserved programmes. 15 EPG(Electronic Programme Guide) Press to display the EPG window. Press to display the Channel List. This button is used to select items on the menus.
PVR-8000 ENG 1/21/03 11:10 PM Page 18 Function Guide Menu language Setup Wizard If the language setting screen is initially displayed in factory default or during first time installation, select the language you prefer to use. 1. Press the buttons to move the cursor to the desired language. 2. Press the OK button to set the Menu language.
PVR-8000 ENG 1/21/03 11:10 PM Page 19 Information Box(I-Plate) : No Timeshift The details of the service part and event part are automatically displayed on the I-Plate when pressing the INFO( ) button or changing services. The Information Box is divided into service part and event part. SERVICE-PART(Top of the box) SERVICE PART consists of the following items: • Service number, Service name. • Teletext, Subtitle and Scrambling service symbol.
PVR-8000 ENG 1/21/03 11:10 PM Page 20 Function Guide Information Box(I-Plate) when enabling timeshift A progress bar and the Trick Play mode are displayed between the Service and Event parts. The progress bar shows the current recording and playback points. The entire length of the progress bar relates to the total length of timeshift, the green bar to the amount of recordings, and the yellow bar to the current playback point.
PVR-8000 ENG 1/21/03 11:10 PM Page 21 Volume Control To adjust the volume level, use the V+/V- buttons. To temporarily reduce the sound volume, press the MUTE( button. To cancel mute, press the MUTE( ) button again or press the V+/V- buttons. ) Teletext Use your TV Remote Control Unit to control the Teletext service. The teletext button doesn’t exist on the STB Remote Control Unit. When the service supports Teletext, the Teletext icon( ) is displayed on the I-plate.
PVR-8000 ENG 1/21/03 11:10 PM Page 22 Main Menu Guide 1. TV Channel/Radio Channel A service navigation system(Channel List) is provided for easier switching to the service you wish to view. It consists of four windows: Category, Sort, Channel, and Operation windows. TV Channel/Radio Channel Menu can be displayed depending on the TV/Radio Mode. 2. TV EPG/Radio EPG Your STB has an Electronic Programme Guide (EPG) to help you navigate through all the possible viewing options.
PVR-8000 ENG 1/21/03 11:10 PM Page 23 1. TV Channel/Radio Channel Channel List Channel List Menu provides a service navigation system. For easier switching to the service you wish to view, use the Channel List Menu. It consists of four windows: Category, Sort, Channel and Operation windows. Channel List consists of All Channel List, Favorite Channel List, Network Channel List, Satellite Channel List and File Channel List.
PVR-8000 ENG 1/21/03 11:10 PM Page 24 Main Menu Guide Service All The Service All menu consists of 7 sort lists. • NUM • • • • • • : Displays the list of services sorted by service number, which is given to every service you have searched. A~Z : Displays the list of services sorted in ascending order by service name. Z~A : Displays the list of services sorted in descending order by service name. FTA : Displays only the list of FTA services sorted by service number.
PVR-8000 ENG 1/21/03 11:10 PM Page 25 Service Satellite The sorting list of the Satellite category consists of the names of satellites. 1. Move the cursor to the Satellite menu on the Category window using the buttons. 2. Move the cursor to the Sort window, using the button. 3. Move the cursor to the desired satellite, using the buttons. Now, the services of the selected satellite are displayed on the Channel window. Using the Operation Window when activating Service All/ Favorite/ Network/ Satellite.
PVR-8000 ENG 1/21/03 11:10 PM Page 26 Main Menu Guide • Move 1. Press the OK buttons at the services to move, using the buttons. 2. Move the cursor at Move of the Operation window, using the buttons. Press the OK button to move all the selected services. Then, the icon( ) will be displayed in front of the service. 3. Using the buttons, move the cursor to where you want. 4. Press the OK button, then the services will be arranged as you want. 5.
PVR-8000 ENG 1/21/03 11:10 PM Page 27 Using the Operation Window when activating Service File. • Playback Plays a file where the cursor is located on the Channel window. If Playback is activated during playback of the current file, an existing file will stop and the appropriate file will be played. • Stop Stops the current playback file, and then shows the last service. If a file is not being played, Stop will not operate. This Stop function operates regardless of file marking.
PVR-8000 ENG 1/21/03 11:10 PM Page 28 Main Menu Guide Channel Attribute The "Channel Attribute" feature allows you to display and change the attributes of the current channel. A window displaying the information about the current service is at the bottom of the channel attribute window. A Channel Attribute window will be activated during normal viewing or by pressing the ATTR( ) button on the Channel List window. Category includes Fav, Lock and Skip. • Favourite To register the current service to Fav.
PVR-8000 ENG 1/21/03 11:10 PM Page 29 To unlock the current service: 1. Select Lock off the Item window by pressing the buttons and then press the OK button. "Lock OFF" will be displayed on Category window. 2. If you have completed your selection, move to Operation window using the button and then move the cursor to save and press the OK button. • Skip To skip on the current service: 1. Move the cursor and select Skip on Category window and press the button to move to the Item window. 2.
PVR-8000 ENG 1/21/03 11:10 PM Page 30 Main Menu Guide • Rename To rename the current service: 1. Move the cursor and select Rename on the Operation window and press the OK button to rename current service. The Input Text window will appear. 2. Enter the service name using the NUMERICAL buttons (0~9) on the Remote Control unit. 3. The Input text window will appear and you can type the Channel Name directly.
PVR-8000 ENG 1/21/03 11:10 PM Page 31 • Save Saves attributes of a modified file in the hard disk. Any attribute that hasn’t been saved and has been changed only in the window will not be saved. • Rename Changes the name of a file. An input text pop-up window is activated. Press the OK button after changing the name. Then the pop-up window will be closed and the name of a file in File Information will be immediately renewed. Favourite List You can select a favourite group that you want. 1.
PVR-8000 ENG 1/21/03 11:10 PM Page 32 Main Menu Guide 2. TV EPG You can watch a programme being shown and reserve it in TV EPG mode. NUMERICAL buttons are used to select items of the operation window directly To enter TV EPG mode. Press the EPG( ) button on the remote control unit, or select the TV EPG on the Main Menu. To switch the Radio EPG. Press the TV/RADIO( ) button on the remote control unit and TV EPG will be switched to the Radio EPG.
PVR-8000 ENG 1/21/03 11:10 PM Page 33 To view the detailed information about a programme on Schedule & Information window: 1. Select a programme you want, using the CH+/CH- buttons in Schedule & Information window. 2. Press numerical button 1 to select more information operation directly. Or move the cursor to the Operation window using the buttons. 3. Select More Info using the buttons and press the OK button. To reserve a programme you want: 1.
PVR-8000 ENG 1/21/03 11:10 PM Page 34 Main Menu Guide • Record Reserve: Record-reserve a programme. When your STB is in standby at the fixed start time: After switching to the channel of an appropriate service, the STB records the channel. The STB returns to standby at the end time. When your STB operates at the fixed end time: A reserved service is recorded at the state of displaying the current channel without switching to the channel of a reserved service. The STB ends recording at the end time.
PVR-8000 ENG 1/21/03 11:10 PM Page 35 3. Parental Control You can set a parental guidance rating to each programme in this mode. 1. When the Parental Control is selected using the buttons in the Main menu, a display window for entering the PIN code will appear on the center of screen. ** The default PIN code is 0000 . 2. Enter the PIN code on the display window. (If any problem occurs when entering a PIN code, you cannot switch to the next mode.) 3.
PVR-8000 ENG 1/21/03 11:10 PM Page 36 Main Menu Guide 4. Channel Search Enter the PIN code to access the Channel Searching menu as you access the Parental Control menu. Press the OK button to start Service Search after setting the parameters. ** The default PIN code is 0000 . Channel Search consists of 5 sub menus. Antenna Configure Antenna Configure enables you to set the installation state of an antenna connected to your STB. You can select using the OK button and toggle between Single and Dual.
PVR-8000 ENG 1/21/03 11:10 PM Page 37 Satellite Name Selects the Satellite Name that corresponds to the value of the Antenna Alternative. 1. Press the button to select the Satellite Name you want. Items on the right side include all the selectable lists of satellite Name. 2. If the desired Satellite Name is not listed then select User Defined and the OK button. 3. The Input text window will appear and you can type the Satellite Name directly.
PVR-8000 ENG 1/21/03 11:10 PM Page 38 Main Menu Guide 22KHz Tone If you use a dual LNB or two antennas connected to a 22KHz Tone switch box, make 22KHz Tone switch Enable or Disable to select LNB or antenna by using the buttons. DiSEqC Input According to the option and position of DiSEqC switch, select Disabled, Tone Burst A to B and DiSEqC A to D. After setting the above mentioned value, press the OK button to move to the Manual Search menu.
PVR-8000 ENG 1/21/03 11:10 PM Page 39 Frequency 1. Press the OK button to select the User Defined. The Frequency Input window will appear. 2. Use the NUMERICAL buttons(0~9) to enter frequency the remote control unit. Polarisation Select Polarisation for manual search. 1. Press the button to select Polarisation you want. Items on the right side display all the selectable lists of Polarisation. (Auto, Horizontal, Vertical) • Horizontal • Vertical : 18 V is output through LNB line : 13.
PVR-8000 ENG 1/21/03 11:10 PM Page 40 Main Menu Guide Automatic Skip Select automatic skip. 1. Press the button to select Yes or No. If you select "Yes", the search will skip all scrambled services. If the found ser vices are scrambled during searching, they are not listed. Refer to descriptor of PMT whether it is scrambled or not. Auto Search When you enter a Satellite Name that is set in Antenna Setting menu, search all of the selected satellites without inputting the extra frequency.
PVR-8000 ENG 1/21/03 11:10 PM Page 41 Advanced Search Performs a manual search with the ability to enter PID(Video/Audio/ PCR) values. This mode is necessary when you search for the signal that has abnormal service Information tables. The setting of the sub items is the same as Manual Search. Video PID/Audio PID/PCR PID You can set PID to search for services. 1. Press the buttons to select User Defined and press the OK button. The Input PID window will appear. 2.
PVR-8000 ENG 1/21/03 11:10 PM Page 42 Main Menu Guide 5. Preference The Preference mode supports the STB internal settings according to the connection of the receiver and external units. This mode includes Language Setting, Time Setting, UHF Tuning, A/V Output Setting, Record/Playback Setup, HDD Utility, Common Interface, Status, Default, Others and STB Upgrade. Language Setting Select the language for menu, audio or subtitle. 1.
PVR-8000 ENG 1/21/03 11:10 PM Page 43 Subtitle Language Select the default language for subtitle when changing services. Language provided: English, French, German, Italian, Spanish, Portuguese, Hungarian, Finnish, Danish, Swedish, Norwegian, Greek and more. Time Setting Move the cursor to the current time and press the OK button. Then the time setting window that has been described in an overview of PVR will appear, and you can change the time.
PVR-8000 ENG 1/21/03 11:10 PM Page 44 Main Menu Guide Wakeup Service No. 1. Move cursor to Wakeup Service No. 2. Select the desired service, using the buttons. Use the TV/RADIO( ) button on the remote control unit to toggle TV/Radio service. Sleep Time Depending on Time Setting, select the time when STB is turned off. 1. Move the cursor to Sleep Time. 2. Press the button to select enabled or disabled. 3. If Enabled is selected, the Time Input window will appear. 4.
PVR-8000 ENG 1/21/03 11:10 PM Page 45 A/V Output Setting Video Output(CVBS/S-Video/RGB) Set the video mode that is output from the TV SCART and RCA/Cinch Jack. 1. Move the cursor to Video Output. 2. Select CVBS/S-Video or RGB using the buttons. Audio Output Set the audio mode that is output from the TV SCART and RCA/Cinch Jack. 1. Move the cursor to Audio Output. 2. Select STEREO or MONO, using the buttons.
PVR-8000 ENG 1/21/03 11:10 PM Page 46 Main Menu Guide Record/Play Setup Your STB temporarily saves the present programme you are watching on the embedded hard disk drive. Therefore, you can enjoy some effects similar to the VCR playback functions. This mode includes Timeshift, Quick skip time and Instant replay time. Timeshift In the Timeshift mode, recording and playback can be carried out simultaneously.
PVR-8000 ENG 1/21/03 11:10 PM Page 47 Common Interface You can enjoy not only scrambled services using the Conditional Access Modules (CAM), but also Free-To-Air services. This product currently supports any kinds of CAM (ViaccessTM, Nagravision, Conax, CryptoWorks(TM), Irdeto, Mediaguard, and so on). Common Interface module and Smart Card depending on the service provider. If you need CAM, contact your service provider of distributor.
PVR-8000 ENG 1/21/03 11:10 PM Page 48 Main Menu Guide STB Upgrade You can download and upgrade the software of this STB via a satellite when a new version of the software of released. Do not turn off the STB during downloading. When the power is switched OFF, turn on the STB and the process will be continued. Antenna Alternative Select the target antenna for Manual Search. The Satellite Name helps you select Antenna Alternatives. This is only for reference and cannot be changed on this menu.
PVR-8000 ENG 1/21/03 11:10 PM Page 49 Hard Disk Recorder Recording This PVR has an embedded hard disk drive. Therefore, you can record programmes without requiring any external storage media such as a VCR. It operates only with the RECORD( ) button on the remote control. The Record mode window consists of category, operation, signal bar and progress bar. File Name File Name enables you to define the file that you want to save.
PVR-8000 ENG 1/21/03 11:10 PM Page 50 Hard Disk Recorder Record Mode The Once mode is fixed in Now recording. In Reserve recording, items include Once/Daily/Weekly and you can select using the buttons. Duration Duration sets the time to be recorded. A list of items consists of user defined/15min/30min/45min or 1hour. Select it using the buttons. Default is one hour. Signal Bar shows the signal quality and signal level of a tuner (tuner B) used for the channel you want to record.
PVR-8000 ENG 1/21/03 11:10 PM Page 51 Using the Operation Window • Start/Reserve ‘Start’ starts recording. ‘Reserve’ reserves recording. After Reserve is activated, the Record window is closed and reserved information is listed on the Reserve List window. Record Reserve operates as follows. 1) When STB is in standby at a set start time of reserved recording: The STB starts operating, switches channels for an appropriate service, and then starts recording the channel.
PVR-8000 ENG 1/21/03 11:10 PM Page 52 Hard Disk Recorder To cancel a reserved service 1. Select a service you want to cancel. 2. Press the numeric ‘1’ button. A message for confirmation will be displayed. After the service is deleted, the cursor will move to the first item. Methods of Trick Mode operation You can operate Trick Mode in the Timeshift mode or Playing a recorded mode. When moving to a new channel, the previous timeshift buffer will be cleared.
PVR-8000 ENG 1/21/03 11:10 PM Page 53 Watch live without TSR and record another When recording in Condition: Main Menu preference Record/Play Setup Time shift: disable. The Channel List window has a list of channels that can be changed. Even without the Channel List window, you can change only channels that can be changed. When Antenna Configure is set to Single You can change channels on the same transponders (and the changed channels will be displayed).
PVR-8000 ENG 1/21/03 11:10 PM Page 54 Hard Disk Recorder When Antenna Configure is set to Dual Regardless of the current recording, all channels can freely be surfed through Tuner A (and this is a recommended signal input of PVR8000). Trick mode operation: FF /FR /SF /SR /Pause /Play can operate in the Timeshift mode Playing a recorded service 1.
PVR-8000 ENG 1/21/03 11:10 PM Page 55 To record another file during playback of a recorded service: 1. Press the OK button and a list of files will be displayed. 2. After moving the cursor to the Operation window, select Stop and press the OK button. A file being played will stop. You can also stop the file by pressing the numeric ‘5’ button during playback. 3. Once a file has stopped playing, your STB will return to normal viewing. Therefore, recording can be activated.
PVR-8000 ENG 1/21/03 11:10 PM Page 56 Hard Disk Recorder Reserve recording or viewing service by EPG 1. Select a day of the week on the Category window using the buttons on the advanced EPG window activated by using the TV/Radio EPG menu or EPG button. 2. Move the cursor to the Schedule & Information window using the buttons and select a desired event (programme) using the buttons. 3. Move the cursor to the Operation window using the buttons.
PVR-8000 ENG 1/21/03 11:10 PM Page 57 Motorised System DiSEqC 1.2 User Instructions If you have a Motorised System for DiSEqC1.2, you can set the Motorised System item to Enable on Antenna Setting window and add necessary functions. If a Motorised System is set to Enable, you cannot select DiSEqC Input items but, instead, you can use new menus(Satellite Name, DiSEqC Command Mode, Movement and Limit Setting) on Antenna Setting window and the Goto/Store items are added to Operation window(User mode).
PVR-8000 ENG 1/21/03 11:10 PM Page 58 Motorised System To perform East/West fine-tuning for a satellite, set the Motorised System to Enable on the window and select the Satellite Name, and then select User instead of Installer on the DiSEqC Command Mode item. Now, you can perform East/West fine-tuning for the selected satellite. To drive the motor, move to and select the Movement item on Category window, and move the cursor to Item by using the buttons like the case of user.
PVR-8000 ENG 1/21/03 11:10 PM Page 59 Troubleshooting Guide GB54 GB
PVR-8000 ENG 1/21/03 11:10 PM Page 60 Troubleshooting Guide If you can’t solve the problem even referring this Troubleshooting Guide, contact us via our homepage. Homepage : http://www.humaxdigital.
PVR-8000 ENG 1/21/03 11:10 PM Page 61 Specification Power Supply Input Voltage Type Power Consumption Protection AC 90~250V, 50/ 60Hz Switching Mode Power Supply(SMPS) Max. 60 W Stand-by : Max. 3.
PVR-8000 ENG 1/21/03 11:10 PM Page 62 Specification RF-Modulator RF/Loopthrough Output Connector Frequency Output Channel TV standard Preset Channel 75 Ω, IEC 169-2, Male/Female 470-860 MHz CH 21-69 for modulator PAL B/G/I/D/K selectable by Menu CH36 (or TBD).
PVR-8000 ENG 1/21/03 11:10 PM Page 63 RCA & S/PDIF Video RCA Audio RCA S/PDIF 1 RCA/Cinch, Video Output (CVBS) 1 Pair (Left & Right) RCA/Cinch Volume and Mute Control (Resolution : 20 bits DAC, Max. 2 Vrms) Digital Audio Output, Fiber Optic (Resolution : 20 bits) Data port RS-232C 9-pin D-sub Transfer rate 115 Kbps Front Slot Buttons Display USB 2 CI slot, 5 Buttons : STAND-BY, MENU, EXIT, CH+, CH5 LEDs : STANDBY ,TIME SHIFT, HDD, RECORD, NO HDD 1 Port(slave) 2.
PVR-8000 ENG 1/21/03 11:10 PM Menu Map GB59 GB Page 64
PVR-8000 ENG 1/21/03 11:10 PM Page 65 GB60 GB