.......................... ST9655 Family .......................... ST9655AG, ST9550AG .......................... ST9385AG .......................... AT Interface Drives .......................... Installation Guide ..........................
Contents Read before you begin... . . . . . . . . . . . . . . . . . . 1 Configuring the drive . . . . . . . . . . . . . . . . . . . . 2 Attaching cables . . . . . . . . . . . . . . . . . . . . . . . 2 Mounting the drive . . . . . . . . . . . . . . . . . . . . .4 Configuring your computer . . . . . . . . . . . . . . . . . 6 Formatting and partitioning the drive . . . . . . . . . . . 9 Installation troubleshooting . . . . . . . . . . . . . . . 10 Compatibility notes . . . . . . . . . . . . . . . . . . . .
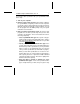
ST9655 Family Installation Guide, Rev. A 1 Read before you begin... Application. Your drive is designed for IBM AT and compatible personal computers, particularly laptop and notebook models. Warning. Turn off the computer (and, if you have a notebook or laptop computer, remove the battery) before you open the case or touch any internal components. Caution. Special training or tools may be needed to service laptop and notebook computers. Opening the case may void your warranty.
2 ST9655 Family Installation Guide, Rev. A you void the warranty. Seagate customer service centers are the only facilities authorized to repair Seagate drives. Seagate does not sanction any third-party repair facilities. Configuring the drive 1. Put on a grounded wrist strap. Wear the grounded wrist strap throughout the installation procedure. 2. Install master/slave jumpers. In a two-drive system, you need to designate one drive as the master, or drive 0, and the other drive as the slave, or drive 1.
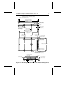
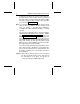
ST9655 Family Installation Guide, Rev. A Note. Drive is shown with circuit board up. Master/slave Pin 1 configuration jumpers Pin 20 removed for keying Circuit board B A D C Drive is master; slave may be detected using DASP– signal Drive is master; Seagate slave drive present Drive is slave; Seagate master drive present Use CSEL pin grounding to differentiate master from slave Figure 1.
4 ST9655 Family Installation Guide, Rev. A 1. Turn off the computer and remove the battery. 2. Put on a grounded wrist strap. 3. Open your computer case. See your system manual for instructions. Caution. Opening the case may void your computer’s warranty. 4. Connect the 44-pin interface/power cable. Match pin 1 of the cable to pin 1 of the interface connectors on the drive and on the computer. Pin 1 is usually denoted by a stripe along one edge of the cable.
ST9655 Family Installation Guide, Rev. A 5 Dimensions are in inches (mm) 0.747 ± 0.007 (18.97 ± 0.18) 4.010 (101.85) max. (head/disc assembly) 0.118 ± 0.010 (3.00 ± 0.25) 0.000 0.152 ± 0.005 (3.86 ± 0.13) 4X 3 mm × 0.5 mm × 0.15 in. (3.81 mm) deep min. full thread 1.227 ± 0.020 (2 each side) (31.17 ± 0.51) 4.020 (102.11) max (head/disc assembly to tip of pins) 1.500 ± 0.010 (38.10 ± 0.25) 0.000 1.375 ± 0.015 (34.93 ± 0.38) 0.155 ± 0.020 (3.94 ± 0.51) 0.000 0.239 ± 0.035 (6.07 ± 0.89) 2.760 (70.
6 ST9655 Family Installation Guide, Rev. A application, you must use MCC-compatible connectors and mounting hardware. If the mounting holes in your computer do not line up with the mounting holes on the drive, your computer may not be MCC-compatible. Configuring your computer Before your computer can recognize a new drive, you must enter basic information about the drive into the computer’s long-term memory (usually a battery-powered CMOS chip).
ST9655 Family Installation Guide, Rev. A 7 To enter these drive specifications into your system BIOS, follow these steps: 1. Turn on your computer. 2. Run the system setup program. This program configures the system BIOS to recognize your drive. In some computers you run the system setup program by pressing special keys while the computer is booting up. In other computers, you can run the program from the DOS prompt. See your system manual for more information. 3. Enter your drive specifications.
8 ST9655 Family Installation Guide, Rev. A program does not allow you to specify a custom drive type, your drive may be able to emulate any of the predefined drive types. Select a predefined drive type that has a BIOS calculated capacity less than or equal to that of your drive (as shown in the table on page 6). Note. If you emulate a drive type with a lower storage capacity than your drive, you limit the effective capacity of your drive.
ST9655 Family Installation Guide, Rev. A 9 Formatting and partitioning the drive Caution. Formatting or partitioning a drive that contains data destroys that data. Make sure all data has been safely backed up before repartitioning or reformatting a drive that contains data. Seagate Technology assumes no liability for lost data. Low-level formatting Seagate ATA Interface drives are low-level formatted at the factory and do not require additional low-level formatting before use. Note.
10 ST9655 Family Installation Guide, Rev. A High-level formatting High-level formatting verifies the information written by the lowlevel format and creates file allocation tables used to catalog and access files. 1. Run the FORMAT program. Insert a DOS program diskette containing the FORMAT program into your diskette drive. At the DOS prompt, type format, followed by the drive letter for the first drive partition you want to format (for example, format C:). Then, press ENTER.
ST9655 Family Installation Guide, Rev. A 11 • Verify hardware compatibility. Check the documentation for your drive, host adapter and computer to confirm that these components are compatible. • Verify your hardware configuration. Check the documentation for your drive, host adapter and computer to confirm that all jumpers are set appropriately. • Check all cables. Make sure that all cables are securely connected. Printed circuit and ribbon cables are quite fragile.
12 ST9655 Family Installation Guide, Rev. A a time, until the conflict reappears. After you have isolated the source of the address conflicts, you can resolve the conflict by changing the I/O address of the peripheral that appears to cause the conflict. • Check the power supply. The output of your power supply may not be sufficient to meet the power requirements of the new devices you have installed.
ST9655 Family Installation Guide, Rev. A 13 • Power down the computer and remove the drive host adapter. If the screen comes on after you reboot, the host adapter may be incompatible or defective. If so, see your dealer. At startup, the computer does not recognize the presence of the drive. • Check all cables. • Check jumper settings on all drives. • Check the power supply. • Reboot the computer and make sure the drive spins up. If your drive is very quiet, you may not be able to hear it spin up.
14 ST9655 Family Installation Guide, Rev. A The dealer partitioned and high-level formatted the drive for you in the store. Later, you installed the drive and it does not work. • Reboot the computer and make sure the drive spins up. • Check all cables. • Check the power supply. • Check your DOS version. Call your dealer to make sure the DOS version the dealer used to partition and high-level format the drive is the same as the version you have installed on your computer. • Verify the BIOS drive type.
ST9655 Family Installation Guide, Rev. A 15 • The FDISK program on your DOS utilities diskette may be corrupted. Try running the program from a different diskette. • If you are using a version of DOS prior to Version 4.0, make the drive partitions smaller than 32 Mbytes. • Try another drive type or translation geometry. Sometimes the host BIOS does not accept a particular translation geometry even though that geometry is listed as an option during system setup.
16 ST9655 Family Installation Guide, Rev. A the full capacity of the drive, and a user-defined drive type is not available, use a third-party partitioning utility. • Run FDISK again and make the partitions smaller. If you are using a version of DOS prior to Version 4.0, make the drive partitions smaller than 32 Mbytes. At startup, the messages, “Disk Boot Failure,” “Non-System Disk,” or “No ROM Basic - SYSTEM HALTED,” appear. • Run the FDISK program and make sure the primary partition is marked active.
ST9655 Family Installation Guide, Rev. A 17 Compatibility notes • The ST9655 family drives conform to the ATA interface specifications. The host system BIOS must provide support for the ATA interface command set. For a detailed description of the ATA commands implemented by these drives, see the Seagate ST9655 Family Product Manual and the Seagate ATA Interface Reference Manual. • In accordance with ATA specifications, the system BIOS must reset any emulation/translation parameters after a hard reset.
18 ST9655 Family Installation Guide, Rev. A Technical support services Always consult your disc drive or computer dealer first for technical support. Your dealer has first-hand experience with a wide variety of system configurations. Technical support is available for all Seagate products by calling the SeaFAX, Seagate Technical Support FAX, SeaFONE, SeaBOARD and SeaTDD services.
ST9655 Family Installation Guide, Rev. A 19 SeaBOARD Using a modem, you can: • Access documentation, drive specifications and jumper settings for Seagate’s entire product line. • Download software for installing and analyzing your drive. • Request a return phone call from the technical support staff. SeaBOARD is available 24 hours daily. It supports communications up to 9,600 baud. Set your communications software to eight data bits, no parity and one stop bit (8-N-1).
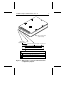
20 ST9655 Family Installation Guide, Rev. A Storing and shipping your drive Keep your original box and packing materials for storing or shipping your drive. The box has a Seagate Approved Package label. Shipping a drive in an unapproved container voids the warranty. Call your authorized Seagate distributor to purchase additional boxes. Figure 3 shows a drive in an approved singlepack box with all necessary packing materials. Foam Antistatic bag Drive Foam Figure 3. Seagate 2.
Notes
Seagate Technology, Inc. 920 Disc Drive, Scotts Valley, CA 95066, USA Publication Number: 36286-001, Rev.