FreeAgent Theater+ HD Media Player User Guide
Media Player User Guide For FreeAgent® Theater+™ Media Player User Guide © 2010 Seagate Technology LLC. All rights reserved. Seagate, Seagate Technology, the Wave logo, and FreeAgent are trademarks or registered trademarks of Seagate Technology LLC, or one of its affiliates. All other trademarks or registered trademarks are the property of their respective owners.
Contents 1. About Your Media Player . . . . . . . . . . . . . . . . . . . . . . . . . . . . . . . . . . 5 This is Your Media Player . . . . . . . . . . . . . . . . . . . . . . . . . . . . . . . . . . . . . . . 5 What You Can Do With Your Media Player . . . . . . . . . . . . . . . . . . . . . . . . . .6 Your Media Player Components . . . . . . . . . . . . . . . . . . . . . . . . . . . . . . . . . . 6 What Else You Need . . . . . . . . . . . . . . . . . . . . . . . . . . . . . . . . . . . . . . . . . . .
7. Syncing Your Media Files . . . . . . . . . . . . . . . . . . . . . . . . . . . . . . . . . 28 Installing Seagate Media . . . . . . . . . . . . . . . . . . . . . . . . . . . . . . . . . . . . . . . 29 Understanding How Media Sync Works . . . . . . . . . . . . . . . . . . . . . . . . . . . 31 Synchronizing Your Media Files (Windows) . . . . . . . . . . . . . . . . . . . . . . . . 31 Synchronizing Your Media Files (Macintosh) . . . . . . . . . . . . . . . . . . . . . . . 36 8.
1. About Your Media Player The FreeAgent Theater+™ media player is a home theater solution that makes it simple for you to move your multimedia files from your computer to your TV. Getting started takes only a few minutes. Just connect the media player to your TV; drag your movies, pictures, and music from your computer onto a portable drive; and connect the portable drive to the media player.
What You Can Do With Your Media Player Your media player is an easy-to-use home theater solution that lets you enjoy your digital movies, pictures, and music on your TV. With your media player, you can: • Move your digital movies, pictures, and music files from your computer to your TV using a Seagate FreeAgent drive or other external USB drive. • Enjoy your photographs and personal videos while they’re still stored on your digital camera or camcorder.
• • • • • Composite audio/video cable Component video cable Ethernet cable AC power adapter Installation CD, including Seagate Media software for Windows® or Macintosh® What Else You Need In addition to the media player components listed in the previous section, you also need: • Television with available HDMI, component, or composite connectors • Video, music, and/or picture files in supported formats • Computer running Windows XP or later, or Mac OS X or later, for Seagate Media, software that synchroniz
2. Getting Started This chapter explains how to set up your media player after you’ve completed the steps in the printed Quick Start Guide, and describes how the screens, menus, and remote control work. Follow the instructions in this chapter to: • Power on your media player for the first time (see next section). • Connect a FreeAgent drive or external USB drive (see page 9). • Learn to navigate the media player screens and menus (see page 9). • Add a WiFi adapter to the media player (see page 13).
Connecting a FreeAgent Drive or External USB Drive If you haven’t done so already, insert a FreeAgent drive containing your movie, picture, and music files into your media player, as shown in the printed Quick Start Guide. Alternatively, you can connect an external USB drive (such as a flash drive or thumb drive) containing your media files to the USB connector on the media player.
The Home Screen To go to the Home screen from any other screen, press Home on the remote.
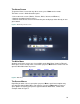
Figure 7: Picture Menu (Example Only) Following Many Paths to the Same Screen The media player UI includes many ways of getting to the same screen. As you use the UI, you will find the paths that work best for you. For instance, you can open the Browse screen three ways: • • • On the Home screen, select Browse, then press OK. On the Home screen, select the device you want to browse from the shortcut icons, then press OK. On any screen, press Menu, select Browse, then press OK.
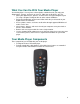
Using the Remote The only way to navigate the media player screens is with the included remote. This section describes the functions of all of its buttons. Figure 8: Media Player Remote Quick Navigation Tips In general, navigate your media player’s screens and menus by: • Using the arrow buttons on the remote to move through the menus and screens. • Pressing OK on the remote to complete a selected action or open a selected screen.
Adding a WiFi Adapter If your network is wireless, you can connect a Seagate WiFi adapter to your media player so that you can wirelessly access media files stored on your computer and other network storage devices. Note: If your network is not wireless, you can use an Ethernet cable to connect your media player to your network switch or router, as described in the printed Quick Start Guide. For more information, or to purchase a Seagate WiFi adapter, go to www.seagate.com.
• Access Web-based media content (see page 25). • Sync your media files between your computer(s) and your FreeAgent drive or external USB drive (see page 28). • Manage your media player and FreeAgent drive (see page 38). • Customize your media player settings (see page 49). • Solve any media player problems you might encounter (see page 57).
.AVI .IFO .MinusVR .MPEG .RMVB .VOB .DAT .ISO .MKV .MPG .TP .WMV .DivX® .M2TS .MOV .MTS .TRP .XVID H.264 MPEG-2 MPEG-4 .SMI/SAMI .SRT .SUB Playing a Movie To select and play a movie: 1. On the Home screen, select Movies, then press OK. OR On any screen, press Menu, select Movies, then press OK. The Movies screen opens. The Movie screen lists all the movies discovered on all the devices connected to your media player, sorted from A to Z. 2.
Adjusting Subtitle Size and Position If you are playing an .MKV file with subtitles, press Pause, then use the arrow buttons to adjust the size and placement of the subtitles.
TIP: Connect a USB keyboard to your media player to make searching faster. See page 42 for more information. 7. Select Done, then press OK. Your media player lists all movies with matching titles. If no movies appear in the list, no title matched the word(s) you entered. 8. Select the movie you want, then press Play/Pause ( ) or OK to start the movie. Or, start a new search.
The camcorder appears as a device in the shortcuts list on the Home screen, and the media player indexes its contents. (If your camcorder doesn’t appear in the list of devices, it’s incompatible for use with the media player.) 3. On the Home screen, select your camcorder, then press OK. 4. Navigate to the video you want to watch, then press Play/Pause ( ) or OK to start the video. (If a file on your camcorder won’t open, it’s in an incompatible format.
On any screen, press Menu, select Pictures, then press OK. 2. The Pictures screen opens. The Pictures screen lists all the picture folders discovered on all the devices connected to your media player, sorted from A to Z. 3. Use the arrow buttons to scroll through the list. 4. Press Menu to quickly sort the folders to suit your needs. Select Sort A–Z, Sort Z–A, Sort by Newest, or Sort by Oldest, then press OK to reorganize the folder list.
Viewing Pictures in a Slideshow Your media player can play your photos in a slideshow. You can customize the slideshow by adjusting the timing and transition between pictures, or setting the slideshow to play as a continuous or shuffle loop. You can also add music to the slideshow. To view your pictures as a slideshow: 1. Navigate to the picture folder you want (see “Viewing Pictures” on page 18), then press OK. 2. Press Play/Pause ( ) to start a slideshow of all pictures in the folder. 3.
Finding Pictures To find the pictures you’re looking for, you can search your media files three ways: 1. By browsing through the list of picture folders 2. By browsing through your picture files as they are stored on the drives and devices connected to your media player 3. By searching the index compiled by your media player. Browsing for Pictures by Device You can find the pictures you’re looking for by browsing through each device connected to your media player.
Viewing Pictures from a Digital Camera If you have a digital camera, you may be able to view your pictures by connecting your camera to the media player. To view pictures from a camera: 1. Connect your camera to your media player using a USB cable. 2. Power on your camera. The camera appears as a device in the shortcuts list on the Home screen, and the media player indexes its contents. (If your camera doesn’t appear in the list of devices, it’s incompatible for use with the media player.) 3.
Supported Playlist Formats Your media player supports playlists in these formats: M3U .PLS Playing Music To select and play music: 1. On the Home screen, select Music, then press OK. OR On any screen, press Menu, select Music, then press OK. The Music screen opens. The Music screen lists all the music files discovered on all the devices connected to your media player, sorted from A to Z. View your music in thumbnail format instead of in a list by selecting View Thumbnails, then pressing OK. 2.
• To repeat the same song, select Repeat One, then press OK. Finding Music To find the music you’re looking for, you can search your media files three ways: • By browsing through the full list of songs on the Music screen. • By browsing through your music files as they are stored on the drives and devices connected to your media player (see page 24). • By searching the index compiled by your media player.
Your media player lists all songs with matching titles. If no songs appear in the list, no title matched the word(s) you entered. 6. Select the song you want, then Play/Pause ( ) or OK to listen to the music. Or, start a new search. Displaying Album Cover Art Your media player will use album cover art in thumbnail view on the Music screen if the image is in the proper place. To ensure display album cover art in thumbnail view: 1. On your computer, find the album art. 2.
3. Follow the on-screen instructions to find what you’re looking for. Note: For help using a particular Internet service, please refer to its online documentation. 4. To exit an Internet service, press Home. Using the Home Screen Shortcuts Shortcuts to the six most popular Internet services appear on the Home screen (see “Navigating the Media Player Screens and Menus” on page 11). A shortcut to the complete list of services is also provided.
To create and activate a Paramount account for your FreeAgent Theater+ so that you can view the Paramount films in the comfort of your living room, you will need to activate an account and register your media player online using a computer, as well as activate your media player directly through the device. To activate your FreeAgent Theater+ online: 1. Visit http://seagate.paramountshop.com and create an account. 2.
To create and activate your existing Netflix account on your media player: 1. On the Home screen, press Netflix and select “Yes” to-activate instant streaming from Netflix. 2. You will be provided with an activation code. 3. Using your computer, got to www.netflix.com/activate and enter the activation code when prompted, then press“OK”. When you next click on the Netflix icon on your home screen menu, you will automatically be redirected to your online Netflix account and be able to view your movie cue.
This chapter explains how to install Seagate Media and use its Media Sync feature to synchronize your movie, picture, and music files between devices. Installing Seagate Media This section describes how to install Seagate Media on your operating system: • For Windows, see the next section. • For Macintosh, see page 36. Installing on Windows To install Seagate Media on a computer running Windows: 1. Insert the Installation CD into your computer. A registration window opens. 2.
Installing on Macintosh To install Seagate Media on a computer running Macintosh: 1. Insert the Installation CD into your computer. A Seagate Media folder containing the installer opens. 2. Drag the installer to the Applications folder on your hard disk. Figure 9: Seagate Media for Windows: Initial Media Sync Screen 3. In the Applications folder, double-click Seagate Media to install and open the application.
The Seagate Media window opens. A registration window also opens. 4. Follow the online instructions register your media player, or click Cancel to postpone the registration. Note: To register your media player later, in the Seagate Media Help menu, select Product Registration. Understanding How Media Sync Works The Media Sync feature of Seagate Media makes it easy to keep the media files on your FreeAgent drive and other external USB drive synchronized with the media files on your computer(s).
• “Deleting Your Custom Media Sync Settings” on page 35 Selecting Your Sync Settings You can set up Media Sync using either the default settings (referred to as simple sync) or custom settings (custom sync). This table compares your options: You don’t need to prepare your drive in any way—simply connect it to your computer. Media Sync automatically creates the folders it needs during the sync process. Use Simple Sync to...
The File Types window opens. 7. Select the media file formats you want to sync, then click Next. The Media Sync Rules window opens. 8. Select one of these options: • Automatic Sync (syncs files automatically when the drive is connected to the computer) • Manual Sync (syncs files only when you start the sync) 9. Click Finish. The Media Sync settings window opens. If you selected Auto Sync, the initial sync job begins automatically.
Figure 11: Seagate Media for Windows: Media Sync Screen 3. Click Sync Now. The sync job starts. The job may take some time depending on how many files need to be updated. TIP: You can also start a manual sync by clicking the Seagate Media icon in the system tray and selecting Sync Now.
Checking the Media Sync Status of Your Computers If you have a LAN or WLAN, you can check which of your computers are set up to sync files, when their last sync was completed, and whether or not they are set to sync automatically. To check the Media Sync status of your computers: 1. In Seagate Media, click Media Sync. The Media Sync window opens. 2. Click Check Sync Status. The Sync Status window opens, showing current status information. 3. Click OK to return to the Media Sync window.
1. In the Media Sync window, click Delete Sync Settings. The Delete Sync Settings Confirmation window opens. 2. Click Delete. The original Media Sync window opens (see Figure 11 on page 34). 3. To set up Media Sync again, follow the instructions in “Selecting Your Sync Settings” on page 36. Synchronizing Your Media Files (Macintosh) Follow the instructions in this section to synchronize files on computers running Macintosh.
Customizing Your Sync Settings To set up a custom sync: 1. Connect a FreeAgent drive or other external USB drive to your computer. Ensure that it appears in the drive list in Seagate Media. (For help, see Chapter 10 “Solving Problems” on page 57.) 2. Open Seagate Media, then select the drive you want to sync.
8. Managing Your Media Player and Connected Devices This chapter explains how to manage and maintain your media player and its included software. It also explains how to use Seagate Media to manage the drives you connect to it. Follow the instructions in this chapter to: • Understand the status LEDs on your media player (see next section). • Connect a USB or wireless USB keyboard to your media player (see page 38). • Update the media player firmware (see page 38).
Checking the Current Firmware Version To see what firmware is currently running on the media player: 1. On the Home screen, press Menu, select Settings, then press OK. 2. Press Menu, select System Setup, then press OK. OR Use the left and right arrows on the remote to scroll through the Settings screens until you find the System screen. 3. Select Version Information, then press OK. The firmware version number displays.
3. Copy the new firmware to a external USB drive, then properly disconnect the USB drive from your computer. 4. Plug the USB drive into the USB port on your media player. The media player recognizes the new firmware file and automatically installs it. Updating the Seagate Media Software Seagate Media (see page 29) automatically notifies you when a software update is available. If a notification appears, follow the on-screen instructions to complete the update.
• (Optional) The label, domain, and host name of the computer on which you’ve created the shared folder—required only if you’re connecting to a shared folder with restricted access Creating a Shortcut Follow the instructions in this section to create a shortcut to a shared folder that requires no user name, password, or other optional information. To create a shortcut to the shared folder: 1. On the Home screen, select Network from the list of device shortcuts (see Figure 5 on page 10), then press OK. 2.
5. Select Net User ID, then press OK. Use the on-screen keyboard to enter your user name, select Done, then press OK. TIP: Connect a USB keyboard to your media player to type faster. See page 42 for more information. 6. Select Net Password, then press OK. Use the on-screen keyboard to enter your network password, select Done, then press OK. 7. In the IP address boxes, use the up and down arrows to enter the IP address of the computer on which you created the shared folder. 8.
Managing FreeAgent Drives with Seagate Media The CD that came with your media player includes the Seagate Media software. On computers running Windows, you can use Seagate Media to manage your FreeAgent drives. (The tasks in this section don’t apply to computers running Mac operating systems.) TIP: You can also use Seagate Media to synchronize media files between your Windows or Macintosh computer and the drives you connect to your media player.
2. Click Adjust Power Setting. The Adjust Power Setting window opens. 3. From the drop-down menu, select a time interval after which the drive enters powersave mode. Or, click Default to return to the drive’s default power setting. TIP: Select a longer time interval if you use the drive frequently, so your work isn’t interrupted by delays when you open or save files. Select a shorter time interval if you use your drive less frequently, so your drive doesn’t consume more energy than it needs. 4. Click Apply.
Testing a Drive You can use Seagate Media to check the health of your FreeAgent drive. (Testing a drive doesn’t affect your files.) To test a drive: 1. Open the My Drives window, select the drive you want, then click Settings. The Settings window opens. 2. Click Test My Drive. The Test My Drive window opens. 3. Click Test. A progress bar appears. When the test is complete, the results display.
Icon Color Blue Status Drive connected Green Drive connected; sync idle Gray No drive connected Yellow Sync in progress Red Sync Failed Figure 14: Seagate Media: Status Icon Note: When a sync fails, the status icon stays red until a sync is completed successfully. Registering a Drive If your computer is connected to the Internet, you can use Seagate Media to register FreeAgent drives. To register a drive: 1. Open the My Drives window, select the drive you want, then click Settings.
Finding Help For more help using Seagate Media, click the blue Help ? button. Removing a FreeAgent Drive To remove a FreeAgent drive from your media player: 1. Turn off the media player by pressing Power on the remote. Caution: You may damage the contents of the drive if you do not turn off the media player before you remove the drive. 2. Carefully slide the drive from the media player. Disconnecting a USB Drive, Camera, or Camcorder To disconnect an external USB device from your media player: 1.
Resetting the Media Player On-Screen To reset the media player to its factory default settings: 1. On the Home screen, press Menu, select Settings, then press OK. 2. Press Menu, select System Setup, then press OK. OR Use the left and right arrows on the remote to scroll through the Settings screens until you find the System screen. 3. On the System screen, select Factory Default, then press OK. 4. Select OK, then press OK. The Initial Setup screen opens. 5. Select the menu language you want, then press OK.
the on-screen menus, change the aspect ratio of the picture to wide screen, or set up a night mode for the sound.
3. Press OK. Adjusting the Brightness and Contrast To adjust the picture brightness: 1. On the Video screen, select Brightness, then press OK. 2. Use the up and down arrows on the remote to adjust the setting, then press OK. To adjust the picture contrast: 1. On the Video screen, select Contrast, then press OK. 2. Use the up and down arrows on the remote to adjust the setting, then press OK.
Customizing the Audio Settings To customize your media player’s audio settings: 1. On the Home screen, press Menu, select Settings, then press OK. 2. Press Menu, select Audio Setup, then press OK. OR Use the left and right arrows on the remote to scroll through the Settings screens until you find the Video screen. 3. Adjust the settings as required, following the information in “Ensuring Softer Sound at Night” on page 56 and “Adjusting the Digital Output Settings” on page 57.
• • • Use this setting when only two speakers are available. HDMI LPCM Multi CH—Supports multiple audio channels. Use this setting for surround sound when multiple speakers are available. HDMI RAW—Is not decoded by the media player. When you use this setting, you must connect the media player to a receiver with decoding capabilities. Changing the Menu Language To change the menu language used by your media player: 1. On the Home screen, press Menu, select Settings, then press OK. 2.
Turning Off a FreeAgent Drive LED If you have a FreeAgent drive in your media player and find the flashing of its LED distracting, you can disable the LED. To turn off the drive LED: 1. On the Home screen, press Menu, select Settings, then press OK. 2. Press Menu, select System Setup, then press OK. OR Use the left and right arrows on the remote to scroll through the Settings screens until you find the System screen. 3. On the System screen, select FreeAgent Go LED, then press OK. 4.
Setting a Static IP Address Note: Only advanced network users should set a static IP address for the media player. If you have connected your media player to a wired LAN, the network settings on your media player don’t need to be adjusted. The default network setting (automatic DHCP IP) is highly recommended. However, if you are an advanced network user and want to manually set a static IP address for the media player, follow these instructions. To set a static IP address: 1.
Adding Your Media Player to a WLAN Follow the instructions in this section to add your media player to a WLAN, or update the media player’s wireless network settings to match your WLAN. Your media player can save connection settings for up to three wireless networks. You will need: SSID (or network name) of the WLAN(s) Security keywords or codes for the WLANs Connection type—access point (recommended), peer-to-peer, or wireless N router. To change your media player’s wireless network settings: • • • 1.
Setting a Language for Information Screens You can press Information to see more details about the movie you’re watching. If the information appears in the wrong language for you, follow these instructions to change it. To set a language for information screens: 1. On the Home screen, press Menu, select Settings, then press OK. 2. Press Menu, select System Setup, then press OK. OR Use the left and right arrows on the remote to scroll through the Settings screens until you find the System screen. 3.
Finding the Deactivation Code To find the DivX deactivation code: 1. On the Home screen, press Menu, select Settings, then press OK. 2. Press Menu, select System Setup, then press OK. OR Use the left and right arrows on the remote to scroll through the Settings screens until you find the System screen. 3. On the System screen, select DivX Deactivate, then press OK. Follow the on-screen instructions to deactivate your DivX account. 10.
Common Problems and Solutions This section provides solutions to some common problems you may encounter while using your media player. Subtitles don’t appear on my movie. T he subtitle format may not be supported by your media player. Your media player supports subtitles in these formats: .MKV .SMI/SAMI . SRT SUB Make sure that the movie file and subtitle file have identical names. Also, ensure that the movie file and subtitle file are stored in the same folder.
• Supported audio file formats: .AAC .MP3 .RA .WAV .ASF .MP4 .RM .WMA .FLAC .OGG .RMVB • Supported music playlist file formats: .M3U .PLS The information screens on my movies are in the wrong language. If the wrong language appears when you press Information to see more details about a movie or song, ensure that the text encoding language is set to the language you want. See “Setting a Language for Information Screens” on page 61 to learn how.
The thumbnail view of my song doesn’t show the album art. For album art to display as a thumbnail, the image has to be stored in the album folder. See “Displaying Album Cover Art” on page 30 for more information. The thumbnail view of my movie doesn’t show the right picture. For a DVD image to display as a thumbnail, the image has to be stored in the right place. In the DVD’s folder, put the image in the same folder as the Audio_TS and Video_TS subfolders.
Resetting the Media Player Manually As a last resort, try resetting the media player to its factory default settings. See “Resetting the Media Player Manually” on page 47 for complete instructions. Finding More Help Seagate Support provides a broad range of resources (including FAQs, a knowledge base and a community forum) to help you solve any problem you might have while using your media player. Go to the Seagate Web site at www.seagate.com.