
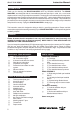
Instructions for use

SPACE WALKER II INSTRUCTION MANUAL.
3
NOTE:To avoid scratching your new aero-
plane we suggest that you cover your
workbench with an old towel. Keep a
couple of jars or bowls handy to hold
the small parts after you open the
bags.
Please trial fit all parts. Make sure you
have the correct parts and that they fit
and are aligned properly before gluing!
This will ensure proper assembly as
the Space Walker II is made from
natural materials and minor adjust-
ments may have to be made.
The paint and plastic parts used in
this kit are fuel proof. However, they
are not tolerant of many harsh chemi-
cals including the following: paint
thinner, cyano-acrylate glue accel-
erator, cyanoacrylate glue de-bonder
and acetone. Do not let these chemi-
cals come in contact with the colours
on the covering and the plastic parts.
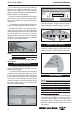
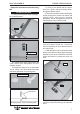
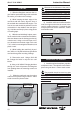
4) Deflect the aileron and completely
saturate each hinge with thin C/A glue. The
ailerons front surface should lightly contact the
wing during this procedure. Ideally, when the
hinges are glued in place, a 1/64” gap or less
will be maintained throughout the lengh of the
aileron to the wing panel hinge line.
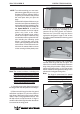
Note:
The control surfaces, including the
ailerons, elevators, and rudder, are
prehinged with hinges installed, but the
hinges are not glued in place. It is
imperative that you properly adhere the
hinges in place per the steps that follow
using a high-quality thin C/A glue.
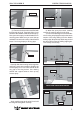
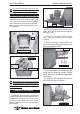
1) Carefully remove the aileron from one of
the wing panels. Note the position of the hinges.
2) Remove each hinge from the wing panel
and aileron and place a T-pin in the center of
each hinge. Slide each hinge into the aileron
until the T-pin is snug against the aileron. This
will help ensure an equal amount of hinge is
on either side of the hinge line when the aileron
is mounted to the wing panel.
HINGING THE AILERONS.
Note:
The hinge is constructed of a special
material that allows the C/A to wick or
penetrate and distribute throughout the
hinge, securely bonding it to the wood
structure of the wing panel and aileron.
C/A glue.
Hinge.
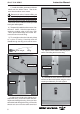
3) Slide the aileron on the wing panel until
there is only a slight gap. The hinge is now
centered on the wing panel and aileron.
Remove the T-pins and snug the aileron
against the wing panel. A gap of 1/64” or less
should be maintained between the wing panel
and aileron.
T-pins.