
Instructions for use

SPACE WALKER II INSTRUCTION MANUAL.
9
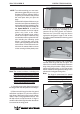
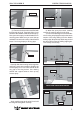
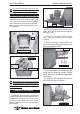
You should mark which tube is the vent
and which is the fuel pickup when you
attach fuel tubing to the tubes in the stopper.
Once the tank is installed inside the fuselage,
it may be difficult to determine which is which.
Blow through one of the lines to ensure
the fuel lines have not become kinked in-
side the fuel tank compartment. Air should
flow through easily.
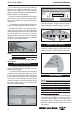
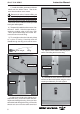
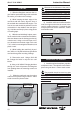
1) Install the pushrod housing through the
predrilled hole in the firewall and into the servo
compartment. The pushrod housing should
protrude 1/4" out past the front of the firewall.
Make a Z-Bend 1/4" from one end of the plain
wire pushrod.
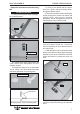
2) Place your engine onto the engine mount.
Adjust the engine is centered of the edges of
the engine case.
4) Remove the engine. Using an drill bit, drill
the mounting holes through the engine mount
at the four locations marked.
3) When you are satisfied with the align-
ment, mark the locations of the engine
mounting.
5) Bolt the engine to the engine mount
using the four machine screws. Double
cheek that all the screws are tight before
proceeding.
6) Attach the Z-Bend in the pushrod wire to
the throttle arm on the carburetor.
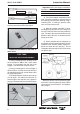
Slide the tank into the fuselage from inside
so that the neck is at the top of the fuselage
and it locates through the engine bulkhead.
Gently secure it to the top horizontal former
with a cable tie.
Fuel fill tube.
Fuel pickup
tube.
Vent tube.
MOUNTING THE ENGINE.
11cm.
3mm X 25mm.
2.5mm.
Pushrod wire.
C/A glue attached.
Fuel.